|
The Hull:
Preparation and Surfacing
This
page was last updated on 30 January 2002
Hull
Prep Page 2 | Hull
Painting
|
 A major part of the restoration of Glissando--perhaps second in importance to the structural work on the decks--is the repainting of the hull (and deck, too) with Awl-Grip. The white gelcoat is original and has been neglected for many years, resulting in a dull, oxidized, depressing finish pocked with many abrasions and gouges. The paint job will, of course, be the most
noticeable result of the restoration when completed. A major part of the restoration of Glissando--perhaps second in importance to the structural work on the decks--is the repainting of the hull (and deck, too) with Awl-Grip. The white gelcoat is original and has been neglected for many years, resulting in a dull, oxidized, depressing finish pocked with many abrasions and gouges. The paint job will, of course, be the most
noticeable result of the restoration when completed.
As of this writing, there is much work remaining, and actual application of paint is many months away. However, much of the prep can be done now and through the winter when it may be too cold to perform any of the structural, mechanical and detail work. |
|
The steps to be followed in the preparation of the hull for painting are as follows:
-
1.
Remove boottop by sanding
-
2.
Strip bottom by sanding
-
3.
Sand entire hull with 80 grit paper
-
4.
Grind out stress cracks, enlarge and feather dings and gouges
-
5. Fill resulting
areas with epoxy filler in 2-3 applications
-
6. Final sanding of
hull through 80, 120 and 220 grit
-
7. Apply 2-3 coats of
Awl-Prep epoxy primer
-
8. Apply 2-3 coats of
Awl-Grip Flag Blue
-
9. Raise and repaint
boottop
-
10. Paint bottom with
3 coats of Micron CSC ablative paint, green
|
|
STEP
1: Boottop Removal
12 November 1999
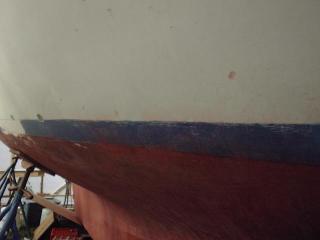
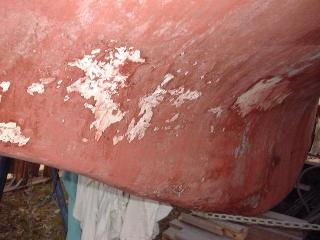
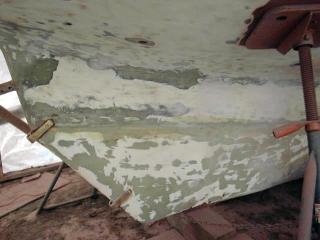
 The boottop was heavily coated with many layers of old, loose, flaking blue paint.
It was faded, ugly, and stained--I hated it. Combined with the ugly, thick
boring red antifouling paint and the gross looking white gelcoat on the hull, it
was just such a depressing look. I couldn't wait to sand everything
down--at least then it would look like the boat was really on its way to being
restored! The boottop was heavily coated with many layers of old, loose, flaking blue paint.
It was faded, ugly, and stained--I hated it. Combined with the ugly, thick
boring red antifouling paint and the gross looking white gelcoat on the hull, it
was just such a depressing look. I couldn't wait to sand everything
down--at least then it would look like the boat was really on its way to being
restored!
The first thing to do was
to remove all the paint, which I did by sanding the bulk of the paint off with a
random orbit sander and 60 grit discs--stopping when only a layer or so of paint
remained to avoid digging into the gelcoat with the rough paper. I then
went over the areas with 80 grit to remove the rest of the paint and start to
reduce the scratches from the 60 grit. I sanded a little bit into the
antifouiling paint as well, so that when I come back with a big grinder I can
stay away from the areas that will eventually be receiving glossy finish paint.
|
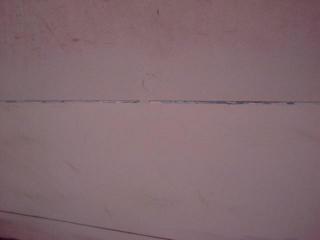
| These photos show the condition of the boottop just before sanding. There are molded scribe lines at the top and bottom of the boottop, so removing the paint will not remove the guidelines for reapplication.
In many areas, the blue paint and antifouling paint were slopped on the wrong side of their scribe lines, leading to an overall poor appearance and uneven paint
lines; in some areas, the overlap was as much as 1". This did
nothing to enhance the appearance of the boat as found. |
|


|
|


|
|
 Sanding
the boottop paint off took about three hours of moderate to hard work, and numerous sanding discs--about 15- 60 grit discs and maybe 10- 80 grit discs. This is tough on the shoulders, as the work is done pretty much at shoulder height. About all my arms feel like doing today is resting on my desk to type these words! Sanding
the boottop paint off took about three hours of moderate to hard work, and numerous sanding discs--about 15- 60 grit discs and maybe 10- 80 grit discs. This is tough on the shoulders, as the work is done pretty much at shoulder height. About all my arms feel like doing today is resting on my desk to type these words!
The areas sanded will require additional sanding with finer grits--120 and 220--before being deemed ready for primer. My plan is to use the orbital sander
on the entire hull with both 80- and 120 grits, then to switch to a palm sander and sand with 80, 120 and 220 grits. This will ensure that all sanding marks are properly erased.
|
 In the coming days and weeks, I will be continuing to sand the hull as indicated above. Sanding of the gelcoat should be much easier than removing the heavy, paper-clogging layers of paint from the boottop. I will also be sanding the paint off the bottom--that should be real fun! In the coming days and weeks, I will be continuing to sand the hull as indicated above. Sanding of the gelcoat should be much easier than removing the heavy, paper-clogging layers of paint from the boottop. I will also be sanding the paint off the bottom--that should be real fun! |
|
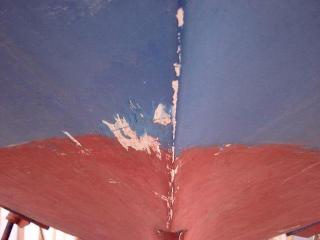
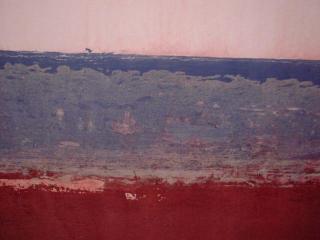
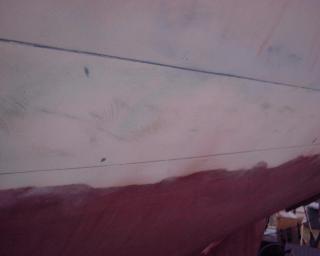
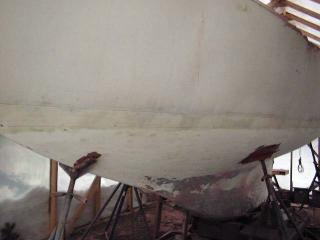
The
photos below show various areas of the boottop after sanding off the
paint. You can see the scribe lines molded into the gelcoat.


|
|
STEP 2: Bottom Stripping
10 February 2000
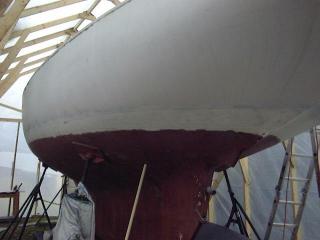
 The bottom (before picture, right) was, as you might expect, coated with many layers of old, old bottom paint. I've seen bottoms in worse shape than this one, much worse, but I still wanted to remove all the paint.
Doing this would also allow me to see if there were any areas of the bottom that might need repair or a little attention. The bottom (before picture, right) was, as you might expect, coated with many layers of old, old bottom paint. I've seen bottoms in worse shape than this one, much worse, but I still wanted to remove all the paint.
Doing this would also allow me to see if there were any areas of the bottom that might need repair or a little attention.
Forgoing expensive strippers that are difficult and messy to use, I decided instead to simply grind the paint off using my 7" angle grinder, to which I fitted an 8" soft pad designed to accept stick back (PSA) discs. The pad prevents dishing and damage to the bottom, although the unidirectional motion of the disc makes it unusable for visible finish work. For the bottom, I figured it didn't matter.
I bought some 40 grit open coat discs from
McMaster-Carr, an industrial supply company. I highly recommend them for their dizzying array of products, and their service was excellent.
|
 I started grinding at the starboard bow. At first, the paint came off easily. However, as I reached the keel and sharp turn of the bilge, the discs started gumming up and clogging in a very short time, as the speed of the spinning grinder essentially melted the paint. With a little technique adjustment--namely lightening my touch with the grinder--I was able to extend the useful life of each disc.
Still, I ended up using probably 40 discs during the process--that's a lot, but the overall cost was far less than stripper would have been. I used my small 5" right angle DA to get into some of the tighter spots. I started grinding at the starboard bow. At first, the paint came off easily. However, as I reached the keel and sharp turn of the bilge, the discs started gumming up and clogging in a very short time, as the speed of the spinning grinder essentially melted the paint. With a little technique adjustment--namely lightening my touch with the grinder--I was able to extend the useful life of each disc.
Still, I ended up using probably 40 discs during the process--that's a lot, but the overall cost was far less than stripper would have been. I used my small 5" right angle DA to get into some of the tighter spots.
Key to my success at this project and, especially, to my overall health was my wonderful 3M full facemask respirator. This has a full glass face piece with integral cartridge-type respirator. The project would be entirely too miserable without this, as nothing else keeps dust and grit out of your face like a full mask. It goes without saying that you shouldn't sand your bottom without a real cartridge-type respirator--the amount of dust is monumental, and very nasty! |
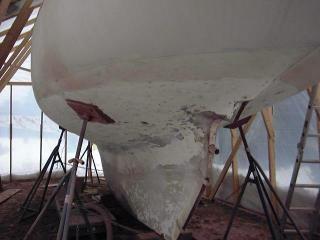 I found a fair bit of air pocketing and minor delamination in the hull at the turn of the bilge leading to the keel--the gelcoat in this area, especially on the port side, was badly cracked. You can see the bare, cracked gelcoat, where the bottom paint flaked away, in the top photo in this group--the before picture. I had to grind into the hull a fair bit to remove the air--these areas will be repaired later by filling with epoxy or, for the deepest ones, by adding a little fiberglass, then fairing. I'll post details later when the project is underway. I found a fair bit of air pocketing and minor delamination in the hull at the turn of the bilge leading to the keel--the gelcoat in this area, especially on the port side, was badly cracked. You can see the bare, cracked gelcoat, where the bottom paint flaked away, in the top photo in this group--the before picture. I had to grind into the hull a fair bit to remove the air--these areas will be repaired later by filling with epoxy or, for the deepest ones, by adding a little fiberglass, then fairing. I'll post details later when the project is underway.
It appears that the air pockets were probably part of the original layup, although they could have been caused by stress on the hull over the years. In one or two cases I ground in probably 1/4" or so to rid the laminate of the air pocket, but generally they extended through only one or two layers of glass. |
 The aft lower portion of the keel, aft of the ballast, is a separately-laminated piece that was joined to the main hull after construction. This was necessary on the early Tritons because of the thin profile of the trailing edge of the
keel--it was too narrow to mold in a female mold, and would likely have never
released from the mold. Tritons manufactured later featured a slightly
different keel design that eliminated this add-on piece. The gelcoat on this section, on both sides, was in poor condition, so most of it had to be ground off (photo, right).
As is common, the bottom portion of my "false keel" was cracked and
required repair. (Please look here for more
information on that.) The aft lower portion of the keel, aft of the ballast, is a separately-laminated piece that was joined to the main hull after construction. This was necessary on the early Tritons because of the thin profile of the trailing edge of the
keel--it was too narrow to mold in a female mold, and would likely have never
released from the mold. Tritons manufactured later featured a slightly
different keel design that eliminated this add-on piece. The gelcoat on this section, on both sides, was in poor condition, so most of it had to be ground off (photo, right).
As is common, the bottom portion of my "false keel" was cracked and
required repair. (Please look here for more
information on that.)
Total time spent to date stripping the bottom: about 8 miserable, dirty hours.
The benefit to doing it outside in February was that I didn't get overheated
inside my protective garb! |
|
STEP
3: Initial Sanding of the Hull
February 15, 2000
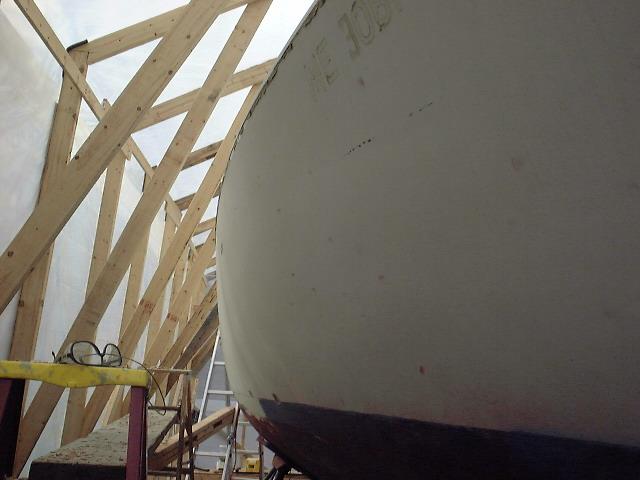
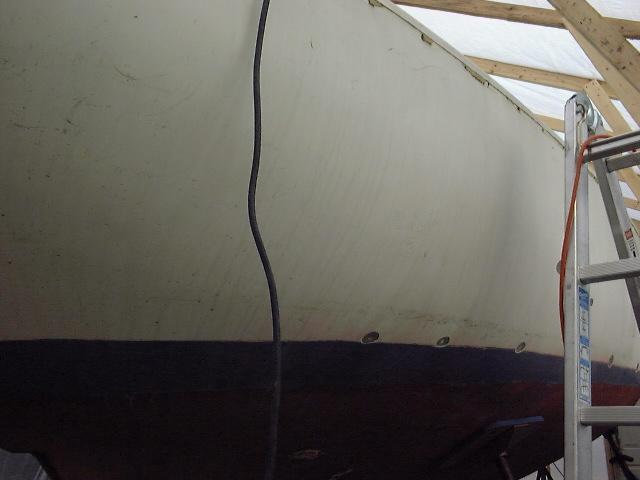
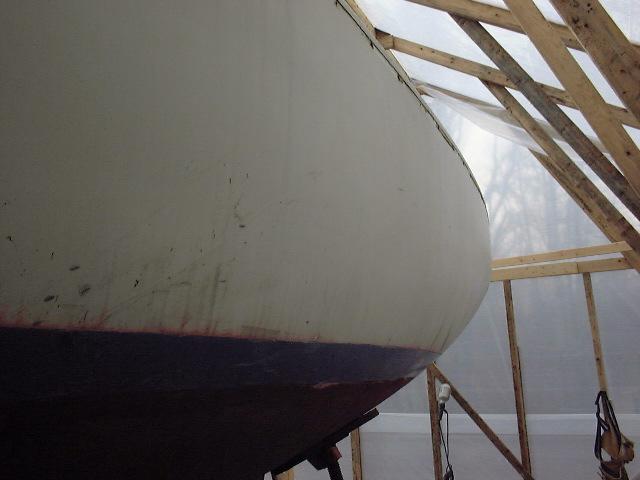
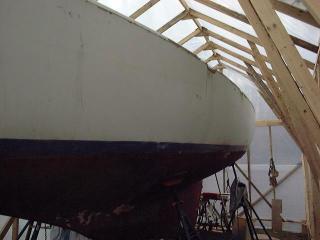
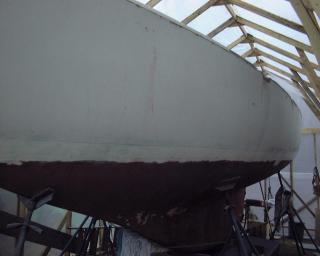
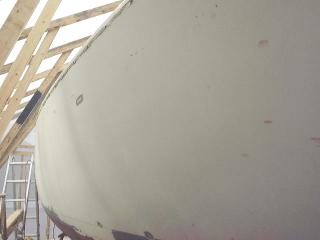 The gelcoat on the hull is original, now 37 years old. As you might expect, it is not in good condition! The entire surface is dull, faded and oxidized, and crazed throughout with shallow, narrow cracks. There are many surface blemishes, gouges, scrapes and other damaged areas, including stress cracks on the transom.
However, it is actually fortunate that the hull had never been previously
painted--I then would have had to strip all the paint off as well, an unenviable
task in many cases. The picture to the left shows the general condition of
the hull before any sanding had been done; also check out the pictures at the
top of this page. The gelcoat on the hull is original, now 37 years old. As you might expect, it is not in good condition! The entire surface is dull, faded and oxidized, and crazed throughout with shallow, narrow cracks. There are many surface blemishes, gouges, scrapes and other damaged areas, including stress cracks on the transom.
However, it is actually fortunate that the hull had never been previously
painted--I then would have had to strip all the paint off as well, an unenviable
task in many cases. The picture to the left shows the general condition of
the hull before any sanding had been done; also check out the pictures at the
top of this page.
The hull will require a lot of preparation before painting, beginning with an initial sanding. This sanding is the first step in a multi-step process of smoothing and fairing the hull, which steps are necessary in order to achieve the best results from the expensive Awlgrip paint that I will be applying later. I will be using Flag Blue for the topsides, and since the dark color will highlight any blemishes and errors in the surface, preparation must be meticulous. Previous experience with this product, last year on my
Ensign, highlighted some areas that require additional attention to detail, which I will go into when appropriate as the project progresses.
|
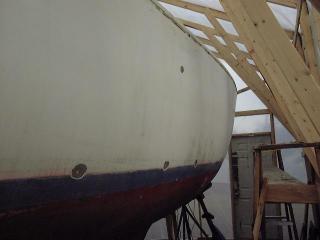
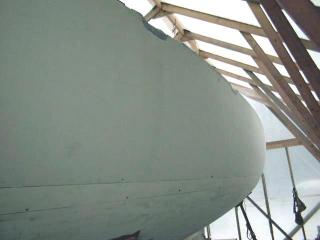 Using my right angle random orbit sander (5") fitted with a soft pad and 80-grit paper, I began sanding the hull. Gelcoat is fairly soft and sands easily without gumming up the discs. Using my right angle random orbit sander (5") fitted with a soft pad and 80-grit paper, I began sanding the hull. Gelcoat is fairly soft and sands easily without gumming up the discs.
There was NO gloss left on the poor neglected hull, so sanding went very quickly. It took about 2 hours to sand the entire hull with the 80-grit, from the gunwale to the waterline.
The two photos to the left and below show the hull after the initial sanding was completed. You can see that the surface is cleaner and smoother than before, and the resin from previous repair jobs that had spilled down the hull from the gunwale is gone, having been sanded off (photo, immediate left). |
|
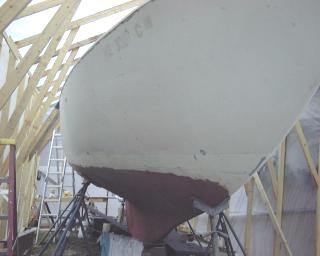
 This next photo shows the starboard side, with several gouges that had been dished out with a grinder before we bought the boat. I will be doing a similar procedure on all the existing gouges, etc, as dishing them out will provide a better base for filling with epoxy putty later. This next photo shows the starboard side, with several gouges that had been dished out with a grinder before we bought the boat. I will be doing a similar procedure on all the existing gouges, etc, as dishing them out will provide a better base for filling with epoxy putty later.
|
|
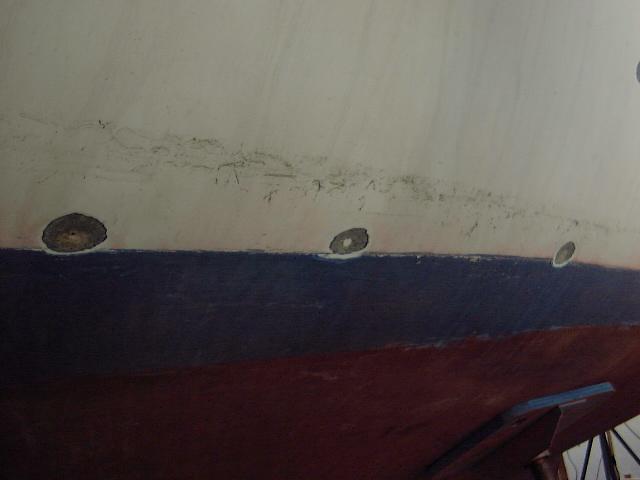
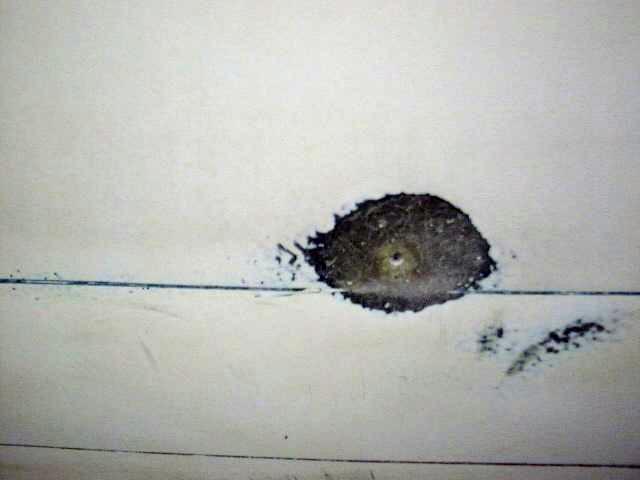
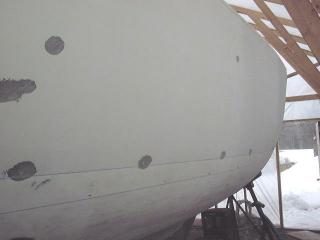
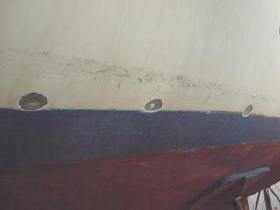 There are a series of fairly regular blemishes in the hull, located right above the upper scribe mark for the boottop. These can be seen in the photos left and below. Some of these were already ground out when we bought the boat, while others appear to have been filled (poorly and unsuccessfully) in the past. I don't know what these marks are from--it's like something was screwed to the hull at one time, then the screw holes filled. In any case, all these areas must be ground out and filled before painting. There are a series of fairly regular blemishes in the hull, located right above the upper scribe mark for the boottop. These can be seen in the photos left and below. Some of these were already ground out when we bought the boat, while others appear to have been filled (poorly and unsuccessfully) in the past. I don't know what these marks are from--it's like something was screwed to the hull at one time, then the screw holes filled. In any case, all these areas must be ground out and filled before painting.
|
|


|
|
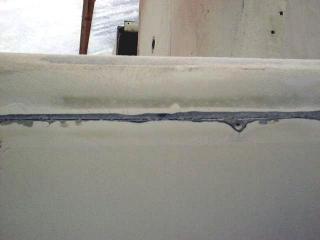 The hull to deck joint, a simple butt joint glassed together from inside the boat, was originally (at least on my boat) covered with a stainless steel half-oval molding, which was removed when I bought the boat. The molding had been attached with screws and an epoxy
compound, much of which was still attached to the hull at the joint. I sanded the area smooth, spending a little time fairing the joint flush. The hull to deck joint, a simple butt joint glassed together from inside the boat, was originally (at least on my boat) covered with a stainless steel half-oval molding, which was removed when I bought the boat. The molding had been attached with screws and an epoxy
compound, much of which was still attached to the hull at the joint. I sanded the area smooth, spending a little time fairing the joint flush.
|
|
 I
am currently undecided as to how I will finish off the joint. My ideal
plan is to install a wooden rubrail over the joint, but cost may prohibit that
approach. (Update: click here for details
on the new toerail.) I
am currently undecided as to how I will finish off the joint. My ideal
plan is to install a wooden rubrail over the joint, but cost may prohibit that
approach. (Update: click here for details
on the new toerail.)
|
|
Please click
here to continue the hull project (step 4)
|
|