|
Installing a Wooden Toerail
This page was last updated on 12
October 2008
|
|
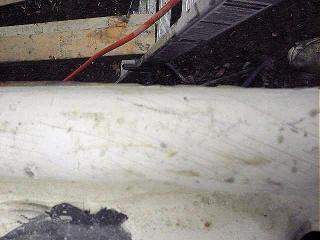 The toerail
on the Triton is molded as in integral part of the deck structure, and is where, from beneath, the hull and deck are fiberglassed together.
The molded portion is hollow, and fiberglass cloth forced into the hollow from beneath
is used to secure the hull and deck together. In most places, there
is a void between the molded toerail and the tabbing that is secured
beneath. This can lead to breakage and damage should an impact occur, as
was the case on Glissando. The toerail
on the Triton is molded as in integral part of the deck structure, and is where, from beneath, the hull and deck are fiberglassed together.
The molded portion is hollow, and fiberglass cloth forced into the hollow from beneath
is used to secure the hull and deck together. In most places, there
is a void between the molded toerail and the tabbing that is secured
beneath. This can lead to breakage and damage should an impact occur, as
was the case on Glissando.
|
|
 Perhaps somewhat uniquely, the
hull-deck joint on the Triton is flush--there is no overhanging external flange,
and the deck is carefully molded to fit nearly perfectly along the entire
hull. Originally, the thin seam between the hull and deck was covered with
a bronze or stainless steel half-oval molding that was screwed in place. Perhaps somewhat uniquely, the
hull-deck joint on the Triton is flush--there is no overhanging external flange,
and the deck is carefully molded to fit nearly perfectly along the entire
hull. Originally, the thin seam between the hull and deck was covered with
a bronze or stainless steel half-oval molding that was screwed in place.
The entire length of the toerail
on the starboard side was riddled with stress cracks of varying severity.
It was pretty obvious from looking at the cracks that repairing them was going
to be a difficult task. Stress cracks have an insidious way of reappearing
despite all attempts to stabilize and hide them, and nothing could be worse
after spending long hours on a nice paint job than finding cracks reappearing
after a short while. Proper and effective repair of stress cracks usually
involves one of two methods: either grinding away the cracked material
until solid, sound material is revealed beneath (typically through the gelcoat
and into a layer or two of the underlying laminate); or laminating new material
over the top to stabilize the surface and cover the cracks.
|
|
 Regardless
of the type of repair, to be effective it would require a substantial investment
in time and effort--much of it involving difficult sanding and fairing of a
curved molded surface. This seemed like a lot of effort that might produce
results of questionable enduring quality. The toerail is an important
feature to the boat in that it defines the sheerline and is very noticeable from
the water and from the deck. Therefore, a smooth, fair appearance is
critical. Regardless
of the type of repair, to be effective it would require a substantial investment
in time and effort--much of it involving difficult sanding and fairing of a
curved molded surface. This seemed like a lot of effort that might produce
results of questionable enduring quality. The toerail is an important
feature to the boat in that it defines the sheerline and is very noticeable from
the water and from the deck. Therefore, a smooth, fair appearance is
critical.
Portions of the toerail were also
damaged--reasons unknown. At the bow, there was a sort of "bite"
out of the molded top part of the toerail, which revealed the tabbing
beneath. Obviously, this would require repair and refairing. It
looked like I had a lot of work ahead to repair and refair the starboard side
alone.
|
|
 The
port side was even worse. The previous owner had begun structural work to
the port side of the deck, and had removed the old core--replacing it with a new
core and partial overlay of new fiberglass cloth. In the process, he also
ground all the cracked gelcoat off the full length of the toerail, the net
result being that the rail was quite rough and unfair. A substantial
amount of careful fairing and sanding would be required to repair it. In
addition, there were several other areas of the port toerail that contained
substantial damage--again, the reasons behind the damage were unknown. The
port side was even worse. The previous owner had begun structural work to
the port side of the deck, and had removed the old core--replacing it with a new
core and partial overlay of new fiberglass cloth. In the process, he also
ground all the cracked gelcoat off the full length of the toerail, the net
result being that the rail was quite rough and unfair. A substantial
amount of careful fairing and sanding would be required to repair it. In
addition, there were several other areas of the port toerail that contained
substantial damage--again, the reasons behind the damage were unknown.
|
|
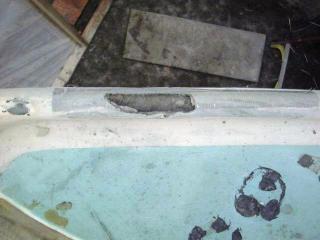
 Two small sections of the port toerail near amidships were cut away, and the beginnings of rudimentary freeing ports, or scuppers, were installed.
The photo at right shows the more complete of these scuppers, located aft of amidships on the port side. The toerail was cut away,
and the area shaped and glassed. The reasoning behind this modification was that water collected on the deck in that area and didn't drain. We feel that the lack of drainage was a result of the bow-down attitude of the boat in it's cradle in the boatyard (see a photo
here for illustration) and that the deck will drain fine when the boat is sitting properly.
Therefore, repairing these cutouts was added to the ever-growing list of issues
to deal with on the toerails. They certainly did nothing to enhance the
sheerline of the boat. Two small sections of the port toerail near amidships were cut away, and the beginnings of rudimentary freeing ports, or scuppers, were installed.
The photo at right shows the more complete of these scuppers, located aft of amidships on the port side. The toerail was cut away,
and the area shaped and glassed. The reasoning behind this modification was that water collected on the deck in that area and didn't drain. We feel that the lack of drainage was a result of the bow-down attitude of the boat in it's cradle in the boatyard (see a photo
here for illustration) and that the deck will drain fine when the boat is sitting properly.
Therefore, repairing these cutouts was added to the ever-growing list of issues
to deal with on the toerails. They certainly did nothing to enhance the
sheerline of the boat.
|
|
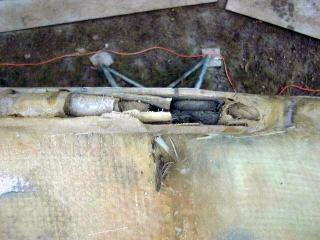 A
second cutout was in the beginnings of formation next to the chainplates. This area had also suffered some damage, the result being that there were openings into the interior through the toerail in this area. The
photo to the right shows part of the most damaged area on the port side; that's the aft chainplate
seen in the center of the photo. A
second cutout was in the beginnings of formation next to the chainplates. This area had also suffered some damage, the result being that there were openings into the interior through the toerail in this area. The
photo to the right shows part of the most damaged area on the port side; that's the aft chainplate
seen in the center of the photo.
|
|
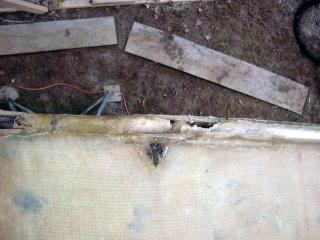 This
is another photo of the area. In the center of the photo is the main
chainplate for the upper shrouds; just aft of that is the partially formed deck
scupper. The after chainplate (as seen in the photo above) is just out of
the frame on the left. This area was a real mess, very chewed up, and
would require substantial reconstruction. This
is another photo of the area. In the center of the photo is the main
chainplate for the upper shrouds; just aft of that is the partially formed deck
scupper. The after chainplate (as seen in the photo above) is just out of
the frame on the left. This area was a real mess, very chewed up, and
would require substantial reconstruction.
|
|
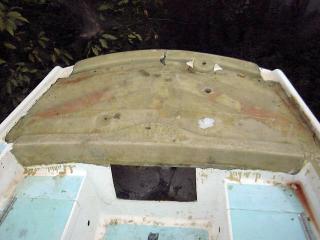
In addition, the taffrail was fairly beat up
and damaged as well, particularly around the slot where the backstay chainplate
had been installed. Again, in order to restore this part of the rail to an
appropriate appearance, a significant amount of repair, sanding and fairing
would be required.
|
|
 As
I tallied up the work list, I realized that repairing and restoring the toerail
was going to take a lot of time. The problem was, the end result of all
this effort would be to restore a molded fiberglass rail that, frankly, seemed a
little antiseptic and stark. Admittedly easy to maintain, the stark
fiberglass rail, I felt, would use some sprucing up anyway--a little wood might
enhance the overall appearance of the boat. I love the warm look of
varnished wood, and actually enjoy varnishing. Therefore, the addition of
more wood did not phase me. As
I tallied up the work list, I realized that repairing and restoring the toerail
was going to take a lot of time. The problem was, the end result of all
this effort would be to restore a molded fiberglass rail that, frankly, seemed a
little antiseptic and stark. Admittedly easy to maintain, the stark
fiberglass rail, I felt, would use some sprucing up anyway--a little wood might
enhance the overall appearance of the boat. I love the warm look of
varnished wood, and actually enjoy varnishing. Therefore, the addition of
more wood did not phase me.
I began thinking of ways to add wood to
enhance the boat's appearance and accentuate the sheerline--and in the process
cover up and repair the existing fiberglass rail. Maybe I could create a
sort of box structure over the toerail using thin strips of wood. I spent
some time mulling this idea. How much would it cost? How practical
an idea was it? Would it look the way I hoped? I figured I could use
1/4" thicknesses of wood, which would be thin enough to easily conform to
the curves of the hull yet heavy enough to be structurally sound.
Measuring the rails, I determined a rough quantity of lumber that would be
required for the job. A call to my hardwood supplier confirmed my worst
fears--teak, my initial choice, was ridiculously expensive. Somewhat
deterred, I reconsidered. It seemed that my mindset had been distorted by
the nearly ubiquitous choice of teak as the wood of choice for deck trim; but
wasn't Honduras mahogany the choice of material for many older and more
traditional crafts' trimwork? The price for mahogany, while high, was at
least within the realm of affordability for what I hoped to accomplish. I
decided to press ahead with my idea.
The plan as it came together in my mind
involved attaching 1/4" mahogany boards to the inside and outside of the
toerail, extending approximately 1/4" higher than the top of the existing
molding. To strengthen the entire structure, I planned to fill this
resulting void with a thickened epoxy mixture. Then, I would secure a
final board over the top, creating a caprail that would finish off the boxed
structure. The wood would be cosmetic, but would effectively hide the
entire rail from view--meaning that I could avoid attempting to repair the
stress cracks and some of the other flaws in the rail. I measured once
again to confirm what I needed, and ordered the mahogany. Because I didn't
have the capability in my small shop to resaw and/or thickness plane lumber, I
ordered the material pre-milled to 1/4" thickness and 4" width, in as
long lengths as possible.
|
|
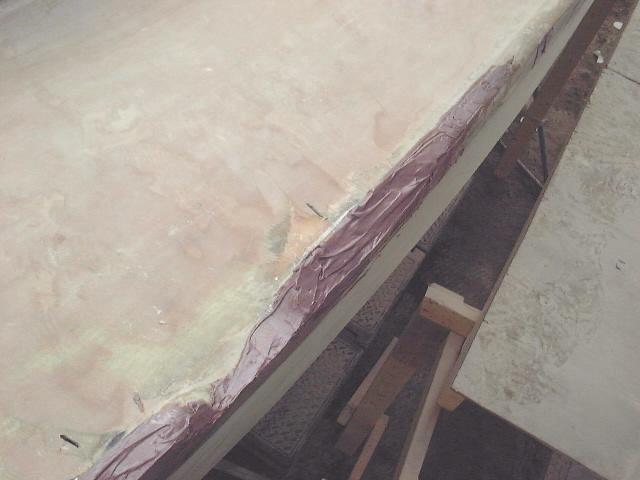 While
waiting for my lumber to be milled and delivered, I set about patching the worst holes in the toerail--the port side, near the
chainplates. First, I installed some new tabbing from inside the boat to
seal up those areas where the old rail had somehow become ripped apart.
Then, I started filling some of the depressions and breakage from the top with
thickened epoxy mixtures. I often used up whatever I had left over from
some of the other fairing jobs that I was tending to at the time, spreading the
remains over the gaping wounds in the toerail. These applications were of
a non-structural nature, as the rail is held together with the fiberglass
installed from the inside; the fill was intended only to build up the broken
areas to give the soon-to-be installed wood veneer the proper support. I
used West System epoxy resin mixed to a thick consistency with colloidal silica
and low-density structural filler. While
waiting for my lumber to be milled and delivered, I set about patching the worst holes in the toerail--the port side, near the
chainplates. First, I installed some new tabbing from inside the boat to
seal up those areas where the old rail had somehow become ripped apart.
Then, I started filling some of the depressions and breakage from the top with
thickened epoxy mixtures. I often used up whatever I had left over from
some of the other fairing jobs that I was tending to at the time, spreading the
remains over the gaping wounds in the toerail. These applications were of
a non-structural nature, as the rail is held together with the fiberglass
installed from the inside; the fill was intended only to build up the broken
areas to give the soon-to-be installed wood veneer the proper support. I
used West System epoxy resin mixed to a thick consistency with colloidal silica
and low-density structural filler.
|
|


|
|
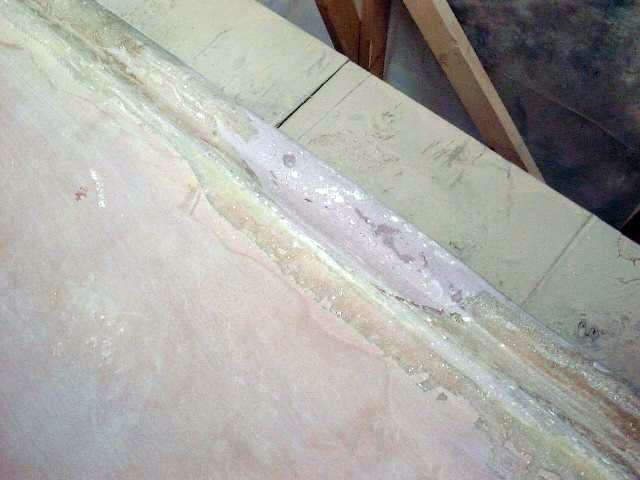 I
also patched the "scupper" cutouts roughly with thickened epoxy.
Again, these repairs did not have to be particularly structural or attractive;
they are only intended to fill the voids so that the entire rail is fairly consistent.
This will be important when it comes time to clamp and secure the wood
rail veneers in place. To fill the cutouts, I made crude
molds of thin plywood covered with waxed paper, and clamped two pieces around
each cutout--on the inside and outside. Then, I filled the voids with
thickened epoxy. (aftermost cutout shown to the left) The molds held the thick mixture in the
proper place and allowed it to cure without sagging or running. Because the forward cutout and toerail (below) in the
general area was such a mess, I didn't bother filling and shaping it to full
height; instead, I concentrated on getting a smooth and fair line on the inside
and outside of the toerail so that my wood veneer would be properly supported.
With this patching complete, and the delivery of the milled mahogany, I could
move forward with installing the wooden box over the toerail. I
also patched the "scupper" cutouts roughly with thickened epoxy.
Again, these repairs did not have to be particularly structural or attractive;
they are only intended to fill the voids so that the entire rail is fairly consistent.
This will be important when it comes time to clamp and secure the wood
rail veneers in place. To fill the cutouts, I made crude
molds of thin plywood covered with waxed paper, and clamped two pieces around
each cutout--on the inside and outside. Then, I filled the voids with
thickened epoxy. (aftermost cutout shown to the left) The molds held the thick mixture in the
proper place and allowed it to cure without sagging or running. Because the forward cutout and toerail (below) in the
general area was such a mess, I didn't bother filling and shaping it to full
height; instead, I concentrated on getting a smooth and fair line on the inside
and outside of the toerail so that my wood veneer would be properly supported.
With this patching complete, and the delivery of the milled mahogany, I could
move forward with installing the wooden box over the toerail.
|
|
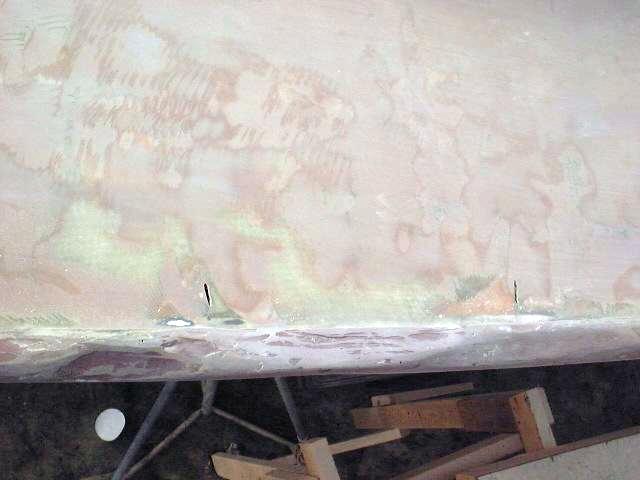 The plan of attack is to box the molded
fiberglass original toerail with a piece of the 1/4" mahogany on each side,
to be just high enough to be a little taller than the original. With these
in place, I plan to fill the resulting void with thickened epoxy, and attach a
third 1/4" piece on top as a caprail. The wood will be secured in
place with 3M 5200 sealant and stainless steel screws. The plan of attack is to box the molded
fiberglass original toerail with a piece of the 1/4" mahogany on each side,
to be just high enough to be a little taller than the original. With these
in place, I plan to fill the resulting void with thickened epoxy, and attach a
third 1/4" piece on top as a caprail. The wood will be secured in
place with 3M 5200 sealant and stainless steel screws.
|
|
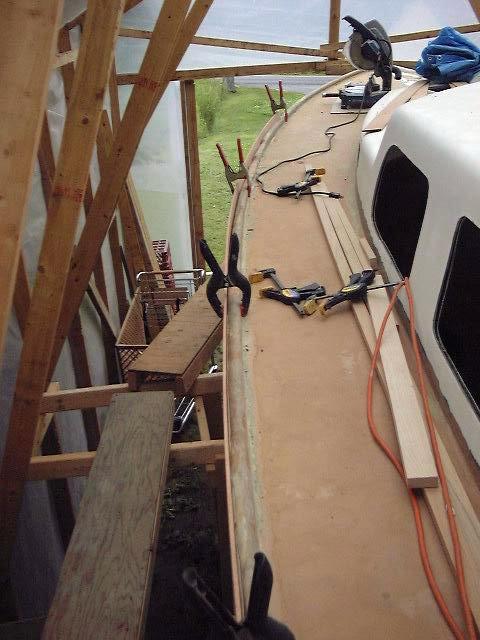 The
first step was to lay out the bottom extent of the outside rail--that is, how
far down the hull should the outside piece be extended, both for appearance and
to cover the visible seam between the hull and deck. I determined this
location arbitrarily by temporarily clamping one of the boards in place along
the sheer and moving it up and down until I found the spot where I felt the
appearance was most pleasing. On my boat, this ended up being about 1/2" below the seam where the hull meets the deck
molding. Because this seam was consistent around the perimeter of the
boat, it was a simple matter to place a series of pencil marks 1/2" below
the seam all the way around the hull. Next, I held a
piece of my milled stock up, keeping the bottom aligned with the marks on the
hull, to see how much excess there would be at the top; I
ended up ripping about 1" off the 4" pieces, which left just over
1/4" extending above the top of the existing rail. Later I'll trim
this down to exactly 1/4". The
first step was to lay out the bottom extent of the outside rail--that is, how
far down the hull should the outside piece be extended, both for appearance and
to cover the visible seam between the hull and deck. I determined this
location arbitrarily by temporarily clamping one of the boards in place along
the sheer and moving it up and down until I found the spot where I felt the
appearance was most pleasing. On my boat, this ended up being about 1/2" below the seam where the hull meets the deck
molding. Because this seam was consistent around the perimeter of the
boat, it was a simple matter to place a series of pencil marks 1/2" below
the seam all the way around the hull. Next, I held a
piece of my milled stock up, keeping the bottom aligned with the marks on the
hull, to see how much excess there would be at the top; I
ended up ripping about 1" off the 4" pieces, which left just over
1/4" extending above the top of the existing rail. Later I'll trim
this down to exactly 1/4".
I moved on to dry fit the outside rail veneer.
Starting at the stern on the port side, I clamped one of the pieces in
place. After making sure it was properly aligned with the marks on the
hull, I drilled holes and countersinks every 16" or so for #10x1" flathead
316 stainless self tapping screws which will hold the board in place. It
took three sections of wood to extend the length of the hull on the port
side. Where the boards met at their ends, I stuck with a simple butt
joint. This part of the process went relatively quickly, although the flare of the hull forward
combined with the curvature of the deck made the last 10 feet or so at the bow
more difficult.
|
|
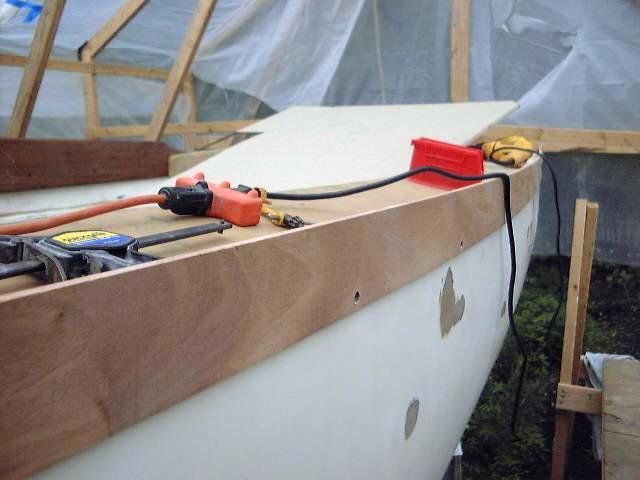 With
the outside boards screwed in place, I
prepared to remove them and resecure them permanently with
5200 and screws. I planned to rely upon the strong adhesive qualities of the 5200
to hold the rails in place more than the screws over the long-term; the screws,
while providing a secondary, mechanical fastening, are intended more to help
secure the boards while the adhesive cured. Removing one section at
a time, I gooped on heavy beads of 5200, and then reattached each section in turn, carefully
tightening the screws. I erred in one or two sections near the ends of the
planks and overtightened the screws, which caused the thin wood to split.
I hope that I'll be able to hid these areas successfully with a carefully
applied epoxy patch. Towards the bow, where the curvature and flare of the
hull became more distinct, I used some clamps to help hold the boards in place.
I let the boards run wild at the bow and stern for now; later I'll trim them to
the proper length. The next day, I repeated the procedure on the starboard
side. This left me with the outer boards in place on both sides, and I was
almost ready to move on to the inside. With
the outside boards screwed in place, I
prepared to remove them and resecure them permanently with
5200 and screws. I planned to rely upon the strong adhesive qualities of the 5200
to hold the rails in place more than the screws over the long-term; the screws,
while providing a secondary, mechanical fastening, are intended more to help
secure the boards while the adhesive cured. Removing one section at
a time, I gooped on heavy beads of 5200, and then reattached each section in turn, carefully
tightening the screws. I erred in one or two sections near the ends of the
planks and overtightened the screws, which caused the thin wood to split.
I hope that I'll be able to hid these areas successfully with a carefully
applied epoxy patch. Towards the bow, where the curvature and flare of the
hull became more distinct, I used some clamps to help hold the boards in place.
I let the boards run wild at the bow and stern for now; later I'll trim them to
the proper length. The next day, I repeated the procedure on the starboard
side. This left me with the outer boards in place on both sides, and I was
almost ready to move on to the inside.
|
|


|
|
First, though, I trimmed the outer pieces down to
their finished height. To do this, I fastened a 1/4" thick
batten to the top of the fiberglass toerail (the screw holes will be covered in the
final product); the batten acts as a guide for the bottom guide bearing of a flush trim router bit
that I installed in my router. Carefully holding
the router flat on the outside of the trim board, and adjusting the depth of the
bit so the bearing rested on the batten, I trimmed the outer board down
to exactly 1/4" above the fiberglass toerail.
|
|
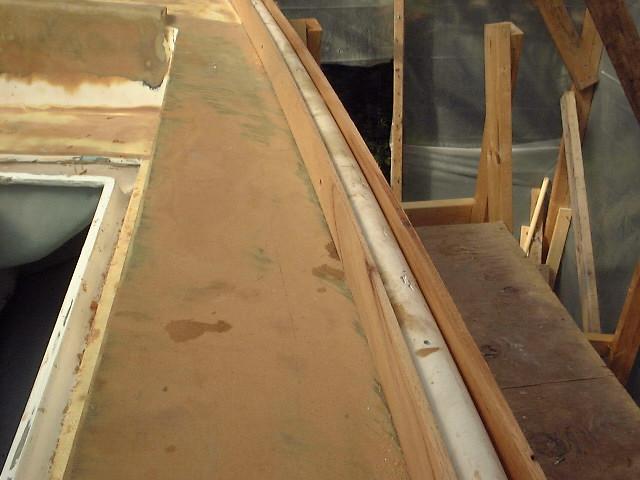 With
this done on both sides, I measured for the height of the inside rail (1
1/2") and trimmed enough of the mahogany stock for the job to the proper width.
Then, following generally the same steps as for the outside, I clamped each
piece temporarily in place, drilling for and installing screws. When all the pieces were
dry fit,
I removed them one at a time, ran a heavy bead of 5200, and reinstalled the strips the final
time with the stainless steel screws. With
this done on both sides, I measured for the height of the inside rail (1
1/2") and trimmed enough of the mahogany stock for the job to the proper width.
Then, following generally the same steps as for the outside, I clamped each
piece temporarily in place, drilling for and installing screws. When all the pieces were
dry fit,
I removed them one at a time, ran a heavy bead of 5200, and reinstalled the strips the final
time with the stainless steel screws.
|
|
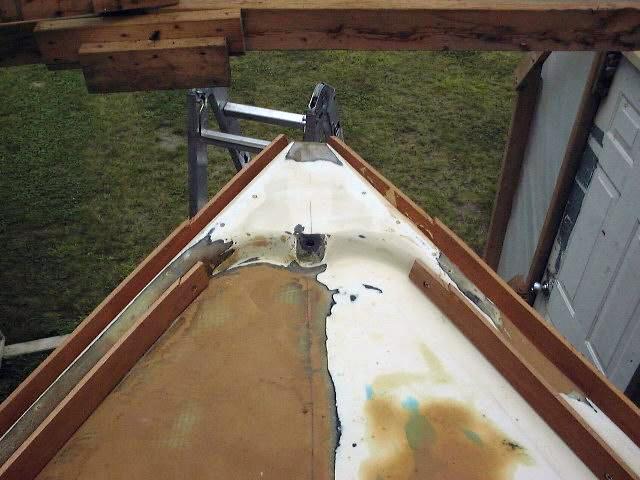 Now
that both the inner and outer boards were secured in place, the final shape of
the boxed toerail was beginning to emerge. Before proceeding, I spent
some time
working on the bow and stern ends, where some additional details were required. Now
that both the inner and outer boards were secured in place, the final shape of
the boxed toerail was beginning to emerge. Before proceeding, I spent
some time
working on the bow and stern ends, where some additional details were required.
At the stern, I attached a small piece
of the 1/4" mahogany over the exposed end, between the inner and outer trim
pieces. This piece will be cut off flush once the void is filled with
epoxy. At the bow, I intend to install a mahogany anchor roller platform,
so I measured a 12" wide space and trimmed the inner and outer rails flush
with the fiberglass bow area; the platform, when installed, will fit in this
area, and the trim will but up cleanly against it. All the fiberglass will be
hidden.
|
|
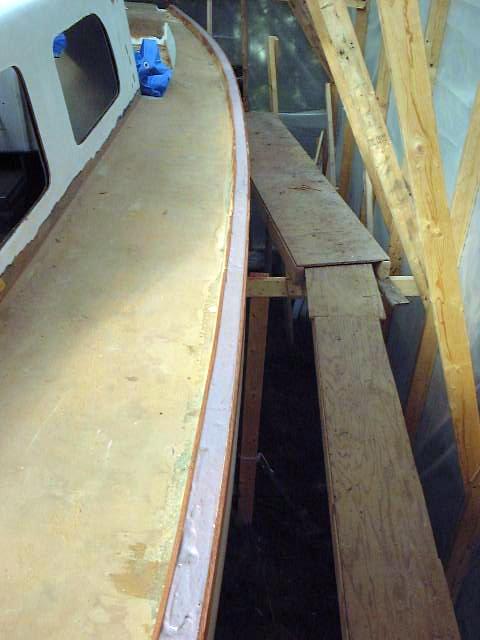 Next,
I filled the void between the two trim pieces (inner and outer) with
thickened epoxy. This will solidify the entire rail, and will provide a
strong, flat place for the caprail to be attached. This took a lot more
epoxy than I thought it would, but the end result is a very strong-feeling rail,
and the caprail should sit nicely on top. When the epoxy kicked, I sanded
any protruding areas flush with the surrounding wood. An area near the
chainplates on the port side--where the original toerail had been broken and
patched--got very hot when the epoxy was applied, since there was a fairly large
void there. Although I was not particularly worried about compromising
the structural integrity of the epoxy--it really doesn't serve an important
structural purpose to the boat--I was concerned about possibly burning the wood,
so I dribbled a little water over the hot, smoking areas until they
cooled. The heat expanded the epoxy above the level I intended, so I had
to grind it down the next day. Next,
I filled the void between the two trim pieces (inner and outer) with
thickened epoxy. This will solidify the entire rail, and will provide a
strong, flat place for the caprail to be attached. This took a lot more
epoxy than I thought it would, but the end result is a very strong-feeling rail,
and the caprail should sit nicely on top. When the epoxy kicked, I sanded
any protruding areas flush with the surrounding wood. An area near the
chainplates on the port side--where the original toerail had been broken and
patched--got very hot when the epoxy was applied, since there was a fairly large
void there. Although I was not particularly worried about compromising
the structural integrity of the epoxy--it really doesn't serve an important
structural purpose to the boat--I was concerned about possibly burning the wood,
so I dribbled a little water over the hot, smoking areas until they
cooled. The heat expanded the epoxy above the level I intended, so I had
to grind it down the next day.
|
|
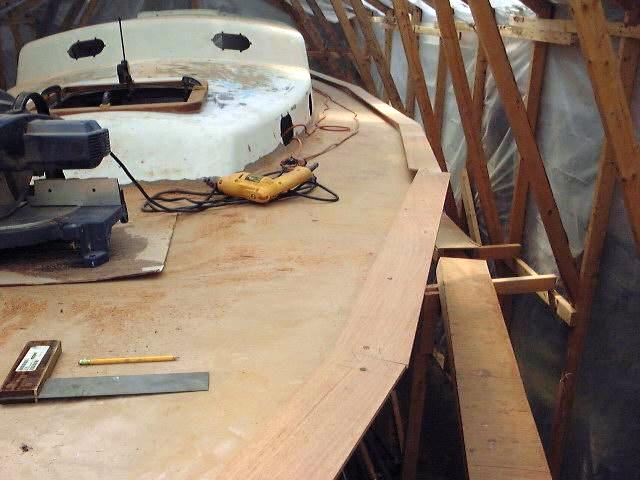 With
the side boards and epoxy in place, it was time to install the caprail--the
finishing touch. I installed the caprail over the course of two days, one
side per day. Each side took about two hours. With
the side boards and epoxy in place, it was time to install the caprail--the
finishing touch. I installed the caprail over the course of two days, one
side per day. Each side took about two hours.
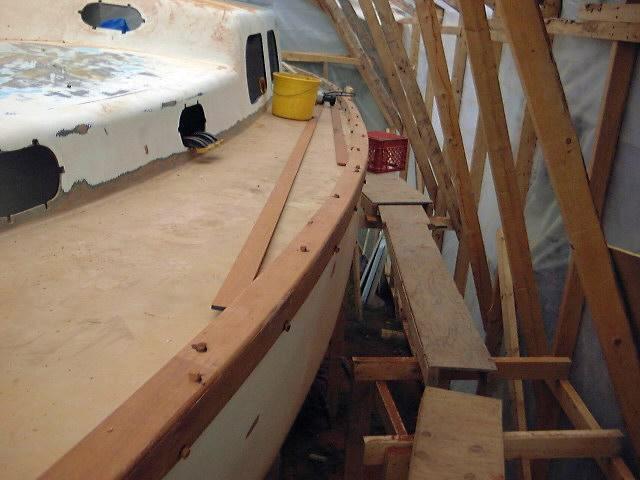
Using
more of my 1/4" stock, I began at the transom and laid out the boards,
cutting them as necessary and angling the next board to match the curvature of
the hull. The boards overhung the side boards by a considerable amount in
most places; this will be trimmed off later. As I went, I drilled for
screws and countersinks, and installed temporary screws to hold each piece in
place as I worked on the next one.
Once all the pieces were fit (it took six
relatively short lengths to conform to the curve and reach the full length of
the toerail) I removed the screws and boards, cleaned the area and applied beads
of 5200, one near each edge. Then, I reinstalled the boards with stainless
steel screws into the bed of 5200, sealing and adhering them permanently in place. I left this to kick for
a couple days before continuing.
|
|
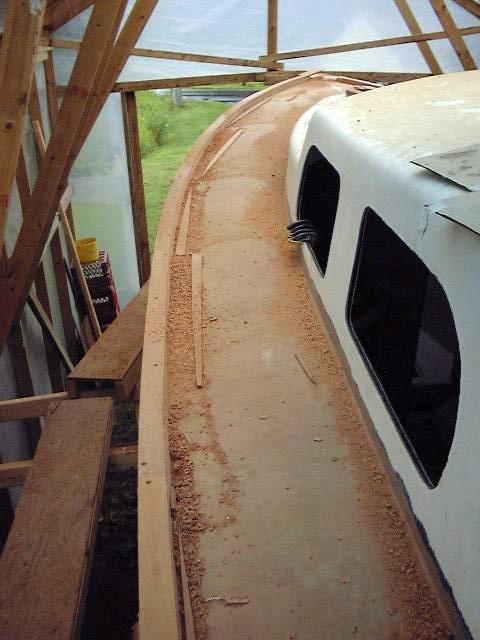 Next,
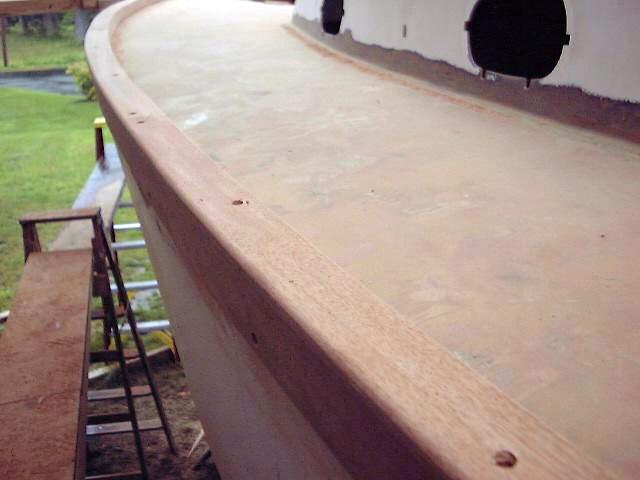
I prepared to trim the caprail flush with the side rails. To do
this, I used a router with a flush-trim bit equipped with a bottom bearing, which rides
along the sideboards and prevents the cutter from removing too much material.
This created a huge amount of shavings and wood chips but left me with a flush
edge on both sides of the caprail. To complete the milling and give the
edges a more finished appearance, I rounded each edge with a 1/4" roundover
bit in my router. Then, I sanded the entire rail smooth with a palm
sander. Next,
I prepared to trim the caprail flush with the side rails. To do
this, I used a router with a flush-trim bit equipped with a bottom bearing, which rides
along the sideboards and prevents the cutter from removing too much material.
This created a huge amount of shavings and wood chips but left me with a flush
edge on both sides of the caprail. To complete the milling and give the
edges a more finished appearance, I rounded each edge with a 1/4" roundover
bit in my router. Then, I sanded the entire rail smooth with a palm
sander.
|
|
|
 To
plug the countersunk screwholes, I cut hundreds of mahogany plugs with a plug
cutter chucked into my drill press, and glued them in place in the screw holes with resorcinol
glue. This was a boring task. A couple days later, I sanded all the
plugs flush, and gave the entire rail a final sanding with 220 grit paper to
ready it for varnish. To
plug the countersunk screwholes, I cut hundreds of mahogany plugs with a plug
cutter chucked into my drill press, and glued them in place in the screw holes with resorcinol
glue. This was a boring task. A couple days later, I sanded all the
plugs flush, and gave the entire rail a final sanding with 220 grit paper to
ready it for varnish.
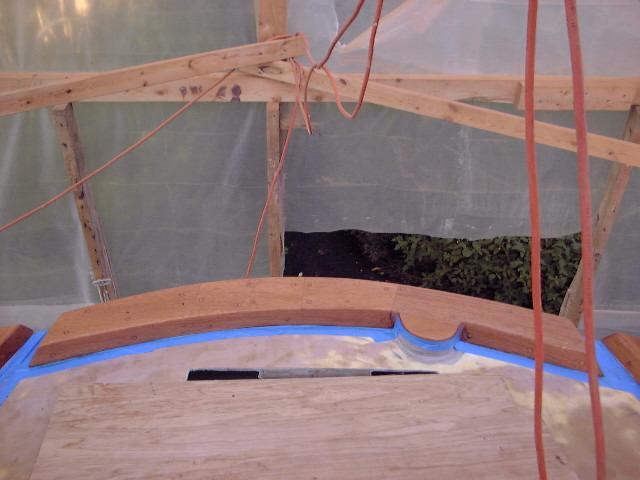
I installed a new wooden box over the existing
taffrail in much the same way. The only difference was that, after cutting
and fitting all the pieces--inside, outside and caprail--I installed them all at
once in a bed of thick epoxy, This saved time and eliminated the need for
the sealant I used on the other rails. Once the epoxy was kicked, I sanded
everything smooth and plugged the screwholes, then sanded the plugs flush the
next day.
|
|
|
|
I wanted to get a few coats of varnish on the
rails right away, to protect them from water (every time it rains, portions of
the rail get dripped on and stained) and sunlight--the mahogany darkens after
only a day or so exposed to sun. Plus, when the rails are at least
partially varnished the wood will be protected from spills, traffic, etc, and I
will be able to fill the gap at the bottom of the inner toerail with
caulk. I also want to get a total of 10 or more coats of varnish on these
rails before launching day next year, so it was time to start.
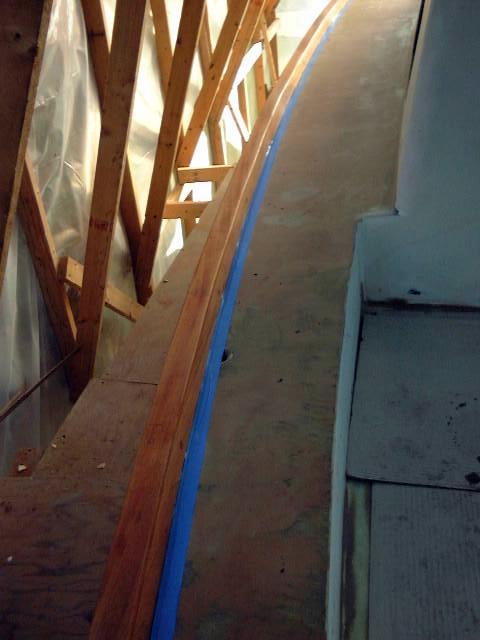 I
sanded everything with 220 grit, and then vacuumed the whole boat and rail
off; then I cleaned the rails with paint thinner to remove any remaining
dust. I then taped off the hull and deck at the edges of the rails, and
tacked everything off. The first coat of varnish is a 50-50 mix of
Epifanes gloss and Epifanes white thinner, to allow the varnish to penetrate the
wood as much as possible. It went on easily. The first several coats
will not require too much finesse; they are foundation only. Each
successive coat will be a higher varnish to thinner ratio--the second coat will
be approximately 25% thinner, the third coat approximately 15%, then
subsequent coats will be thinned only as necessary for proper flowing.
After 5 or 6 coats, thoroughly sanded the rails to flatten the varnish,
so that the final number of coats will go on flat and smooth, giving that
mirror-like finish desired. I applied a total of 10 coats of varnish to
all surfaces. I
sanded everything with 220 grit, and then vacuumed the whole boat and rail
off; then I cleaned the rails with paint thinner to remove any remaining
dust. I then taped off the hull and deck at the edges of the rails, and
tacked everything off. The first coat of varnish is a 50-50 mix of
Epifanes gloss and Epifanes white thinner, to allow the varnish to penetrate the
wood as much as possible. It went on easily. The first several coats
will not require too much finesse; they are foundation only. Each
successive coat will be a higher varnish to thinner ratio--the second coat will
be approximately 25% thinner, the third coat approximately 15%, then
subsequent coats will be thinned only as necessary for proper flowing.
After 5 or 6 coats, thoroughly sanded the rails to flatten the varnish,
so that the final number of coats will go on flat and smooth, giving that
mirror-like finish desired. I applied a total of 10 coats of varnish to
all surfaces.
|
|
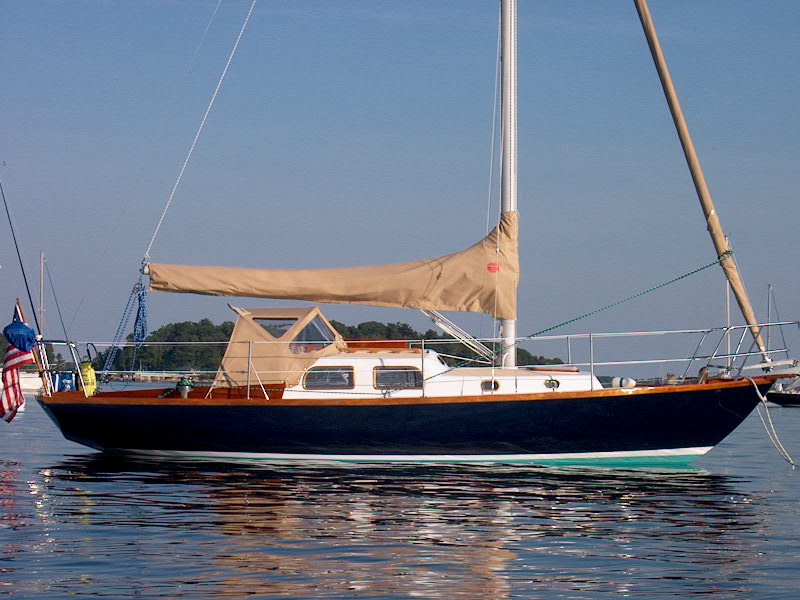 The
completed toerail has accomplished everything I had hoped. It accentuates
the sheerline and really adds warmth and character to the profile of the
boat. The end result is very pleasing, whether viewed from deck level or
from the water. The new rail gives an impression of heft and substance, as
only close inspection reveals that it is made from several pieces of wood rather
than being a solid piece. Additionally, it provides a slight edge in
security on deck, as it creates a sort of short bulwark on the edge of the
deck. And there has been no problem with water collecting in the area of
the ill-fated deck scuppers on the port side. As a final step, when the
varnish was complete I ran a bead of sealant along the bottom edge of the inner
rail, to seal the slight gap left there during installation. The
completed toerail has accomplished everything I had hoped. It accentuates
the sheerline and really adds warmth and character to the profile of the
boat. The end result is very pleasing, whether viewed from deck level or
from the water. The new rail gives an impression of heft and substance, as
only close inspection reveals that it is made from several pieces of wood rather
than being a solid piece. Additionally, it provides a slight edge in
security on deck, as it creates a sort of short bulwark on the edge of the
deck. And there has been no problem with water collecting in the area of
the ill-fated deck scuppers on the port side. As a final step, when the
varnish was complete I ran a bead of sealant along the bottom edge of the inner
rail, to seal the slight gap left there during installation.
|
|
|
|
|
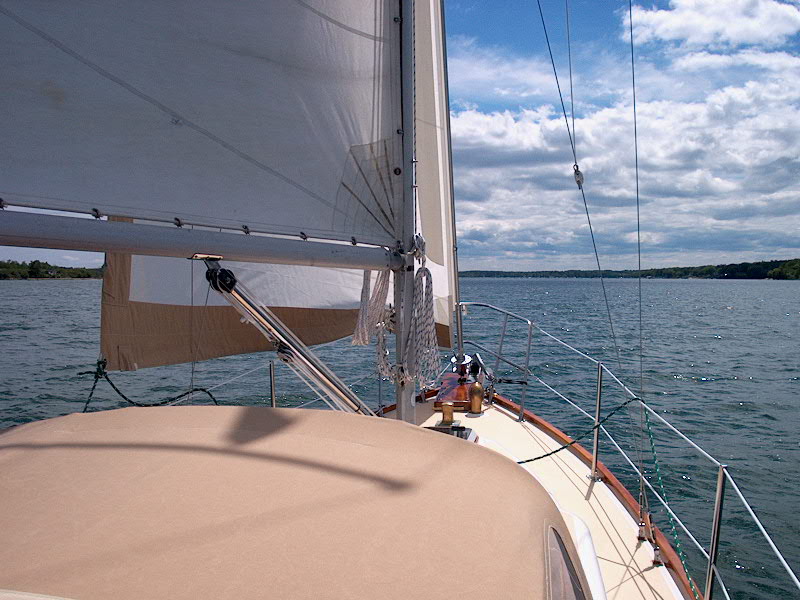
Update:
2008 As faithful readers
know, in 2003 I added a
rubrail and brass
rubstrip to the base of the toerail that made an impressive
difference in the overall appearance of the toerail, and of the boat as
a whole. This addition really finished things off. When
properly maintained, the toerail and rubrail combination makes an
important statement on the boat, and sets her apart.
While I like this wooden toerail a lot,
and continue to feel that the approach I took made sense given the
conditions at hand when I built it in 2000, I would not do the same
thing again. The real problem with the toerail, which is made of
many separate pieces of wood, as you can see in the discussion above, is
that there are too many seams; these seams, however well they seem to be
sealed, tend to allow water beneath the varnish, which can cause it to
lift.
For several winters, I fought lifting
and flaking varnish annually, as the cold weather seemed to essentially
freeze the varnish right off the wood, in those areas where water had
gotten behind (and which had been unnoticeable in the fall).
Maintaining the varnish on the toerails continues to be a constant
battle, as it is with all varnished toerails to some extent--but in this
case, the myriad seams, coupled with overall construction techniques
that could have been better than they were (never stop learning), simply
make it harder than it needs to be to maintain the finish.
The initial appearance of the
flaked-off varnish during the winters was a surprise to me, and caught
me unawares. This problem was exacerbated by a year (2006) in
which I performed no maintenance on the varnish, and I was still
catching up as of this writing. The condition of the toerails in
early 2007 was simply
embarrassing.
In the end, I am prepared to deal with
the continuing maintenance problem, though it generally means that some
areas of the toerail get stripped to bare wood each year.
The rails still look good, though my reluctance to completely strip 100%
of the varnish off the rails each year has led to some color variations
in the rails, most noticeably between the top, horizontal surface and
the outer portion of the rail; the varnish on these two sections wears
in completely different ways, with the top receiving the worst UV from
the sun and therefore surviving the least well. The tops end up
getting sanded quite thoroughly each year, and I've stripped all the
varnish off the tops a couple times too. Till the sun lightens the
varnish after a couple weeks' exposure, the darker tops are rather
noticeable in comparison to the lighter color of the sides. So be
it.
My point in preparing this update is to
inform those who may be interested that by no means do I feel this
toerail solution is the best one, and that a similar approach would not
be recommended. There need to be fewer seams, and what seams do
exist need to be very well sealed. I'd probably take a completely
different approach were I to do an identical project all over again,
given the lessons from this experience and others. |
|