|
Atomic Four: Removal
September 15, 1999 |
|
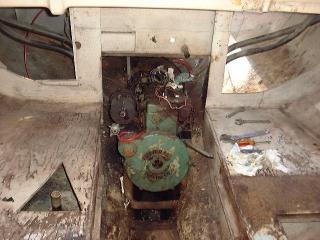
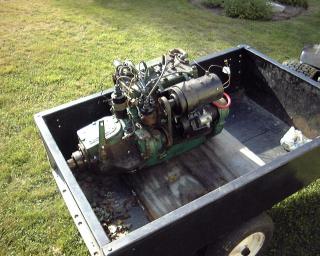
 The engine on
Glissando was an original Atomic Four, probably a 1963. It did not appear to have ever been out of the boat. I was told by the previous owner that the person
he bought the boat from indicated that the engine ran when the boat came out of the water--six or seven years ago! I decided to pull the engine from the boat for a
variety of reasons, not the least of which is to rebuild the engine over the winter. Removal will also allow me to clean the bilge beneath, to beef up the engine foundation, and to easily access the stuffing box--which, as mentioned elsewhere in this site, had already caused us headaches! The engine on
Glissando was an original Atomic Four, probably a 1963. It did not appear to have ever been out of the boat. I was told by the previous owner that the person
he bought the boat from indicated that the engine ran when the boat came out of the water--six or seven years ago! I decided to pull the engine from the boat for a
variety of reasons, not the least of which is to rebuild the engine over the winter. Removal will also allow me to clean the bilge beneath, to beef up the engine foundation, and to easily access the stuffing box--which, as mentioned elsewhere in this site, had already caused us headaches!
I had never pulled
an engine before, and I have never rebuilt one. I figure there is nothing to lose by trying it myself;
worst case scenario: drop in a new diesel, probably a preferable course of action anyway, but not in the budget unless absolutely necessary.
|
 The first step was to remove the heavy old water jacket copper exhaust pipe. This will be replaced with reinforced flexible hose when the systems are reinstalled next year. Amazingly, the bolts securing the flange to the manifold came off relatively easily, a real treat. Next, I cut the hose at the transom--a short length that appeared to be original and was in BAD condition. This allowed me to move the pipe somewhat to raise it off the hull, so I could cut it in two with my sawz-all. The first step was to remove the heavy old water jacket copper exhaust pipe. This will be replaced with reinforced flexible hose when the systems are reinstalled next year. Amazingly, the bolts securing the flange to the manifold came off relatively easily, a real treat. Next, I cut the hose at the transom--a short length that appeared to be original and was in BAD condition. This allowed me to move the pipe somewhat to raise it off the hull, so I could cut it in two with my sawz-all.
I started the cut with the blade I had in the saw, and made it partway through before the blade snapped. I jumped off the boat and headed to the garage for a new one--of course, I had none! This forced me to change clothes (the engine is really greasy and nasty, and just coming within a few feet of it makes you look like "Pig-Pen") and drive to town for new blades.
Armed with an arsenal of 10 expensive new blades, I set to work again on the pipe. Of course, this time I was able to cut right through with one blade. This done, I pulled the two HEAVY sections out, reserving them for a trip to the scrapyard someday.
(Yeah right...the thing is still moldering in my backyard nearly 4 years
later!) |
Next, I tackled the propeller shaft coupling. I had little hope that I would be able to remove the bolts. I soaked them several times in penetrating solvent, but to no avail. Not wanting to: a. kill myself trying to undo the things through the cockpit hatch or 2. take six years to get the shaft out, I cut it from inside the hull with the sawz-all. This means a new shaft, something I would have considered anyway. Oh well.
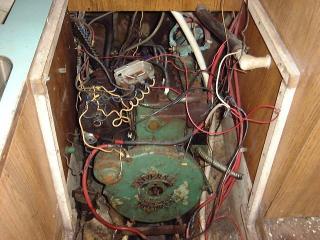
Next up: fuel system and wiring. I took
numerous photos of the setup before dismantling anything, to hopefully make installation easier later on. I removed the wiring, bus blocks, and fuel line and filter that was attached to the galley cabinets inside the engine compartment. Most of this will be replaced with new anyway, regardless of my care in labeling and documentation of the process.
Most of the above work
occurred after the removal of the galley, with the exception of the wiring and fuel line removal. |
 On to the engine bolts! There are four bolts securing the engine to the fiberglass foundation. The forward two came off easily--they were not even tight. The aft two, however, were a real pain. The port aft bolt was loose, but there was no room beneath the mounts for a wrench to keep it from turning. I ended up cutting the nut off without too much difficulty--access was pretty easy without the icebox in the way. The starboard aft bolt, however, was a bear. I removed the raw water pump to make access easier, but the angle of the nut (the nuts are four-sided only, not hex) and the angle/curve of the neighboring hull made attaching a wrench nearly impossible--no leverage. Plus, as on the opposite side, there was no room to secure the bottom of the bolt. Simply put, I couldn't get it off. On to the engine bolts! There are four bolts securing the engine to the fiberglass foundation. The forward two came off easily--they were not even tight. The aft two, however, were a real pain. The port aft bolt was loose, but there was no room beneath the mounts for a wrench to keep it from turning. I ended up cutting the nut off without too much difficulty--access was pretty easy without the icebox in the way. The starboard aft bolt, however, was a bear. I removed the raw water pump to make access easier, but the angle of the nut (the nuts are four-sided only, not hex) and the angle/curve of the neighboring hull made attaching a wrench nearly impossible--no leverage. Plus, as on the opposite side, there was no room to secure the bottom of the bolt. Simply put, I couldn't get it off. |
|
 I ended up cutting the nut off, a process made difficult by the awkward angles involved. I found that inserting the blade backwards into the saw made enough of a difference to get the job done. I was able, with much blue language, to finally cut most of the nut off; more came off with a cold chisel. A small amount remained, but I figured it would pop loose when lifting the engine. I ended up cutting the nut off, a process made difficult by the awkward angles involved. I found that inserting the blade backwards into the saw made enough of a difference to get the job done. I was able, with much blue language, to finally cut most of the nut off; more came off with a cold chisel. A small amount remained, but I figured it would pop loose when lifting the engine.
Several days later, I rented a manual chain hoist from the local store and rigged up a simple gantry over the companionway. Moving the engine out and up in this manner was a cinch, although I damaged part of the foundation when the starboard aft bolt refused to let go--after all that! I was able to pop it free, but it tore the tabbing off the hull on that side (which wasn't too well secured anyway--better to redo it) and damaged the flange where the bolt was. I'll have to do some minor repairs at some point. go--after all that! I was able to pop it free, but it tore the tabbing off the hull on that side (which wasn't too well secured anyway--better to redo it) and damaged the flange where the bolt was. I'll have to do some minor repairs at some point.
|
|
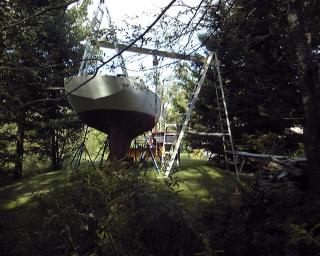
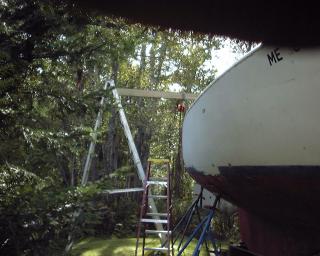
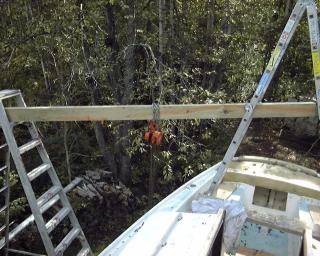 Once out in the cabin, I was able to lift (with the hoist) the engine out the companionway and swing it onto the bridgedeck. Nothing to it! Now, I had to figure out how to get the engine off the boat. I was loathe to hire a crane, although that was a seemingly necessary option. Not willing to give up yet, I moved the engine slightly farther back into the cockpit and rested it on a board running
transversely across the coamings. (I used my HD folding stepladder as a gantry for this part) Then, using a large stepladder on the ground and my folding one on deck as supports, I ran the heavy timber I used to lift the engine out of the cabin to span between the two. I then rigged the hoist up close to the rail on the timber and used it to pull the engine first outwards from the boat's centerline, then over the side, where I was then able to lower it to the ground and my waiting little garden trailer. I was very pleased with the success of this method, and with the cost: $16.00 for the hoist rental. I figure I can raise the
new engine the same way. Once out in the cabin, I was able to lift (with the hoist) the engine out the companionway and swing it onto the bridgedeck. Nothing to it! Now, I had to figure out how to get the engine off the boat. I was loathe to hire a crane, although that was a seemingly necessary option. Not willing to give up yet, I moved the engine slightly farther back into the cockpit and rested it on a board running
transversely across the coamings. (I used my HD folding stepladder as a gantry for this part) Then, using a large stepladder on the ground and my folding one on deck as supports, I ran the heavy timber I used to lift the engine out of the cabin to span between the two. I then rigged the hoist up close to the rail on the timber and used it to pull the engine first outwards from the boat's centerline, then over the side, where I was then able to lower it to the ground and my waiting little garden trailer. I was very pleased with the success of this method, and with the cost: $16.00 for the hoist rental. I figure I can raise the
new engine the same way.
|
 |
|
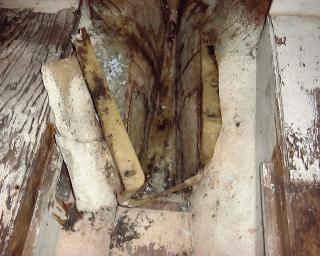
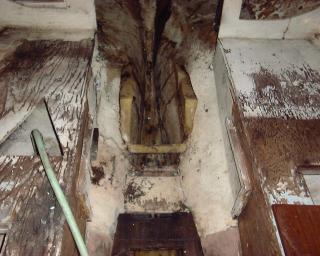 It was nice to finally get into
the engine room with degreaser and go to town--it was really nasty, but the
degreaser worked its magic. For the first time in many years, the engine
room and bilge are actually fairly clean. I will clean some more and coat
with Bilgekote soon. It was nice to finally get into
the engine room with degreaser and go to town--it was really nasty, but the
degreaser worked its magic. For the first time in many years, the engine
room and bilge are actually fairly clean. I will clean some more and coat
with Bilgekote soon.
Next: Removing the old engine beds, installing
new engine foundation, and installing the engine. Follow the link below.
|
|
UPDATE!
7 December 1999
I decided not to rebuild the engine , having decided to buy an inexpensive used diesel engine to replace it. Given the scope of the project, and the preferred reliability, safety and fuel efficiency of a diesel, it seems the best choice. I have located a used Yanmar SB 12 in
Florida, which will shortly be shipped to Maine. Click here
for details on the engine.
Please
click here to see the installation process for the used diesel.
UPDATE!!
If you're reading this website in sequential order, maybe you don't yet know
that we installed the used diesel mentioned above--and it didn't work out.
In late July 2001, we pulled out this smoky old beast and installed a sparkling
new diesel engine. Details are found elsewhere on the website.
Please
click here to begin reading about the events leading up to the decision to
install a new engine.
|
|