MAINTENANCE LOG 2004
|
|
I will use this page to cover
some of the general maintenance and small projects I do on the boat that are too
small to justify their own pages on the site. Most of these items
are either small upgrades or routine maintenance. Where a project
requires more description and detail, you'll find a link leading to that project
page.
To read the log sequentially,
click here to go to the bottom. To read archived logs, choose one of these links: |
2003
|
2004
|
|
|
Date |
Maintenance/Projects
Underway (and, sometimes, general musings) |
|
10/5/04 |
 With
a slew of other, non boat-related projects on my plate for October, and
few, if any, projects of significance planned for Glissando this
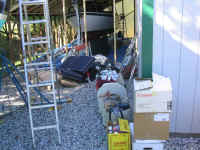
off-season, I worked tirelessly over the course of an entire day to
unload, strip, winterize, and cover the boat for the winter. I was
amazed at the amount of gear that was on the boat--two truckloads,
including all the cushions, pillows, blankets, food, and other boat
gear. With
a slew of other, non boat-related projects on my plate for October, and
few, if any, projects of significance planned for Glissando this
off-season, I worked tirelessly over the course of an entire day to
unload, strip, winterize, and cover the boat for the winter. I was
amazed at the amount of gear that was on the boat--two truckloads,
including all the cushions, pillows, blankets, food, and other boat
gear.
With the boat unloaded, I continued by
winterizing the head, water system, and engine. I also changed the
engine oil and filter. Nothing new here--I've described the
process elsewhere on this site in the past. Finally, I washed the
whole boat, inside and out, to remove the grime of haulout and
unloading.
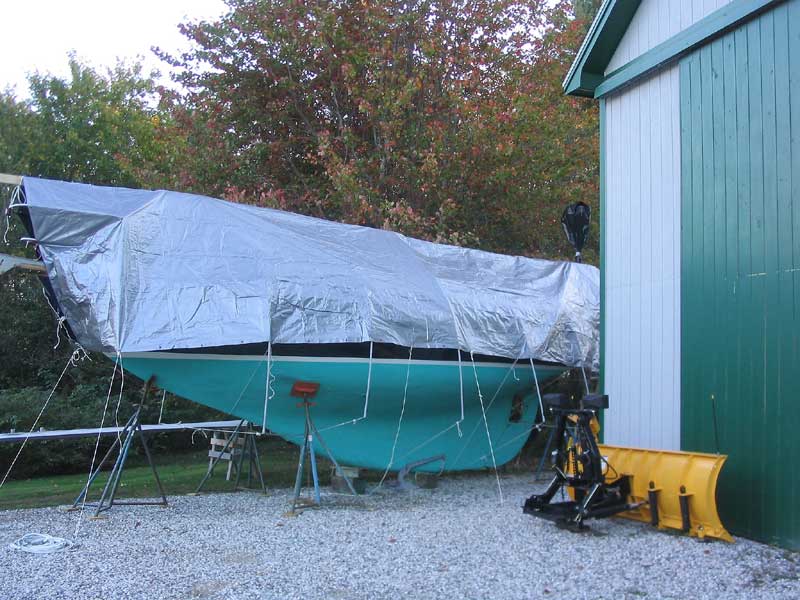
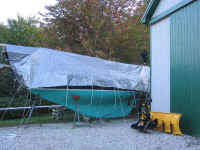 At
the end of the day, I set up a basic frame over the boat. In years
past, when the boat was stored outside, I used the mast (suspended atop
a pair of horses) as a ridge for my cover. This fall, however, I
planned to Awlgrip my mast white, so I had removed it from the
boat. In its place, I installed two 16' 2x4s as a ridge, and then
set up my cover in the usual way (as described in the 2001 winterizing
section of this site). Finally, late in the day, I unrolled the
tarp and secured it with lines run to a number of tent stakes that I
drove into the ground; this holds the tarp out away from the hull,
preventing damage to the paint. At
the end of the day, I set up a basic frame over the boat. In years
past, when the boat was stored outside, I used the mast (suspended atop
a pair of horses) as a ridge for my cover. This fall, however, I
planned to Awlgrip my mast white, so I had removed it from the
boat. In its place, I installed two 16' 2x4s as a ridge, and then
set up my cover in the usual way (as described in the 2001 winterizing
section of this site). Finally, late in the day, I unrolled the
tarp and secured it with lines run to a number of tent stakes that I
drove into the ground; this holds the tarp out away from the hull,
preventing damage to the paint.
It was a long day, but it was nice to
have the boat covered and put away and off my mind--or as much so as
possible, anyway!
|
|
5/2/04 |
With a launch date
set for Thursday, May 13, I turned my attention from working on building
the Daysailor
to getting Glissando ready for launch. There was little of
major consequence to do, but even small punch lists have a way of
growing. This entry details the various small projects
accomplished over the past couple weeks.
First, I removed the protective plastic
that I had draped over the boat back in January, which worked well to
keep most of the shop dust off the boat. After some general
cleanup and reacquaintance (I had barely been on board since January), I
got to work on a few small things.
I have new wind instruments for the
masthead, so on one nice early spring day, I spent a couple hours
installing the masthead receptacle and cabling through the mast. I
had hoped to pull all the mast wiring so that I could install some
effective slap eliminator, but decided that beginning this project now
was unnecessary. Maybe next year...
I got the masthead unit installed and the
cable run to the mast base, where I pulled it out through the same hole
as my other mast wires. I left abundant extra, and cut off the
remaining cable, which I then installed in the boat, running from the
instrument readout location (on the cockpit bulkhead) to the underside
of the mast step in the boat. Once the mast is stepped, the two
ends of the cable will be joined in a junction box designed for
that purpose.
 I
test-ran the engine, which was uneventful other than the fact that the
engine started, if anything, more quickly than it often does during the
sailing season! Please refer to my log entries from last fall to
see my exhaust-drain arrangement for use in the shop. I ran the
engine for several minutes, then shut down. I also flushed my
fresh water system and filled the tank. I
test-ran the engine, which was uneventful other than the fact that the
engine started, if anything, more quickly than it often does during the
sailing season! Please refer to my log entries from last fall to
see my exhaust-drain arrangement for use in the shop. I ran the
engine for several minutes, then shut down. I also flushed my
fresh water system and filled the tank.
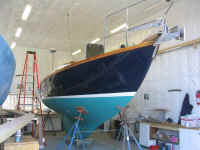
I painted the bottom, using up the
remains of two older cans of paint. A couple days later, I moved
the jackstands and painted the spots beneath.
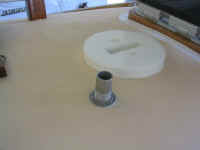
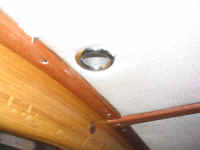 I
installed a new, larger through hull fitting in the deck near the mast
step, for use with my mast wiring. The old one was cheap plastic,
poorly located, and too small to allow the VHF coax connector to pass
through, so I removed the fitting during my mast step rebuild project
last fall. I found a perfect stainless steel fitting in a
catalog. I
installed a new, larger through hull fitting in the deck near the mast
step, for use with my mast wiring. The old one was cheap plastic,
poorly located, and too small to allow the VHF coax connector to pass
through, so I removed the fitting during my mast step rebuild project
last fall. I found a perfect stainless steel fitting in a
catalog.
Installation was straightforward.
From inside the boat, I chose the location and then drilled a pilothole
up through the overhead. Then, outside, I drilled the new hole
with a 1-1/4" hole saw. The new hole passed conveniently
through the solid glass mast step area, so there was no need to remove
any core material. I coated the fitting with 3M 101 sealant, and
secured it in the hole, cleaning up the excess sealant afterwards.
 Later,
once the boat is launched and the mast is stepped, I'll run my mast
wiring through a hose running between the mast and this fitting, forming
a nicely watertight (and as attractive as possible) seal. More on
that later; it's the same thing I've done for the past three seasons,
but with a new fitting. Later,
once the boat is launched and the mast is stepped, I'll run my mast
wiring through a hose running between the mast and this fitting, forming
a nicely watertight (and as attractive as possible) seal. More on
that later; it's the same thing I've done for the past three seasons,
but with a new fitting.
Look for another update to this site
soon. I finally got around to building my cockpit table, and will
post details on that as soon as possible, along with any other final
pre-launch details.
|
|
1/17/04 |
The major project work is complete! A few items remain on my
list, but all the major stuff is done--some of which I intended to do when the boat arrived last fall, and some of which
kind of just happened. The period from haulout last October till now has been like a sort of "mini
refit"--a time to take care of some ongoing irritations, handle needed repairs, and right some of the wrongs from 3
years ago.
Since the last update, I completed the scupper and deck drain
installation, installed two new hatches in the cockpit, rerouted and
neatened the battery cabling in the cockpit lockers, and several other, insignificant projects.
I finally got around to installing a turn latch on the new engine instrument panel
cover. I also installed a simple plywood protective cover over the back side of the panel.
Click
here for more...
I reinstalled the mast step on deck, finally wrapping up the mast step/mast beam
reinforcement project. Read more...
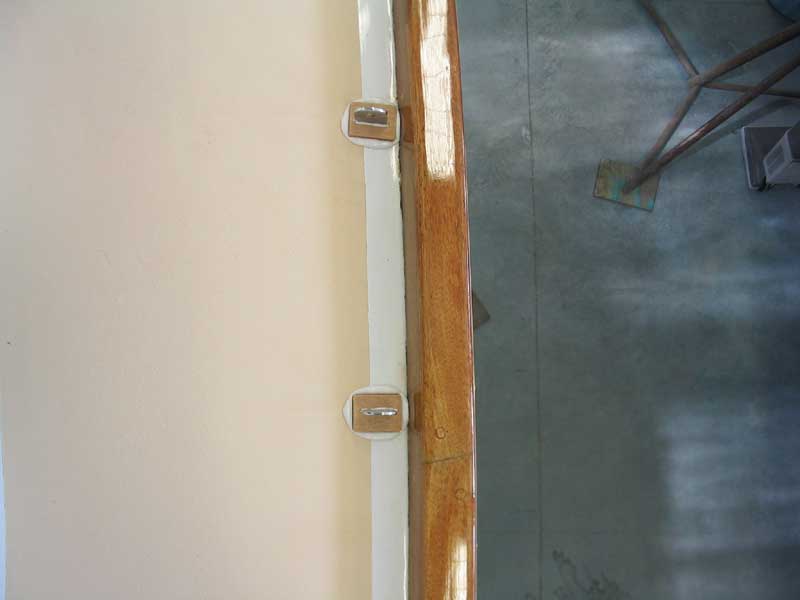
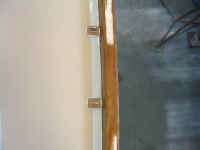 As
part of routine maintenance, as well as to make way for the deck painting, I had earlier removed the existing chainplate
deck covers, which I initially installed three years ago. Because I couldn't get stock ones to fit (because of the
toerail), I originally made up some basic wooden ones, which worked well. Removing the old ones destroyed them, so I
made up some new ones and installed them in a heavy bed of polysulfide. It's a bit more unsightly, but I like to
ensure that plenty of sealant oozes out around all sides, and then, in this instance, I leave it just as is. I think
this helps ensure a better overall seal in these dynamically-loaded installations. Every few years, I'll remove and
rebed these covers, since chainplates are one of the most likely places to experience a leak. As
part of routine maintenance, as well as to make way for the deck painting, I had earlier removed the existing chainplate
deck covers, which I initially installed three years ago. Because I couldn't get stock ones to fit (because of the
toerail), I originally made up some basic wooden ones, which worked well. Removing the old ones destroyed them, so I
made up some new ones and installed them in a heavy bed of polysulfide. It's a bit more unsightly, but I like to
ensure that plenty of sealant oozes out around all sides, and then, in this instance, I leave it just as is. I think
this helps ensure a better overall seal in these dynamically-loaded installations. Every few years, I'll remove and
rebed these covers, since chainplates are one of the most likely places to experience a leak.
So, what's left to do before launching (now fewer than 4 months away!!!!!)? Well, at
some point I have some mast-related work to do--installing the new hardware for the wind instruments and, I hope (not sure,
though) possibly painting the mast and/or rewiring so that I can stop the annoying wire-slap inside the mast. I need
to replace the starboard lifelines, which were stretched and damaged in last summer's minor collision
with Dasein, and there's still the new tiller to be built. I'm considering adding some new chainplates (or a
strong deck-mounted setup) for forward lowers, but that's not a priority yet. But essentially, except for basic
pre-launch maintenance like painting the bottom and a bit more varnish work, the boat is ready to go now.
Meanwhile,
I'm looking forward to shifting my focus to working on the Daysailor
project, which has been rather neglected of late.
There you have it. All the news
that's fit to print! |
|
1/7/04 |
 Over
the past few days, after wrapping up the anchor platform and deck hardware installation by removing the excess caulk
squeezeout, I spent some time going through the lockers on the boat, removing all gear for inventory, reorganization, and,
in some cases, removal from the boat. Once each locker was cleaned out, I vacuumed out any dust or debris and cleaned
each locker before replacing the items that belonged there. The last time I did any sort of thorough inventory or
reorganization was in the early summer of 2002, and there was a definite need for some changes in organization. Over
the past few days, after wrapping up the anchor platform and deck hardware installation by removing the excess caulk
squeezeout, I spent some time going through the lockers on the boat, removing all gear for inventory, reorganization, and,
in some cases, removal from the boat. Once each locker was cleaned out, I vacuumed out any dust or debris and cleaned
each locker before replacing the items that belonged there. The last time I did any sort of thorough inventory or
reorganization was in the early summer of 2002, and there was a definite need for some changes in organization.
Since the last update, I completed the brass rubrail
installation, installed the anchor rollers, and loaded the anchor rodes back into the chainlocker. I received new
bronze scuppers that I ordered from Spartan Marine, and made plans to move forward with my scupper replacement
project. Read more...
For this season, I am installing new wind instruments at the masthead, which I received as a
very nice gift for Christmas. I began the process by installing the instrument head in the cockpit; installation of
the masthead unit and cabling will wait until later on this spring.
Click
here for more...
I'm still waiting for my new jigsaw so that I can complete the cutout in the cockpit sole for
my new aluminum cockpit hatch. Unfinished projects drive me crazy!
More... |
|
1/2/04 |
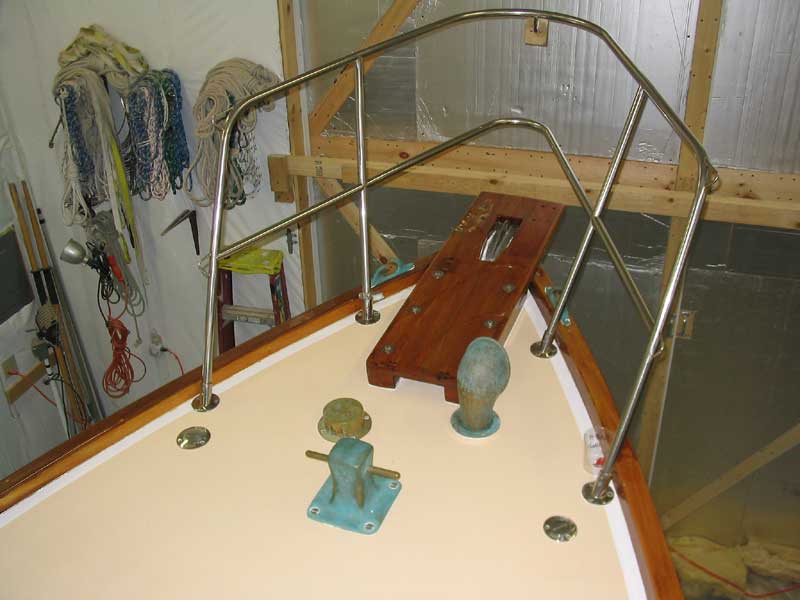
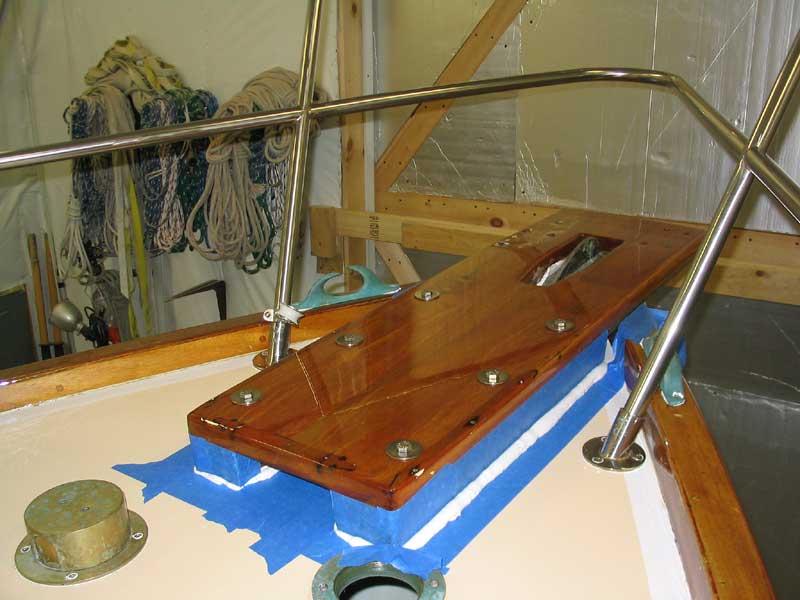
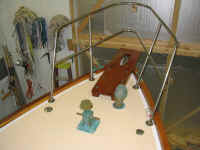
 Yesterday,
with Heidi's help, I installed the big mooring bit and anchor platform. These are about the only two deck items that I
cannot install alone; most of the hardware is installed through tapped holes, but not these pieces. Yesterday,
with Heidi's help, I installed the big mooring bit and anchor platform. These are about the only two deck items that I
cannot install alone; most of the hardware is installed through tapped holes, but not these pieces.
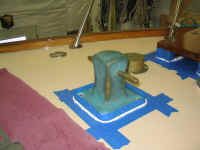
 I
used the bulk of two tubes of 3M 101 to bed the anchor platform, and, with Heidi holding the boltheads, I tightly secured
all six bolts from below. Then, we secured the mooring bit in a similar bed of 101. As with the other hardware,
I taped off the deck around each location so that cleanup would be easier. Because of the large amount of caulk
spillout, I left it to cure for two or three days before attempting to cut away the excess. With these installations,
the reassembly of the deck is complete--a nice milestone. I
used the bulk of two tubes of 3M 101 to bed the anchor platform, and, with Heidi holding the boltheads, I tightly secured
all six bolts from below. Then, we secured the mooring bit in a similar bed of 101. As with the other hardware,
I taped off the deck around each location so that cleanup would be easier. Because of the large amount of caulk
spillout, I left it to cure for two or three days before attempting to cut away the excess. With these installations,
the reassembly of the deck is complete--a nice milestone.
Today, I installed most of the brass half oval on the new rubrail. I only stopped
because I ran out of screws...stupidly, I only bought one box for some reason. But I completed the starboard side, and
nearly all of the port side.
Click here for more detail on this project.
|
|
1/1/04 |
Reassembly of the boat after the fall's series of projects is nearly
complete. Over the past couple days, I reinstalled the stanchion bases, bow pulpit, hawsepipes and bronze vent, and
other deck hardware that I had removed for deck painting and other projects. I feel under pressure to finish up these
projects for whatever reason--I guess I feel guilty that I haven't been working on the Daysailor
much. I'm amazed at how much time and effort I have spent working on a boat that was supposedly complete and in good
condition! But tying up these loose ends, correcting minor mistakes and installations I made originally that, in
hindsight, I should have done differently, and making important upgrades and improvements, is important--after all,
maintenance and upgrading never ends.
Amazingly, I still have projects on the slate for this season. I want to replace the
cockpit scuppers and get that issue solved once and for all, and I need to get my new cockpit hatch installed. I have
a series of mast-related projects that I hope to complete, though these aren't as critical. I had hoped to paint the
mast this winter, and still might--but I'm not sure now. If I can wrap up the major projects on the boat sooner than
later, then I'll feel better about my self-imposed schedule, and can start concentrating on other things--like building the
Daysailor.
The Daysailor has no set construction schedule. I feel that once I can start dedicating
substantial time to the job, progress should be relatively swift. Still, there are many unknown factors involved in
the project, and I can't begin to estimate how much time any of the work will actually take. I guess I feel like I've
been neglecting the project, and letting down those of you who are attempting to follow the progress. Sorry!
That's why I've been setting little deadlines for myself--a goal towards which to work, so that I keep myself on
track. It would be startlingly easy for me to just dabble on Glissando all winter, but soon I must wrap up all
the projects, drape plastic over the boat to protect her from dust, and get serious about my other project.
And the last month has allowed less progress than I had hoped on many fronts. The long
holiday season this year, and a relative shutdown of my shop for the past couple weeks while I worked on varnish, has slowed
me more than anticipated. But it's a new year, a fresh start, and I'm looking forward to several intensive months of
work on both projects--especially the Daysailor, which is awaiting the beginnings of new construction.
Stick around. |
|