|
Small Interior Projects
This page was last updated on 23 January 2002
Stovetop Cover/Cutting
Board
With the limited counterspace available, it
pays to eke out as much additional flat space as possible, wherever
possible. The top of the propane stove is prime real estate, but virtually
unusable as is. For the first season, we used a small, pre-manufactured
cutting board over the top; this helped, but was far from perfect. I
decided to build something simple for the top.
The stove comes with a raised railing, of
sorts, to help hold pots on top. This also makes the perfect retainer for
a stovetop cutting board. I measured up the inside dimensions of the
"railing", and also determined a good overall size for the cutting
board. The overall size ended up being about 14-1/2" by 20-1/2",
give or take.
|
|
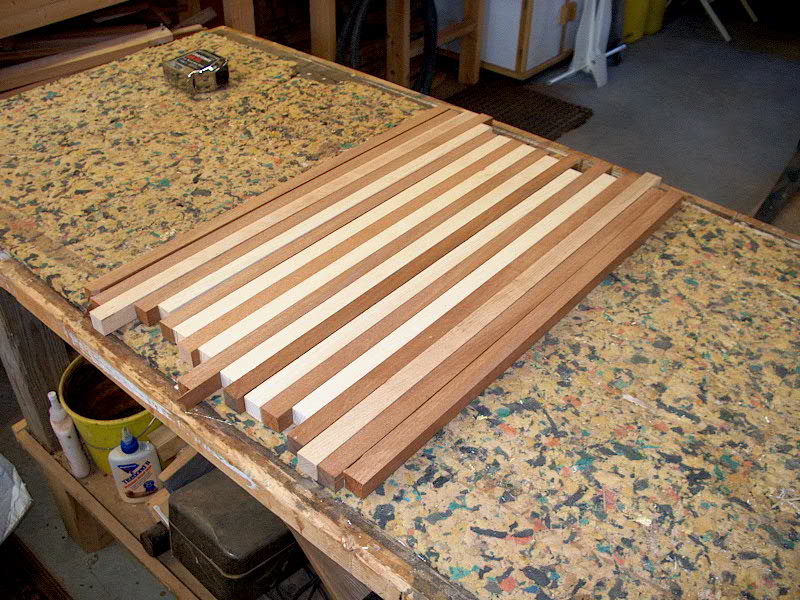 Using
scrap mahogany and ash, I cut up a series of 3/4" x 3/4" strips, each
at least 21" long (I didn't worry about the lengths as long as they were
long enough) until I had enough to create a board over 14-1/2" wide.
Then I arranged them so that the mahogany and ash alternated strip to strip for
a pleasing look. I ended up with a double width of mahogany at each edge
because I had more mahogany than ash, but this OK because I'll end up trimming
the edges anyway. There's also two strips of birch in there, third in from
each edge in the picture. This shows the strips just laid out dry; I
haven't glued anything up yet. Using
scrap mahogany and ash, I cut up a series of 3/4" x 3/4" strips, each
at least 21" long (I didn't worry about the lengths as long as they were
long enough) until I had enough to create a board over 14-1/2" wide.
Then I arranged them so that the mahogany and ash alternated strip to strip for
a pleasing look. I ended up with a double width of mahogany at each edge
because I had more mahogany than ash, but this OK because I'll end up trimming
the edges anyway. There's also two strips of birch in there, third in from
each edge in the picture. This shows the strips just laid out dry; I
haven't glued anything up yet.
The next day, I put my cold epoxy in front of
my garage heater for a half hour or so to warm it up and make it easier to
pump. While it warmed, I cleaned the strips of wood with acetone in
preparation for glueup.
With so many strips of wood, there runs the
real risk of the strips becoming uneven during glueup. Sanding
the strips smooth would be difficult because I've turned them all sort of on
edge; that is, the softest face grain is on the vertical, which exposes the
harder edge grain of each strip. Cutting boards really should be made up
of true end grain for the longest life and toughest cutting surface, but to
create this would entail lying up the strips as is and waiting for it to
kick. Then, I'd have to resaw the panel across the strips, creating
new 3/4" strips of end grain. Then, these could be glued together again,
creating a nice cutting board of all 3/4" x 3/4" end grain
blocks. I don't think I'm going to do this, although I'm undecided.
The edge grain is sufficiently resistant to cuts for what this board is going to
be used for; it's not a chopping block, after all.
|
|
 Anyway,
I've gone off on a tangent here. The point is, sanding edge grain is much
harder than the face, and I want to minimize any sanding. Therefore, I
decided to glue up the strips with them laying flat on a shiny Formica panel
that I have left over from something. Any epoxy squeeze out will chip or
clean off the shiny surface easily. The surface is nice and flat, which
means that the bottom of the strips should end up nice and even. This will
form the top of the cutting board; the other side will be hidden from view in
regular use and won't need to be as flat and even when all is said and done, so
if there's unevenness between the strips on one side it won't matter. Anyway,
I've gone off on a tangent here. The point is, sanding edge grain is much
harder than the face, and I want to minimize any sanding. Therefore, I
decided to glue up the strips with them laying flat on a shiny Formica panel
that I have left over from something. Any epoxy squeeze out will chip or
clean off the shiny surface easily. The surface is nice and flat, which
means that the bottom of the strips should end up nice and even. This will
form the top of the cutting board; the other side will be hidden from view in
regular use and won't need to be as flat and even when all is said and done, so
if there's unevenness between the strips on one side it won't matter.
|
|
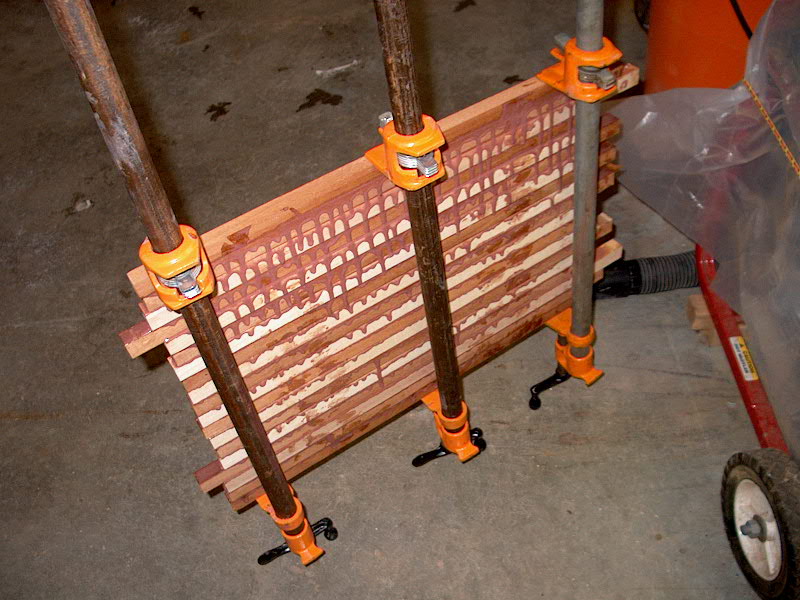
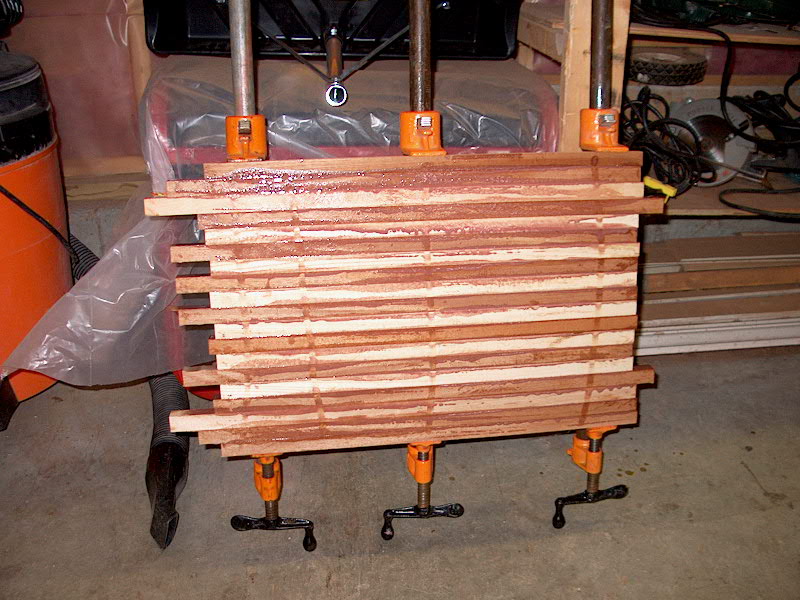
 I mixed up some slightly thickened epoxy and
glued up the strips; there's 20 pieces of wood here. As I covered each
facing edge with epoxy, I placed it on the Formica countertop. When they
were all covered with glue, I secured them tightly with three pipe clamps, and
made sure all the strips were flat on the countertop by striking them with a
deadblow mallet. When everything was nice and tight, I slid the whole
arrangement off the Formica--sliding to break the suction--and checked the top
surface. The strips were, for all intents
and purposes, even all the way across. There's some epoxy squeezeout, and
some minor unevenness, but nothing drastic. A short time with a belt
sander should take care of it. What will become the underside of the panel
is decidedly more messy, but that's OK--it doesn't have to be perfect because it
will always be hidden. I set the panel aside for the epoxy to cure for at
least a day; I'll probably leave it longer to make sure the bond is strong
before removing the clamps. I mixed up some slightly thickened epoxy and
glued up the strips; there's 20 pieces of wood here. As I covered each
facing edge with epoxy, I placed it on the Formica countertop. When they
were all covered with glue, I secured them tightly with three pipe clamps, and
made sure all the strips were flat on the countertop by striking them with a
deadblow mallet. When everything was nice and tight, I slid the whole
arrangement off the Formica--sliding to break the suction--and checked the top
surface. The strips were, for all intents
and purposes, even all the way across. There's some epoxy squeezeout, and
some minor unevenness, but nothing drastic. A short time with a belt
sander should take care of it. What will become the underside of the panel
is decidedly more messy, but that's OK--it doesn't have to be perfect because it
will always be hidden. I set the panel aside for the epoxy to cure for at
least a day; I'll probably leave it longer to make sure the bond is strong
before removing the clamps.
|
|
After the glued-up blank had a chance to cure
for a couple days, I removed the clamps and prepared to cut the board to the
proper size. I had determined the overall size the top should be to fit
properly in the space over the stove, and also where to install cleats on the
bottom to hold the board in place by chocking it inside the framework at the top
of the stove. (Please click here
to see a picture of the top of the stove to better visualize the situation.)
When I glued up the blank, I made sure that I
had one edge piece that was nice and straight. Using this known straight
edge, I placed the blank in a homemade panel cutting jig I made for the table
saw. This is simply a piece of plywood with a runner attached to the
bottom that slides in one of the miter grooves on the table; at the infeed end,
I screwed a straight cleat. With a straight edge butted up against the
cleat, the whole jig can be passed through the saw, and the cut made will be a
perfect 90 degrees from the known straight edge. I cut both of the uneven
short ends of the cutting board in this manner, measuring the proper length of
20-5/8" when I made the second pass. This left me with a nice
rectangular blank ready for sanding and finishing.
I began sanding the top surface of the blank
with a belt sander and 80-grit belts to remove any unevenness and epoxy spill
out. I held the sander at 45 degrees to the grain of the wood to do this,
then finished with the sander in line with the grain. I did the same on
the bottom of the blank, although I didn't worry so much about making this side
perfect as it will never be seen. I did get it pretty smooth, with no
bulges or epoxy masses.
|
|
 Then, I switched to my random orbit sander
equipped with 80 grit paper and sanded off the belt sander marks on both
sides. I then used a router and a 1/4" roundover bit to ease all the
edges of the blank, and also sanded a nice radius on each corner. (No
sharp corners allowed on boats!) To complete the sanding,
I switched to a palm sander and sanded to a 220 grit. Then, I switched to my random orbit sander
equipped with 80 grit paper and sanded off the belt sander marks on both
sides. I then used a router and a 1/4" roundover bit to ease all the
edges of the blank, and also sanded a nice radius on each corner. (No
sharp corners allowed on boats!) To complete the sanding,
I switched to a palm sander and sanded to a 220 grit.
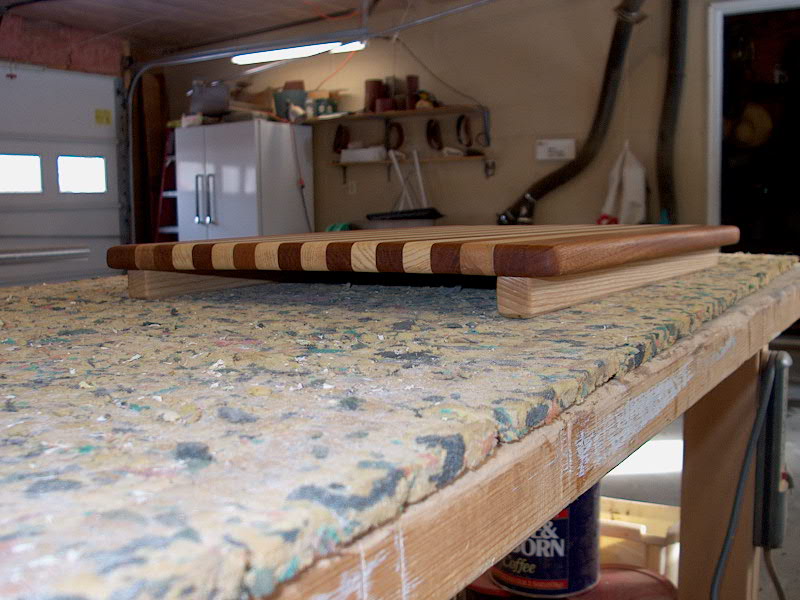
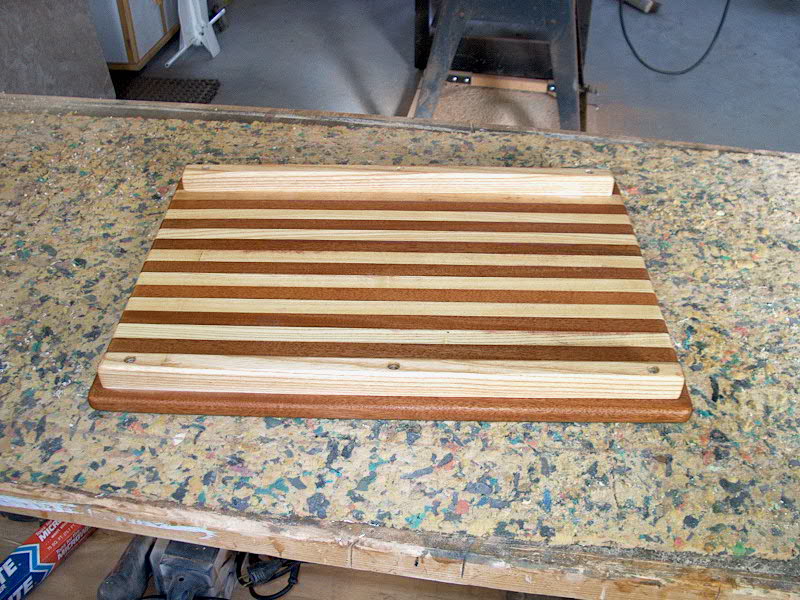
To hold the cutting board in place on the
stove, I installed two ash cleats to the bottom. I decided to install
these with the grain so that the entire length of each cleat would be holding
the board in place when the boat heels; I thought of installing them the other
way, across the grain, to help stabilize the  piece,
but I decided that with the epoxy and small size of the various wood strips that
it would be unnecessary. I double checked my measurements on the boat and
cut two strips of ash to the proper length and chamfered the bottoms and ends
with a router to ease those edges. Then, I sanded them smooth and
installed the two cleats with stainless steel screws. (Above) piece,
but I decided that with the epoxy and small size of the various wood strips that
it would be unnecessary. I double checked my measurements on the boat and
cut two strips of ash to the proper length and chamfered the bottoms and ends
with a router to ease those edges. Then, I sanded them smooth and
installed the two cleats with stainless steel screws. (Above)
|
| The completed cutting board looks very nice,
and will also look very nice in place on the stove. To finish the piece, I
applied several coats of consumable mineral oil to both sides. This will
require renewing from tome to time, but is the best and safest finish for a
board on which food may be placed. |
|
Project complete!
|
|