|
Foredeck:
Recore After the Fact
This page was last updated
on 26 November 2003.
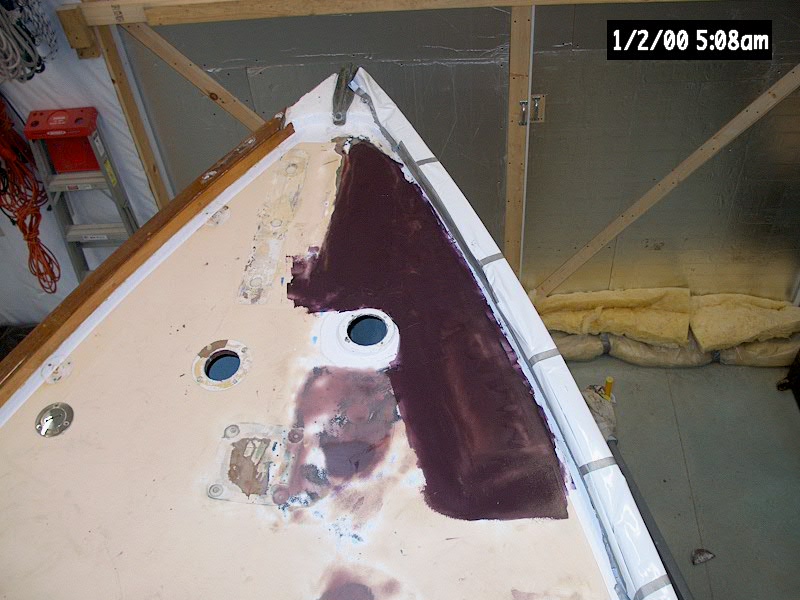
To my disappointment, I
discovered a section of the foredeck--nearly all the way forward on the
starboard side--contained substantial core rot and lack of
structure. Dumbly, this was an area that I had not recored during
the initial restoration of the boat, thinking that it was OK.
Whatever the reasons, I knew that I had to take care of the problem.
Tim's New Recore
Mantra: When recoring the deck of a boat, do the whole thing no
matter what, you dope!
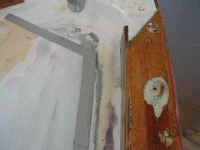
 The
first step to repairing this problem was to remove the bow pulpit.
An ongoing toerail repair required its
removal for convenience's sake anyway. Removing the pulpit was
relatively straightforward. First, I loosened the setscrews
holding the pulpit to its bases, and removed the rail.
(Note: I hate setscrews. When reinstalling the pulpit and
stanchions later, I plan to through bolt each connection in place of the
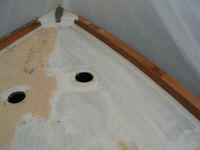
setscrews.) To remove the bases, from beneath I loosened the nuts
and removed them, which was easy to do alone since the bolts are
threaded through tapped holes in the deck. Then, I removed the
bolts from above and pulled off the bases. The deck surface was
compressed around the starboard aft base, which is central to the worst
section of the rotted core. The
first step to repairing this problem was to remove the bow pulpit.
An ongoing toerail repair required its
removal for convenience's sake anyway. Removing the pulpit was
relatively straightforward. First, I loosened the setscrews
holding the pulpit to its bases, and removed the rail.
(Note: I hate setscrews. When reinstalling the pulpit and
stanchions later, I plan to through bolt each connection in place of the
setscrews.) To remove the bases, from beneath I loosened the nuts
and removed them, which was easy to do alone since the bolts are
threaded through tapped holes in the deck. Then, I removed the
bolts from above and pulled off the bases. The deck surface was
compressed around the starboard aft base, which is central to the worst
section of the rotted core.
|
|
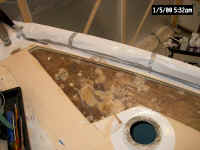
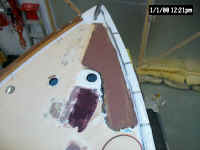
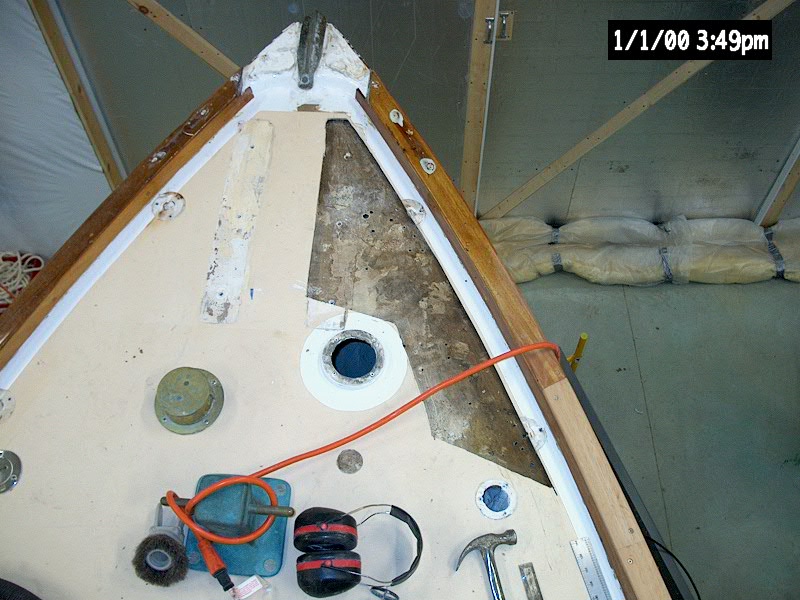
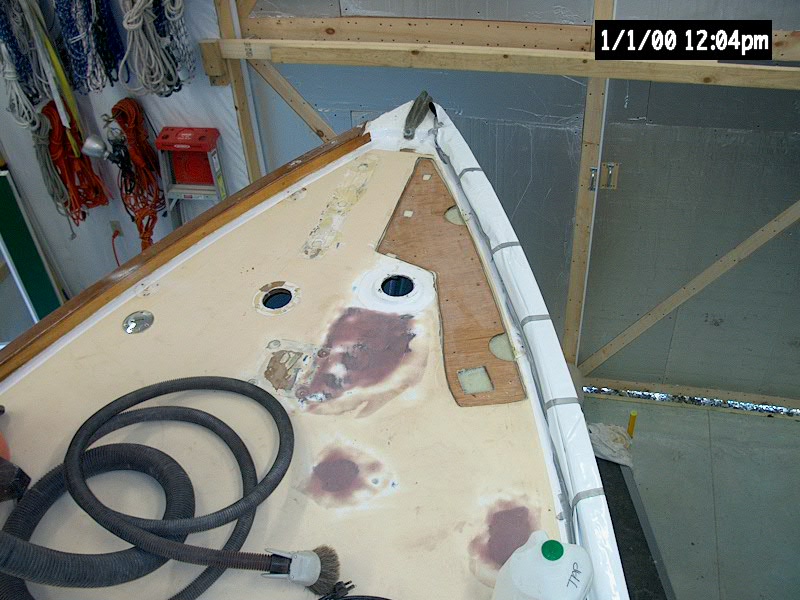
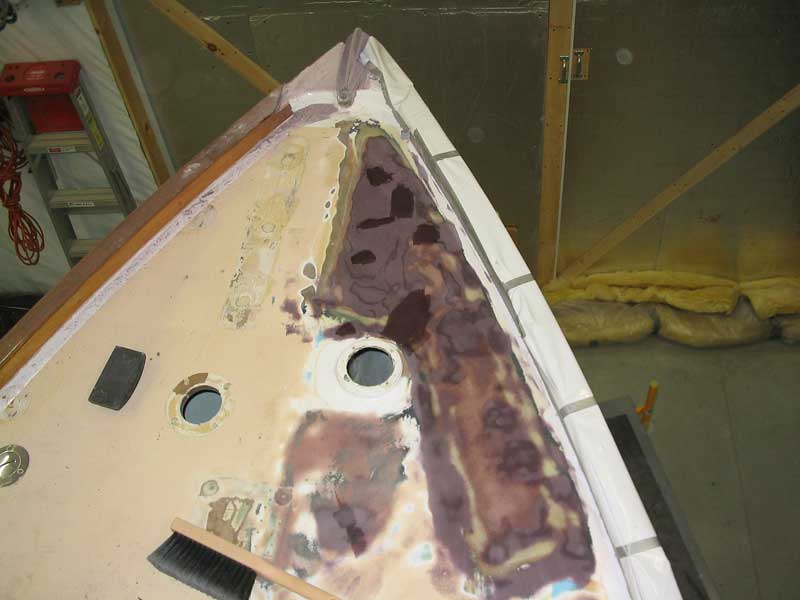
 A
few days later, I began some exploratory surgery to determine what my
course of repair had to be. With a hole saw chucked into my drill,
I cut a few holes through the top skin in strategic locations to expose
the core. What I found was hardly unexpected: saturated and
dry-rotted core, throughout the general area from the starboard stem aft
to just behind the pulpit base. A
few days later, I began some exploratory surgery to determine what my
course of repair had to be. With a hole saw chucked into my drill,
I cut a few holes through the top skin in strategic locations to expose
the core. What I found was hardly unexpected: saturated and
dry-rotted core, throughout the general area from the starboard stem aft
to just behind the pulpit base.
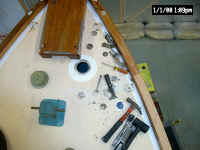
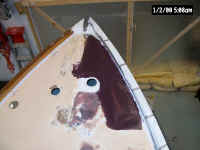
The
inspection holes, along with careful sounding of the area, indicated
that I needed to remove the anchor platform so as to access the entire
area. Sigh. Fortunately, the platform came off quite easily,
although the six bolts were so thoroughly bedded in polysulfide that it
was a bit of a chore to get them to pull through the top. Given
the lack of good access beneath, I couldn't even bang the bolts up with
a hammer, so I used vice grips from above to pull them out once I had
removed the nuts beneath. |
|
 The
platform was installed in a heavy bed of polysulfide, so once I began
the release process with a thin putty knife, the remainder broke free
fairly easily with a medium-sized crowbar. I carefully removed the
heavy (!) platform and placed it on my bench for further dismantling and
eventual refinishing before it was to be replaced later. The
platform was installed in a heavy bed of polysulfide, so once I began
the release process with a thin putty knife, the remainder broke free
fairly easily with a medium-sized crowbar. I carefully removed the
heavy (!) platform and placed it on my bench for further dismantling and
eventual refinishing before it was to be replaced later.
|
|
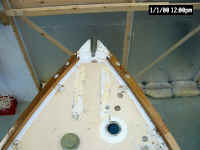
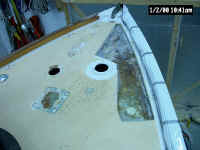
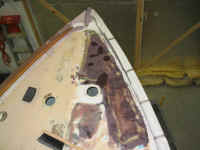
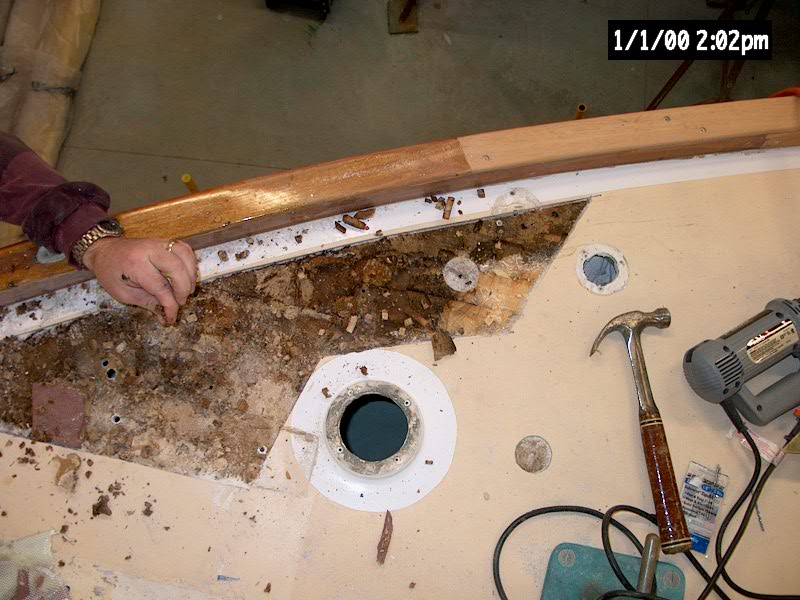
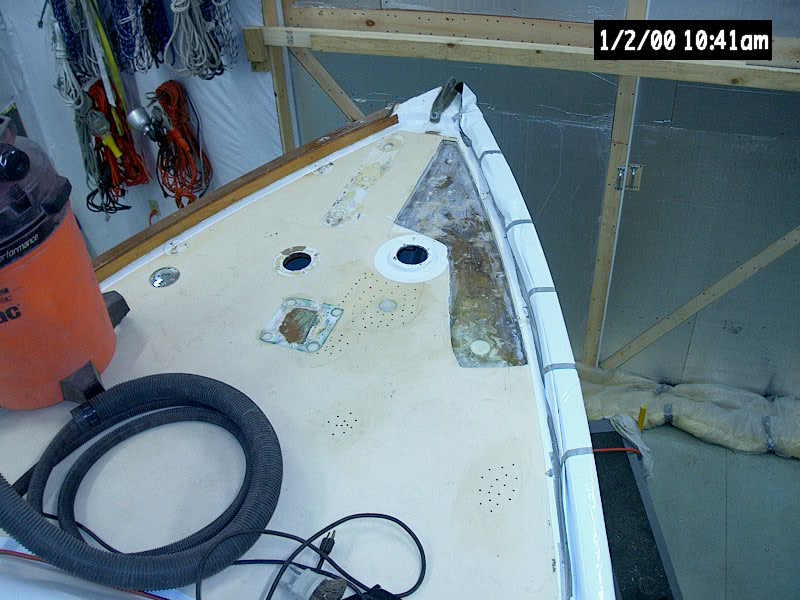
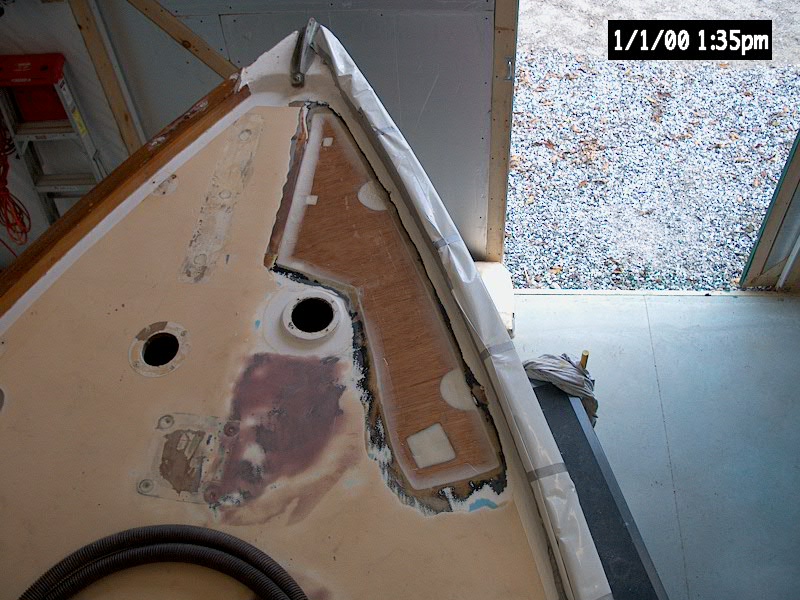
 With
the platform out of the way, I marked out an area to cut and then
plunged in with my saw, cutting out a conservative area that I hoped
would be sufficient. I had to cut around the raised hole for the
bronze cowl vent, as the hole was molded during original construction,
and the core tapers off all around it so that bottom skin becomes one
with the top skin. Not really wanting to recreate the
opening if I could help it, I cut around it, leaving it in place. With
the platform out of the way, I marked out an area to cut and then
plunged in with my saw, cutting out a conservative area that I hoped
would be sufficient. I had to cut around the raised hole for the
bronze cowl vent, as the hole was molded during original construction,
and the core tapers off all around it so that bottom skin becomes one
with the top skin. Not really wanting to recreate the
opening if I could help it, I cut around it, leaving it in place.
|
|
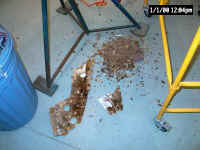
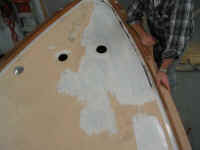
 The
core was a mess--heavily saturated and in bad condition. However,
I was happy to see clean, dry core at the edges of my cut, except for at
the aftermost end, where an additional cut would be necessary to
expose the remaining wet core. I removed the broken and ruined
core with a chisel and prepared for the replacement work ahead. I
elected to not reuse the top skin in this instance, since its thickness
was inconsistent and the area was small enough that it would be just as
easy to laminate new material. The
core was a mess--heavily saturated and in bad condition. However,
I was happy to see clean, dry core at the edges of my cut, except for at
the aftermost end, where an additional cut would be necessary to
expose the remaining wet core. I removed the broken and ruined
core with a chisel and prepared for the replacement work ahead. I
elected to not reuse the top skin in this instance, since its thickness
was inconsistent and the area was small enough that it would be just as
easy to laminate new material.
|
|
|
|
With the old core removed, I found that the
wetness extended a bit farther aft than I had hoped, so I extended the
opening along the starboard side, just past the hole where the water
tank fill had been. Careful sounding had indicated the edge of the
wetness, and I cut just beyond. I was pleased to find good core at
the edges when I opened up this last section.
 Now
that the entire area was open, I spent some time reaming the core out
from beneath the edges of the opening, and carefully checking the
remainder of the foredeck for other issues before continuing.
There were three instances of top-skin delamination, which I marked with
a pencil. Minor exploratory surgery confirmed that the core was
basically sound, so I planned for some epoxy injection in these areas to
rebond the skin to the core. I removed the large mooring bit,
since it was located on the edge of one of the areas of debonding.
Then, I drilled a series of small holes (about 7/32") in the three
areas, just through the topskin. More on this later. Now
that the entire area was open, I spent some time reaming the core out
from beneath the edges of the opening, and carefully checking the
remainder of the foredeck for other issues before continuing.
There were three instances of top-skin delamination, which I marked with
a pencil. Minor exploratory surgery confirmed that the core was
basically sound, so I planned for some epoxy injection in these areas to
rebond the skin to the core. I removed the large mooring bit,
since it was located on the edge of one of the areas of debonding.
Then, I drilled a series of small holes (about 7/32") in the three
areas, just through the topskin. More on this later.
|
|
 Next,
I ground the inner skin to remove resin and old core, and then installed
tape from the inside to cover several screwholes and the like (to
prevent resin from dripping into the boat). Then, I filled the
edges of the open area with thickened epoxy, pushing it deeply into the
voids beneath the deck edges. I used some extra to skim coat
the entire inner skin for good measure. When the epoxy cured, I
washed off the blush and declared the area ready for new core.
However, since I was awaiting a delivery of the core material, I moved
on to other projects that I could complete, leaving the foredeck
core for later. Next,
I ground the inner skin to remove resin and old core, and then installed
tape from the inside to cover several screwholes and the like (to
prevent resin from dripping into the boat). Then, I filled the
edges of the open area with thickened epoxy, pushing it deeply into the
voids beneath the deck edges. I used some extra to skim coat
the entire inner skin for good measure. When the epoxy cured, I
washed off the blush and declared the area ready for new core.
However, since I was awaiting a delivery of the core material, I moved
on to other projects that I could complete, leaving the foredeck
core for later.
|
|
I decided to take care of the other jobs I
wanted to complete on the foredeck: injecting the debonded areas
with epoxy resin to resecure the skin to the core. I also took
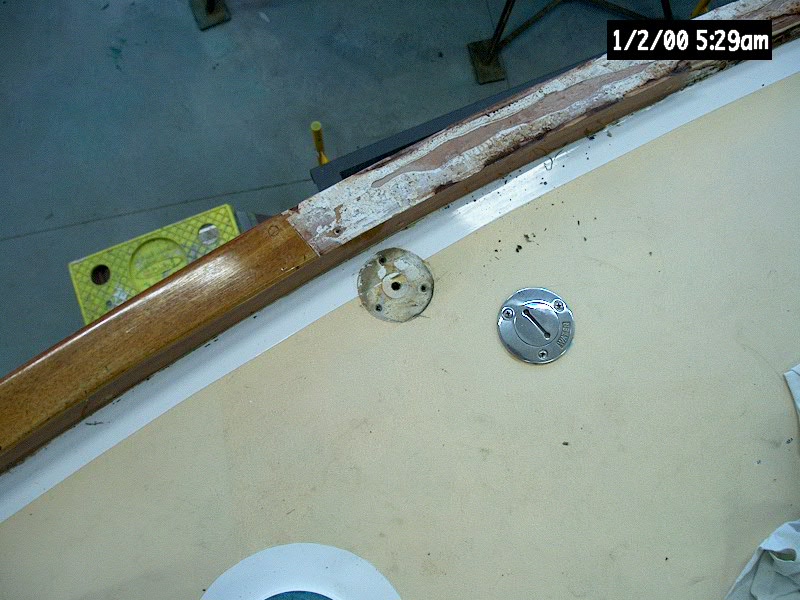
advantage of the situation to ream out the boltholes for the mooring bit
and anchor platform with a 1" holesaw, passing just through the
topskin and core, so that I could overfill the holes with epoxy to
ensure that no water could ever enter the core through those
openings. (This had not been done originally, for whatever
reason.)
 To
inject the deck, I used unthickened epoxy resin and some small plastic
syringes with the tip cut to fit inside the holed I had drilled.
The general idea is to inject resin into the holes until it wells up
from neighboring holes, and so on. It took a surprising amount of
epoxy to complete the jobs--more than I had expected, though the amount
was still relatively small (the syringe doesn't hold much). I
cleaned up the overspill, and then filled the reamed-out boltholes with
thickened epoxy, tamping it down to ensure that there were no air voids. To
inject the deck, I used unthickened epoxy resin and some small plastic
syringes with the tip cut to fit inside the holed I had drilled.
The general idea is to inject resin into the holes until it wells up
from neighboring holes, and so on. It took a surprising amount of
epoxy to complete the jobs--more than I had expected, though the amount
was still relatively small (the syringe doesn't hold much). I
cleaned up the overspill, and then filled the reamed-out boltholes with
thickened epoxy, tamping it down to ensure that there were no air voids.
|
|
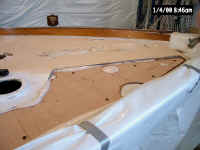
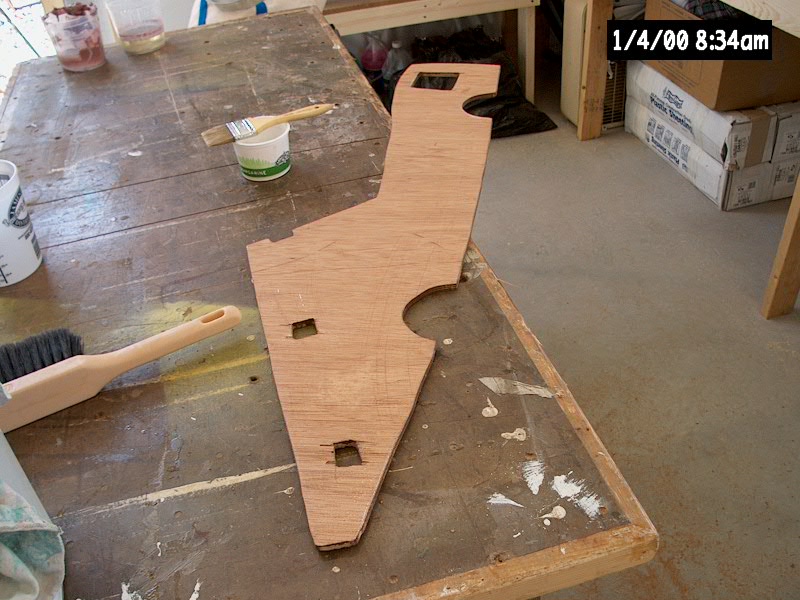
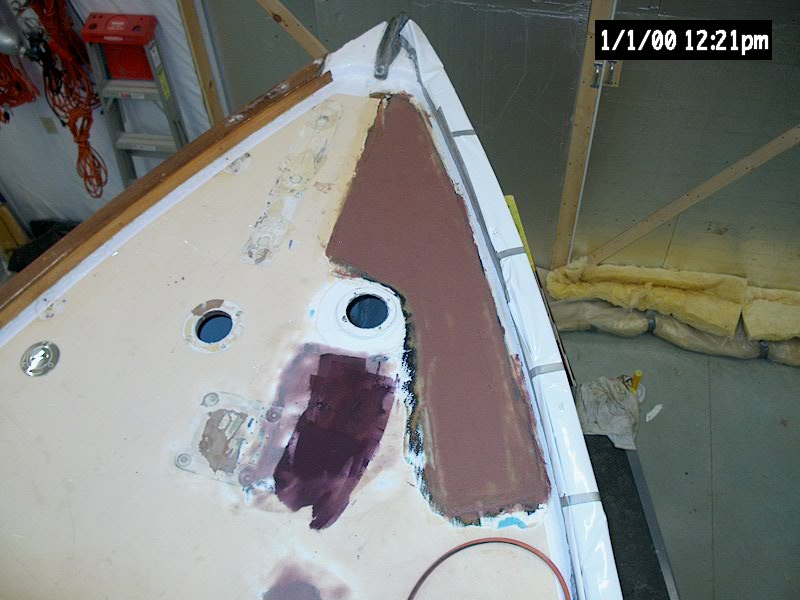
After awaiting delivery of wood and core material
for nearly a week, I set to work installing the core as soon as the
material arrived. Since the rest of the deck (at least those areas
that have been addressed) is cored with marine plywood, I saw no reason
to not use more plywood in this application. While I
waited, I created a template of the uncored area with which to pattern
the new core and fiberglass overlay.
As a further caveat,
I will repeat once again that the only reason I ever used plywood for
a core material was that a free supply came with the boat. Yes,
I'm pleased with the results of my recore with the plywood, but would
not willing choose plywood over balsa or Nida core were I starting
fresh.
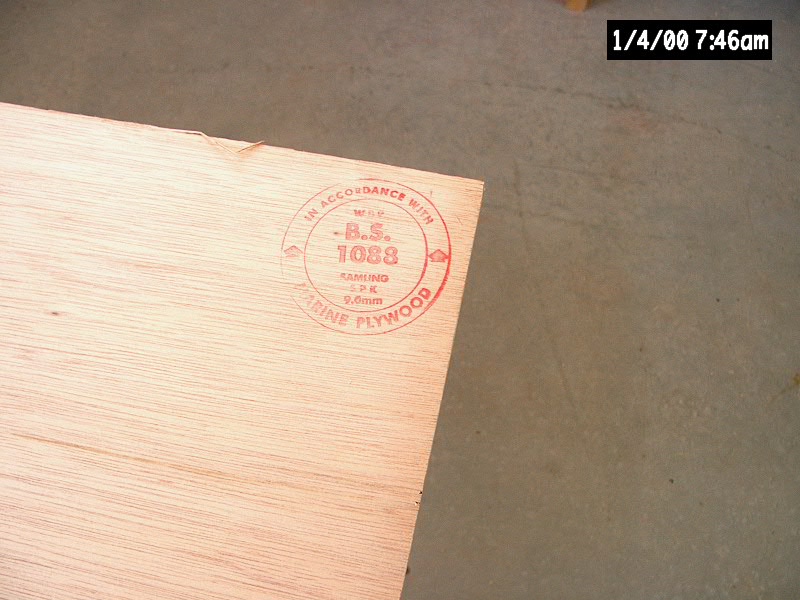
 Anyway,
I chose high quality 9mm Meranti plywood (to BS 1088 standards) to fill
the void in the foredeck, as I have been pleased with this material for
a multitude of uses in the past. Using my template, I cut out a
piece of the plywood to match, and made a few minor modifications after
a test fit showed that the plywood was a bit oversized in a couple
areas. Thinking ahead, I removed sections of the core in way of
the bolt locations for the anchor platform, around the pulpit base
locations, and around the water tank fill at the after end. These
areas were to be filled with solid glass and epoxy. Anyway,
I chose high quality 9mm Meranti plywood (to BS 1088 standards) to fill
the void in the foredeck, as I have been pleased with this material for
a multitude of uses in the past. Using my template, I cut out a
piece of the plywood to match, and made a few minor modifications after
a test fit showed that the plywood was a bit oversized in a couple
areas. Thinking ahead, I removed sections of the core in way of
the bolt locations for the anchor platform, around the pulpit base
locations, and around the water tank fill at the after end. These
areas were to be filled with solid glass and epoxy.
|
|
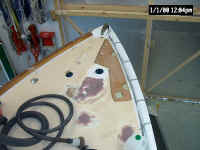
 With
the core cut to size, and the void fully prepared, I installed the core
in place. First, I wet out the core and the inner deck skin with
unthickened epoxy, then I mixed up a fairly loose batch of epoxy
thickened with silica, and toweled it thickly on to the inner deck
skin. I pressed the core into the bed of adhesive, and, as I did
before during the main deck recore, secured it with several temporary
screws. With
the core cut to size, and the void fully prepared, I installed the core
in place. First, I wet out the core and the inner deck skin with
unthickened epoxy, then I mixed up a fairly loose batch of epoxy
thickened with silica, and toweled it thickly on to the inner deck
skin. I pressed the core into the bed of adhesive, and, as I did
before during the main deck recore, secured it with several temporary
screws.
More caveats:
this method worked for me, but will work only with a dense material
like plywood. Were I using balsa or Nida-core, I would support
the deck from beneath and use weights or other means to prevent press
the core into the epoxy, being careful not to weight it so much that
all the epoxy was squeezed out of the joint. Also, the screw
method would not be effective if installing core into a finished area
of the boat, since the screws penetrate the inner skin. When I
did the main recore, the interior was unfinished--hence, no
harm. And in this instance, the area being recored is entirely
located above the unfinished chain locker forward. All this
being said, there is no harm from using the screws.
|
|
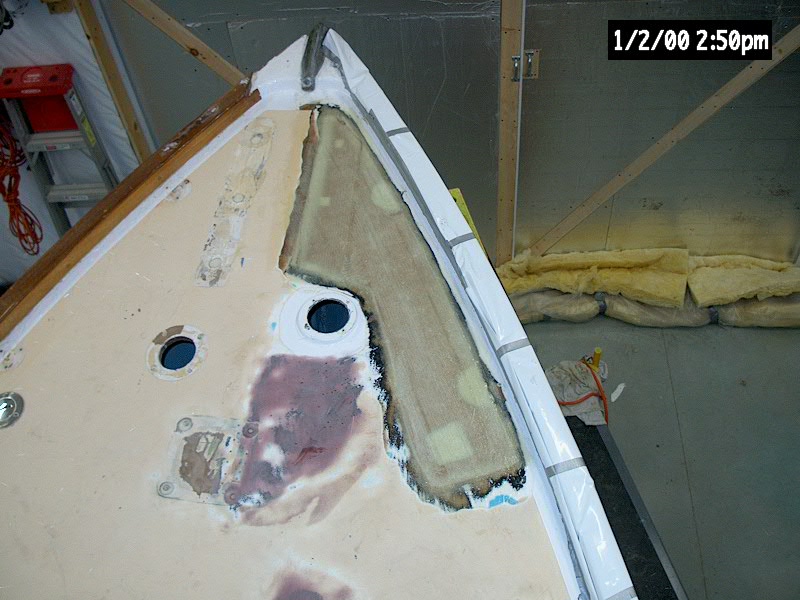
 Once
the core was secured in place, I spent some time removing the epoxy that
oozed out all around, and filling the gaps around the edges full of the
thickened epoxy. I also removed most of the spillout from the
larger core cutouts around the stanchion bases and water tank fill,
since I planned to install fiberglass in these areas. I left the
solid, thickened epoxy in place in the three openings around the anchor
platform boltholes. With this done, I left the core to cure, and
worked on other projects. Later, I cut some 17 oz. biaxial cloth
to size and installed 4 layers in each of the larger openings, filling
them a bit more than halfway. I didn't dare add any more glass at
the time, to prevent overheating as it cured. Later, I filled the
voids the rest of the way with material, finishing up with some
thickened epoxy to bring the voids flush with the surrounding plywood.. Once
the core was secured in place, I spent some time removing the epoxy that
oozed out all around, and filling the gaps around the edges full of the
thickened epoxy. I also removed most of the spillout from the
larger core cutouts around the stanchion bases and water tank fill,
since I planned to install fiberglass in these areas. I left the
solid, thickened epoxy in place in the three openings around the anchor
platform boltholes. With this done, I left the core to cure, and
worked on other projects. Later, I cut some 17 oz. biaxial cloth
to size and installed 4 layers in each of the larger openings, filling
them a bit more than halfway. I didn't dare add any more glass at
the time, to prevent overheating as it cured. Later, I filled the
voids the rest of the way with material, finishing up with some
thickened epoxy to bring the voids flush with the surrounding plywood..
|
|
|
|
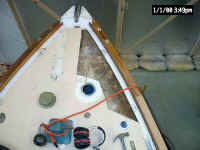
 To
prepare for final fiberglassing (the top skin was not in good enough
shape to reuse, given the myriad holes in it), I installed some more of
the thickened epoxy filler around the edges, creating fillets to make up
the slight difference in height where needed. This will allow the
fiberglass layers to overlap onto the surrounding deck as needed, tying
in the repair with the rest of the structure. I left the fairing
to cure overnight. To
prepare for final fiberglassing (the top skin was not in good enough
shape to reuse, given the myriad holes in it), I installed some more of
the thickened epoxy filler around the edges, creating fillets to make up
the slight difference in height where needed. This will allow the
fiberglass layers to overlap onto the surrounding deck as needed, tying
in the repair with the rest of the structure. I left the fairing
to cure overnight.
|
|
The next morning, the fairing was cured
enough to fiberglass over--though it seemed to be curing very slowly,
leading me to believe that I had mixed the material at slightly the
incorrect ratio. However, it was curing, and all
indications were that it would cure fully given enough time. I
decided to go ahead with glassing over.
 I
cut enough material for two layers to cover the patch (17 oz. biaxial
cloth) and overlap as needed onto the surrounding deck, and then mixed
up enough epoxy for the job. Laminating was straightforward, and I
was pleased with the end result. I
cut enough material for two layers to cover the patch (17 oz. biaxial
cloth) and overlap as needed onto the surrounding deck, and then mixed
up enough epoxy for the job. Laminating was straightforward, and I
was pleased with the end result.
Late in the day, the
fiberglass had kicked sufficiently for me to mix and trowel on a coat of
fairing putty, the first of several required. I left the
putty--and the glass beneath--to cure overnight.
|
|
|
|
 The
next day, after a thorough rough sanding, the foredeck section was ready
for the first of several (2 or 3) applications of a smoother fairing
putty--System Three Quik-Fair. I mixed up a batch and troweled it
on, covering the whole area. The Quik-Fair is supposed to set
within 3-4 hours to sandable state, but it was still too gummy to sand
at the end of the day, so I left it overnight. (Must be just that
much too cool in the shop...) The
next day, after a thorough rough sanding, the foredeck section was ready
for the first of several (2 or 3) applications of a smoother fairing
putty--System Three Quik-Fair. I mixed up a batch and troweled it
on, covering the whole area. The Quik-Fair is supposed to set
within 3-4 hours to sandable state, but it was still too gummy to sand
at the end of the day, so I left it overnight. (Must be just that
much too cool in the shop...)
The
next day, I sanded the compound and applied a second coat as
necessary. Again, after allowing the material to fully cure, I
sanded it, only to find that it required another spot application of
filler here and there to take care of some minor unevenness.
Perhaps the longest part of any recore job is the final fairing, as it
seems to require inordinate amounts of waiting time, if not actual
application time (5 minutes of application and up to 24 hours to wait
till the patch can be sanded...) |
|
|
|
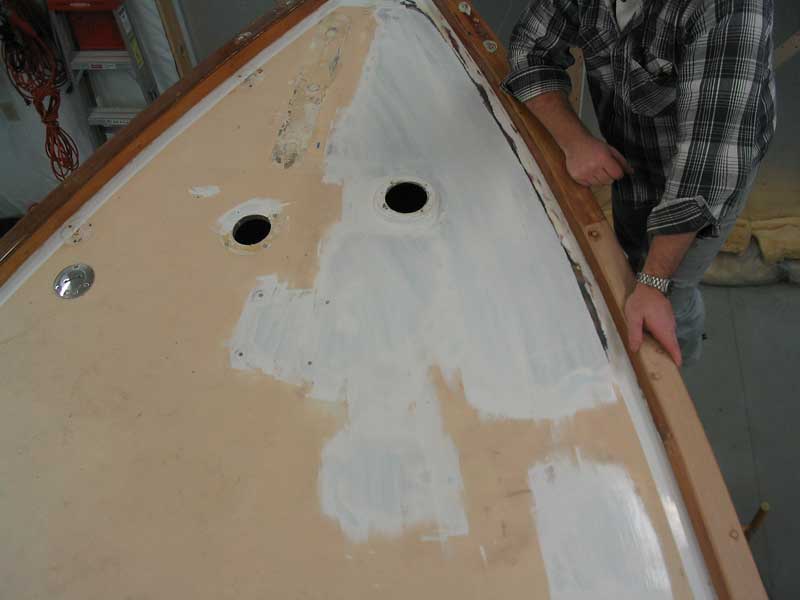
 With
the fairing finally complete, I coated the patched areas with
unthickened resin to seal, and, after waiting a day for the resin to
cure, I sanded it smooth and applied a coat of Interlux Brightside white
primer in preparation for the eventual nonskid application. I left
a strip unprimed along the toerail, since that area will receive Awlgrip
primer and Awlgrip, and the Brightside primer is incompatible with those
strong solvents. With
the fairing finally complete, I coated the patched areas with
unthickened resin to seal, and, after waiting a day for the resin to
cure, I sanded it smooth and applied a coat of Interlux Brightside white
primer in preparation for the eventual nonskid application. I left
a strip unprimed along the toerail, since that area will receive Awlgrip
primer and Awlgrip, and the Brightside primer is incompatible with those
strong solvents.
|
|
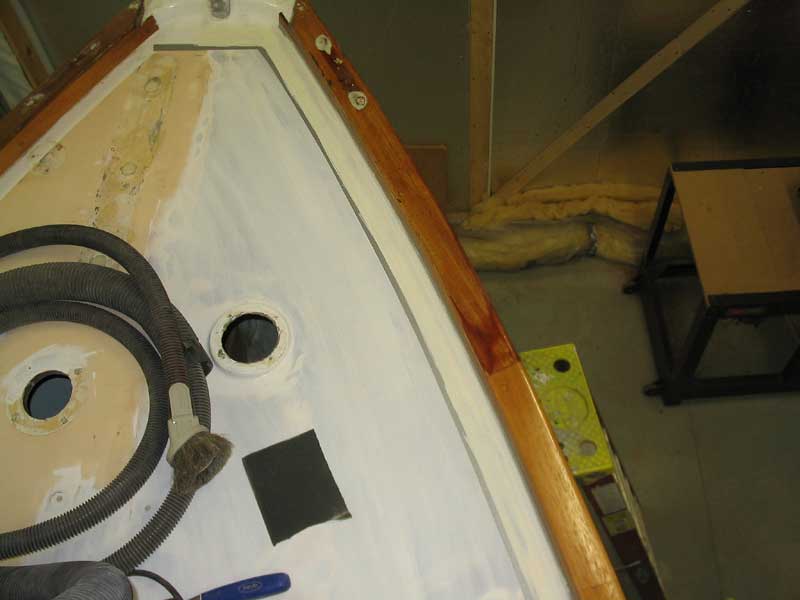
Since the entire
nonskid surface of the deck and coachroof was slated for refinishing, I
left the primed areas on the foredeck (and the mast step) in their
primed state, awaiting eventual final sanding and refinishing.
Before the nonskid was to be painted, I wanted to prime and paint the
white deck edge with Awlgrip, so I proceeded with that step. The
area requiring paint was only about 10 feet or less in length, and just
along the outer deck edge outboard of the nonskid area.
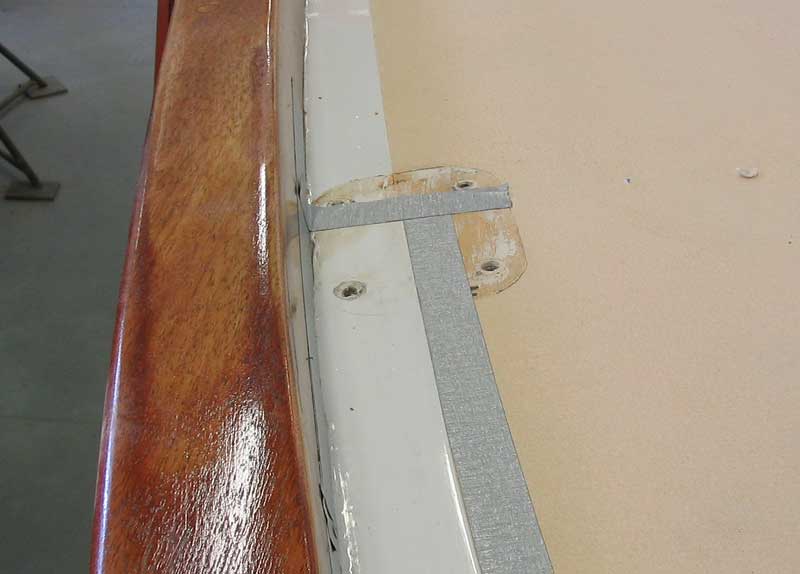
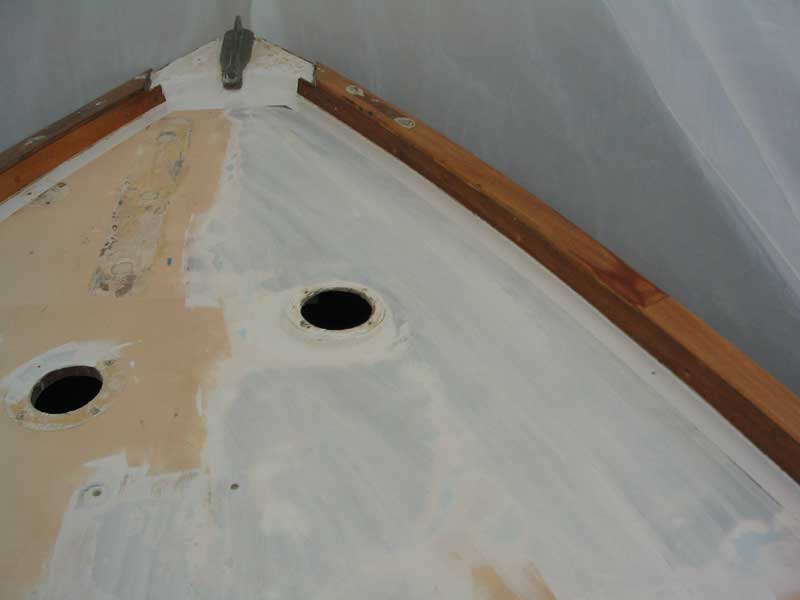
 When
completing this deck repair, I originally gave thought as to where to
create the "seam" in the Awlgrip paint that would be needed to
patch the deck edge. Awlgrip is next to impossible to blend, so I
decided to remove the forwardmost stanchion base on the starboard side,
which would give me an invisible place to create the transition between
existing paint and the new. The centerline seam, located at the
stem, would be invisible beneath the anchor platform when it was
reinstalled, so there was no trouble with that end. When
completing this deck repair, I originally gave thought as to where to
create the "seam" in the Awlgrip paint that would be needed to
patch the deck edge. Awlgrip is next to impossible to blend, so I
decided to remove the forwardmost stanchion base on the starboard side,
which would give me an invisible place to create the transition between
existing paint and the new. The centerline seam, located at the
stem, would be invisible beneath the anchor platform when it was
reinstalled, so there was no trouble with that end.
|
|
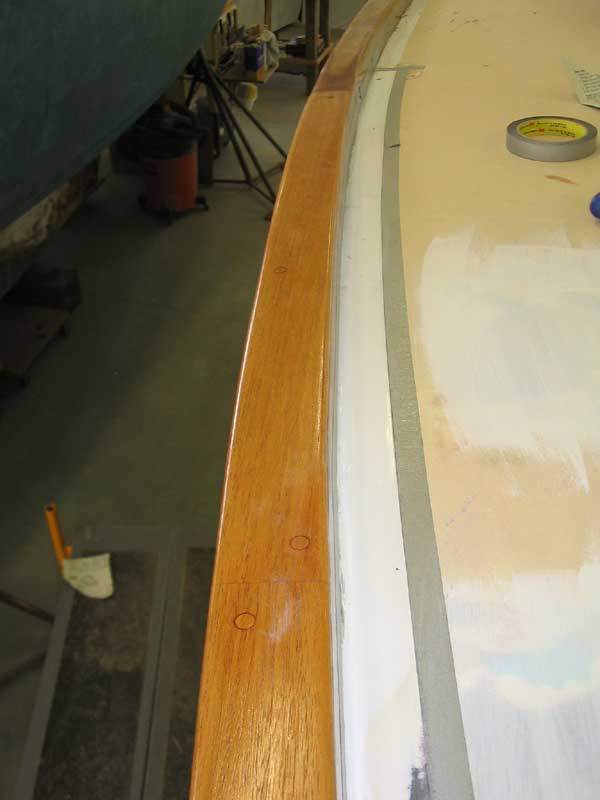
 Using
a scribe, much as I did when I originally painted the decks three years
ago, I marked a new line about 2" from the toerail, holding the
scribe along the inside of the rail and drawing the corresponding line
on the deck. I simply set the scribe to the same width as the
existing paint, and when the line was marked I applied some of my
favorite silver masking tape along the line, being careful to keep a
smooth and fair line that blended in well with the existing portion just
aft of the repair. I taped all the way back to the first stanchion
base location, and taped across the stem as well. Where the two
sections of tape overlapped, I used a quarter to create a pleasing curve
to the paint line, for a nice rounded corner (just as I did during the
original painting project). To complete the taping, I taped the
inside of the toerail to protect it. Using
a scribe, much as I did when I originally painted the decks three years
ago, I marked a new line about 2" from the toerail, holding the
scribe along the inside of the rail and drawing the corresponding line
on the deck. I simply set the scribe to the same width as the
existing paint, and when the line was marked I applied some of my
favorite silver masking tape along the line, being careful to keep a
smooth and fair line that blended in well with the existing portion just
aft of the repair. I taped all the way back to the first stanchion
base location, and taped across the stem as well. Where the two
sections of tape overlapped, I used a quarter to create a pleasing curve
to the paint line, for a nice rounded corner (just as I did during the
original painting project). To complete the taping, I taped the
inside of the toerail to protect it.
|
|
 With
the taping done, I sanded the 2" wide area with 220 grit sandpaper,
which removed the small amount of Brightside primer that was inside the
tape line, and also roughed up the surface of the already-painted area
aft of the repair, onto which I would apply the new coats of
paint. After cleaning the area to remove dust, I solvent washed it
with the appropriate US Paint product (Awl-Prep), and applied a coat of
one of my least-favorite products: Awl-Quik primer. I used
it because I had it on hand (and didn't have any of the preferred 545
primer), and the area was so small as to not particularly
matter. With
the taping done, I sanded the 2" wide area with 220 grit sandpaper,
which removed the small amount of Brightside primer that was inside the
tape line, and also roughed up the surface of the already-painted area
aft of the repair, onto which I would apply the new coats of
paint. After cleaning the area to remove dust, I solvent washed it
with the appropriate US Paint product (Awl-Prep), and applied a coat of
one of my least-favorite products: Awl-Quik primer. I used
it because I had it on hand (and didn't have any of the preferred 545
primer), and the area was so small as to not particularly
matter.
|
|
 Over
the course of two days, I applied three coats of Awl-Quik primer. I
mixed one small batch (1 Tbs each of base and converter, plus appropriate
reducer) and applied two coats over a period of a few hours one afternoon;
I stored it in the fridge overnight, which allowed me to reuse it the next
day for the third and final coat. Over
the course of two days, I applied three coats of Awl-Quik primer. I
mixed one small batch (1 Tbs each of base and converter, plus appropriate
reducer) and applied two coats over a period of a few hours one afternoon;
I stored it in the fridge overnight, which allowed me to reuse it the next
day for the third and final coat.
|
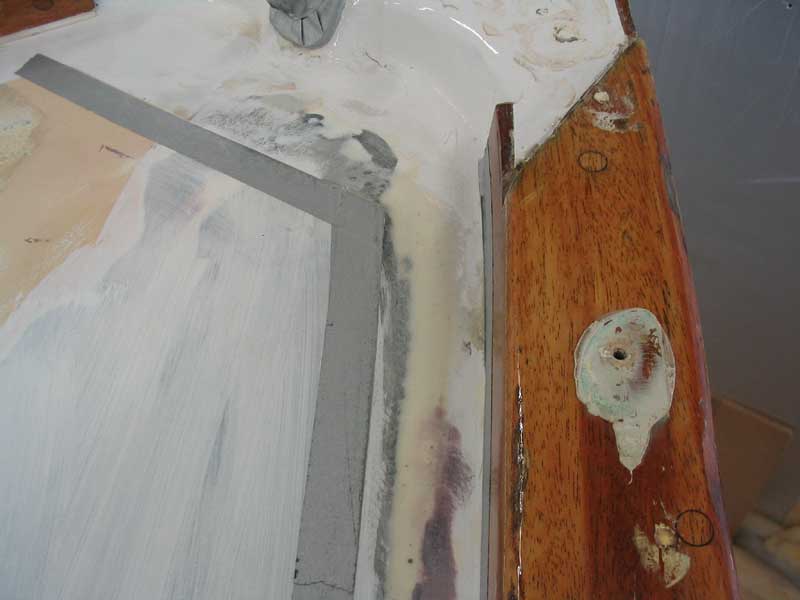
After the third coat dried overnight, I
sanded the primed area with 320 grit paper to smooth it. The
primer had laid down fairly well, so it was easy to sand the area
smooth. After cleaning away the dust and solvent washing, I
prepared a small batch of Snow White Awlgrip to paint the deck
edge. I mixed the product as required and brushed it on the thin
strip around the deck, using a foam brush. The foam brushes work
OK for small areas, but they don't lay the material down the way those
expensive badger brushes do. Because it's impossible to mix a tiny
batch of Awlgrip (at least with the measuring cups I had around), I had
plenty left over, so I stored it in the fridge in the hopes that I could
use it the next day to apply one final coat, which would then complete
the Awlgrip portion of the painting.
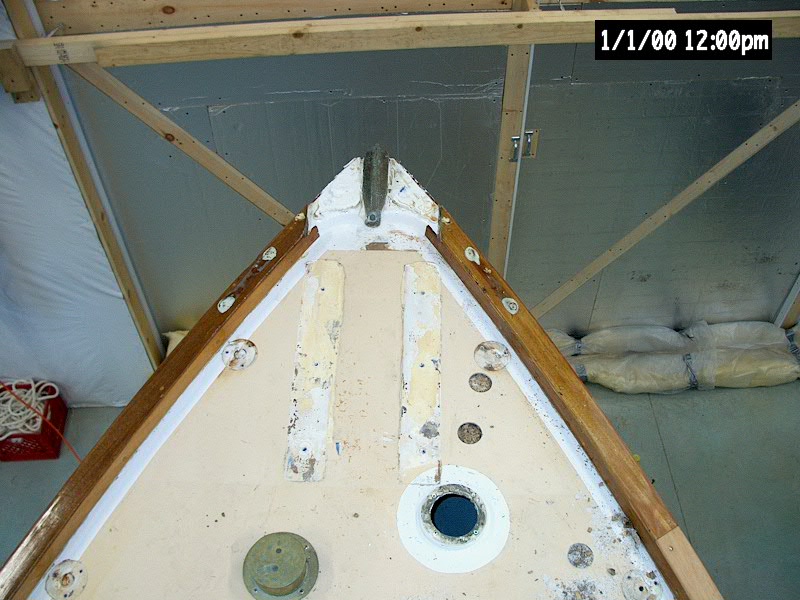
 The
next day, I sanded the first coat lightly with 320 grit, and applied
a second--and, as it turned out--final coat of Awlgrip, using the
product I saved overnight in the fridge. I only added a bit of
reducer to decrease the viscosity. Remember: only the thin
strip at the deck edge is Awlgrip. The inner portion, which still
looks terrible in this photo, is coated with Brightside primer. The
next day, I sanded the first coat lightly with 320 grit, and applied
a second--and, as it turned out--final coat of Awlgrip, using the
product I saved overnight in the fridge. I only added a bit of
reducer to decrease the viscosity. Remember: only the thin
strip at the deck edge is Awlgrip. The inner portion, which still
looks terrible in this photo, is coated with Brightside primer.
To complete the foredeck work, all that
remained was to repaint all the nonskid on the entire deck.
Please click here to read about that project.
|
|


