|
Fuel Tank: Out With
the Old and In With the New
This page was updated
on 29 May 2000
Removal
Installation/Replacement
|
|
 REMOVAL REMOVAL
24 September 1999
Glissando is an East Coast Triton, which means that the fuel tank is located in the starboard cockpit locker. It's location there blocks useful storage and
access to the engine and stuffing box, and the off-center weight is not ideal. I decided to remove the tank and replace it; I have plans to relocate a new tank beneath the cockpit sole.
Because I had removed the galley anyway, accessing the tank for removal was easy. The monel tank was attached to the hull with four sections of fiberglass tabbing, which were easily pulled away or, when necessary, cut with a sawz-all. I removed the fill hose with moderate difficulty, cutting the hose where it attached to the tank nipple. I also removed the tank vent fitting and fuel
pickup fitting, as they are in the way when sliding the tank forward.
|
|
 To remove the tank, it is necessary to temporarily remove the two scupper hoses from the sidedeck and cockpit, allowing the tank to fit beneath. I also cut a small amount off one of the fiberglass nipples at the top end of the hose, which gave me an extra inch of space. It was then a simple matter of maneuvering the tank up, forward and out through the
access panel behind the galley--made simple by the complete absence of the galley. I don't know how it would be to try to get the tank through an existing galley, but it would be harder. To remove the tank, it is necessary to temporarily remove the two scupper hoses from the sidedeck and cockpit, allowing the tank to fit beneath. I also cut a small amount off one of the fiberglass nipples at the top end of the hose, which gave me an extra inch of space. It was then a simple matter of maneuvering the tank up, forward and out through the
access panel behind the galley--made simple by the complete absence of the galley. I don't know how it would be to try to get the tank through an existing galley, but it would be harder.
We're
not reusing the old tank. (Sorry--already gave it away.) Read on for
the installation of the new tank.
|
|
INSTALLING
A NEW FUEL TANK
23,24,27 May 2000
After worrying and agonizing
more or less forever, I finally got down to the business of finding a fuel tank
to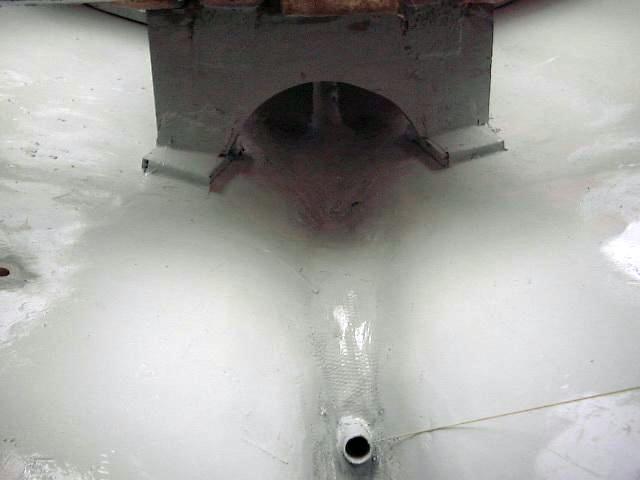 fit. I hated where the old tank had been located--it was off center and too far
aft, and completely blocked access to a useful cockpit locker--so I wanted to
install a new tank immediately beneath the cockpit sole. There's a good
amount of space here, but the slope of the hull and a plywood brace (essential)
supporting the cockpit limited the height of the tank to a seemingly impossible
9". Plus, I didn't want the tank to extend too far forward and block
off decent access to the stuffing box.
fit. I hated where the old tank had been located--it was off center and too far
aft, and completely blocked access to a useful cockpit locker--so I wanted to
install a new tank immediately beneath the cockpit sole. There's a good
amount of space here, but the slope of the hull and a plywood brace (essential)
supporting the cockpit limited the height of the tank to a seemingly impossible
9". Plus, I didn't want the tank to extend too far forward and block
off decent access to the stuffing box.
I measured the area and came
up with dimensions that I planned to use for a custom tank. The more
I thought about it, though, the more I figured such a tank would cost more than
I wanted to spend, and would be too small to be of real value. I wanted
some decent fuel capacity.
|
|
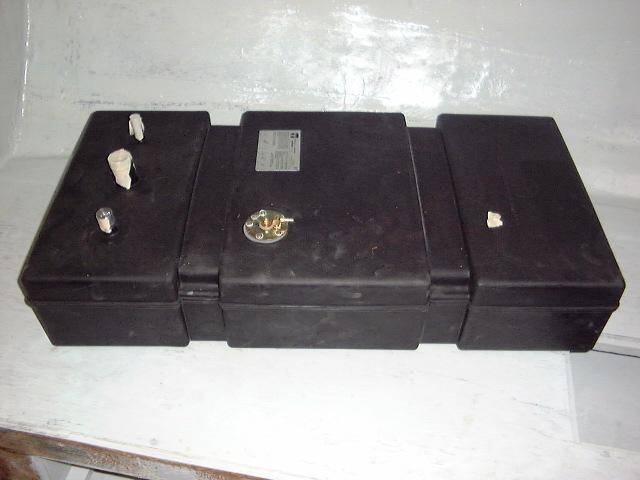 After looking through several
catalogs, I found a tank at West Marine that I thought would fit. It's a
Tempo 16.5 gallon poly tank, measuring 9" tall (to the top of the fill
neck; the tank itself is only about 7.5"), 18" wide and 36"
long. By using a longer tank, situated with the longest dimension
athwartships, I hoped to be able to have the fill neck and vent extend just
outside of the cockpit well, thus allowing for enough clearance. My
measurements seemed to indicate that it would work. With some trepidation,
I ordered the tank and a diesel conversion kit. After looking through several
catalogs, I found a tank at West Marine that I thought would fit. It's a
Tempo 16.5 gallon poly tank, measuring 9" tall (to the top of the fill
neck; the tank itself is only about 7.5"), 18" wide and 36"
long. By using a longer tank, situated with the longest dimension
athwartships, I hoped to be able to have the fill neck and vent extend just
outside of the cockpit well, thus allowing for enough clearance. My
measurements seemed to indicate that it would work. With some trepidation,
I ordered the tank and a diesel conversion kit.
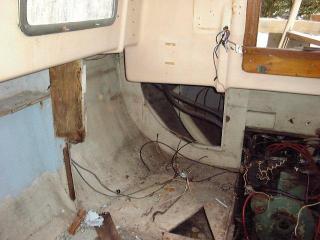
When the tank arrived, I was
thrilled to find that it fit exactly as I had hoped, with room to spare.
There's plenty of room beneath the tank to reach the stuffing box, and the fill
and vent necks are easily accessible from the cockpit locker. The only way
in for the tank is through the opening at the rear of the engine room, so it had
to go in before the engine.
|
|
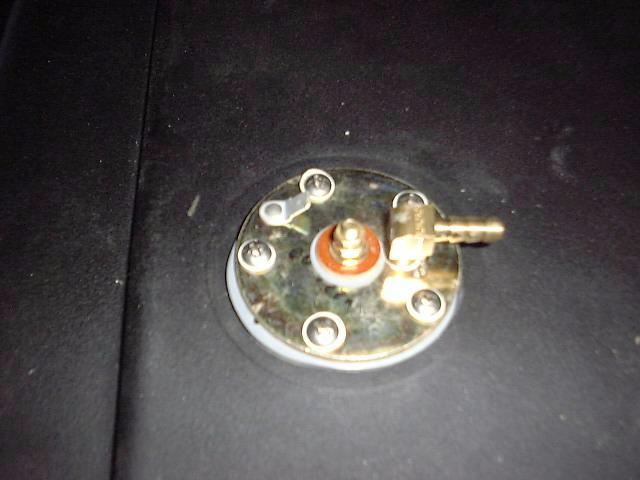
 First,
though, I went about adding the fuel return fitting. It was a simple
matter of removing the supplied sending unit and replacing the plate with a new
one that includes a barbed fitting for a return fuel line. Nothing
to it. First,
though, I went about adding the fuel return fitting. It was a simple
matter of removing the supplied sending unit and replacing the plate with a new
one that includes a barbed fitting for a return fuel line. Nothing
to it.
|
|
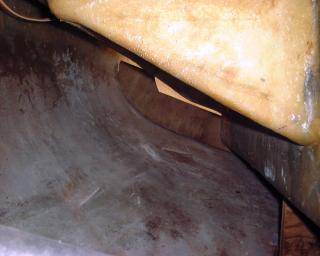
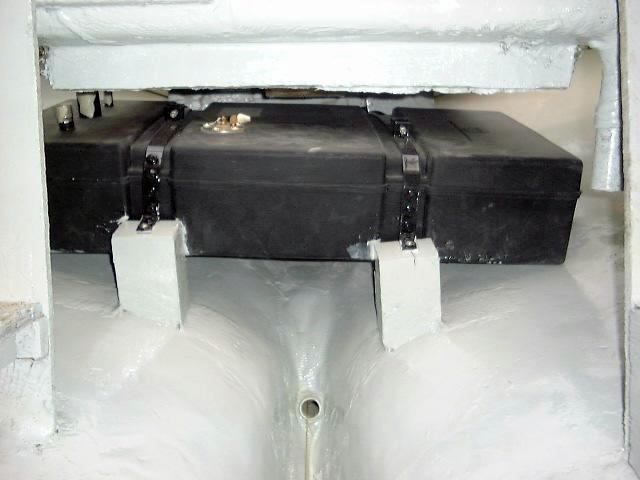 The next day, I began the process of
permanently installing the tank beneath the cockpit, and securing it in
place. I had ordered a Tempo hold-down kit, consisting of flexible
vinyl-coated metal straps, but first I had to epoxy some wood blocks to the hull
to secure the strapping to. This was a simple matter of cutting angles on
the bases of the blocks to roughly conform to the shape of the hull, and then
gluing them in place with thickened epoxy. I installed blocks on either
side of the tank, and forward the tank in line with the recessed strap
channels. The blocks were installed with the tank in place, since there
would not be enough clearance to pass the tank by afterwards. After the
epoxy had cured for several hours, I glassed the forward two blocks--the ones to
which the straps will attach--to the hull with several layers of roving. The next day, I began the process of
permanently installing the tank beneath the cockpit, and securing it in
place. I had ordered a Tempo hold-down kit, consisting of flexible
vinyl-coated metal straps, but first I had to epoxy some wood blocks to the hull
to secure the strapping to. This was a simple matter of cutting angles on
the bases of the blocks to roughly conform to the shape of the hull, and then
gluing them in place with thickened epoxy. I installed blocks on either
side of the tank, and forward the tank in line with the recessed strap
channels. The blocks were installed with the tank in place, since there
would not be enough clearance to pass the tank by afterwards. After the
epoxy had cured for several hours, I glassed the forward two blocks--the ones to
which the straps will attach--to the hull with several layers of roving.
|
|
  Before setting the tank in place, I had
secured the after sections of the hold-downs, since that area would be impossible
to get to afterwards. Once the resin kicked, I then secured the forward
sections, and bolted the two loosely together at the top of the tank. The
plastic tank will expand when filled, and the straps need to be kept slightly
loose. Then, I painted the new blocks and glass to blend with the surrounding hull, and the fuel tank installation was complete. I know, the
installation is pretty ugly, and the tank is angled slightly towards the port
side (the right side of the photo); this is a little bit of an experiment.
I figure that with the pickup located a little higher than the lowest part of
the tank, I may be able to prevent any debris that ends up in the tank from
being sucked into the fuel lines. I can always shim that side of the tank
up a bit if need be to make it level. For now, I'm going to leave it as
is. Before setting the tank in place, I had
secured the after sections of the hold-downs, since that area would be impossible
to get to afterwards. Once the resin kicked, I then secured the forward
sections, and bolted the two loosely together at the top of the tank. The
plastic tank will expand when filled, and the straps need to be kept slightly
loose. Then, I painted the new blocks and glass to blend with the surrounding hull, and the fuel tank installation was complete. I know, the
installation is pretty ugly, and the tank is angled slightly towards the port
side (the right side of the photo); this is a little bit of an experiment.
I figure that with the pickup located a little higher than the lowest part of
the tank, I may be able to prevent any debris that ends up in the tank from
being sucked into the fuel lines. I can always shim that side of the tank
up a bit if need be to make it level. For now, I'm going to leave it as
is.
|
|
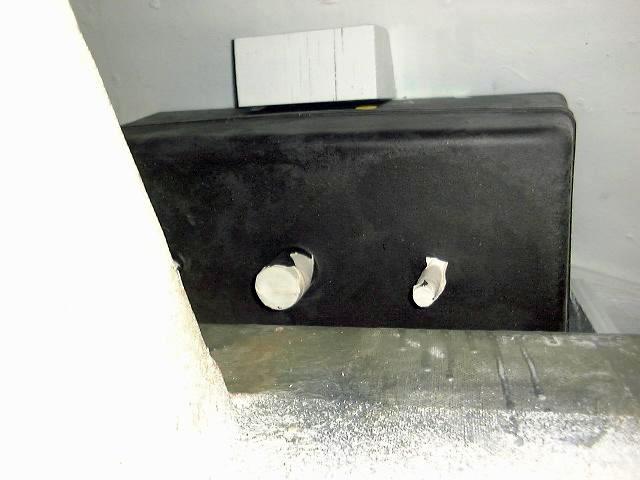
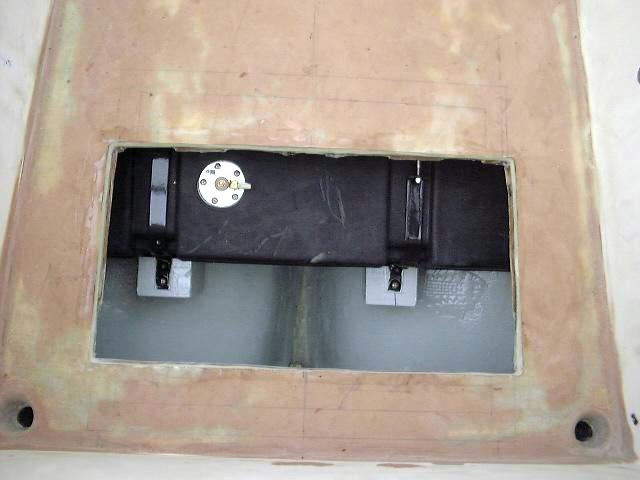
The location of the tank allows good access to
the fuel fill neck and vent fitting through the starboard cockpit locker (left
photo, above). There is good access to the tank straps and fuel gauge
sender through the new cockpit access hatch (right photo, above).
Once the hoses are installed, I will build some sort of protective barrier over
and around the fill and vent necks, so that stuff that ends up in the cockpit
locker won't damage them.
Please click here
to see the rest of the fuel system being installed.
|
|