|
Cockpit Scuppers Redux
This page was last updated on 6 June 2004. |
For three seasons, and even back into the
restoration work before, the cockpit scuppers had been a headache.
Earlier, during the main restoration, I had removed the original
fiberglass through-hull tubes and replaced them with flanged bronze
seacocks. Dumbly, I placed the seacocks in the same place that the
original tubes had been, but this created alignment and space issues in
the tight area beneath the cockpit. Had I known better, or even
thought about it more, I could have simply changed the location of these
seacocks, thereby eliminating many of the issues I faced down the
road. It's always a learning experience, and there's always room for
improvement!
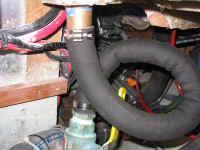 After
the fiberglass "Y"-type fittings beneath the cockpit began to
fail, I decided during the winter of 2004 to address these fittings once
and for all, and replaced them with new bronze drains--a not-insignificant
project by any means. While I was pleased with the new fittings, I
found, once the boat was launched, that the new hoses I had installed were
not allowing water to drain properly. With the shortsightedness
borne of intense frustration, I had, after literally days of fighting,
installed long hoses that formed sharp loops between the cockpit fittings
and the seacocks. It was the only way I could get hardwall,
reinforced hoses to fit in the space. Testing at the time, with the
boat on the hard, indicated that the scuppers drained just fine. After
the fiberglass "Y"-type fittings beneath the cockpit began to
fail, I decided during the winter of 2004 to address these fittings once
and for all, and replaced them with new bronze drains--a not-insignificant
project by any means. While I was pleased with the new fittings, I
found, once the boat was launched, that the new hoses I had installed were
not allowing water to drain properly. With the shortsightedness
borne of intense frustration, I had, after literally days of fighting,
installed long hoses that formed sharp loops between the cockpit fittings
and the seacocks. It was the only way I could get hardwall,
reinforced hoses to fit in the space. Testing at the time, with the
boat on the hard, indicated that the scuppers drained just fine.
|
Memory Aids: (All open in new
window)
Click
here to go back to 2000 and read all about the original scuppers, and some
interim repairs from 2003.
Click here to go
back to 2000 and read about the seacocks I installed.
Click here to return to January
2004 and read about my new cockpit fittings and ill-conceived hoses.
|
For the first few weeks of the 2004 season, I
dealt with the annoyance of discovering that the scupper hoses did not
allow water to drain properly from the cockpit. The severe loops,
and the fact that the loops extended below the waterline, prevented
efficient drainage, and even allowed wave-induced sea water into the
cockpit in small amounts, under certain circumstances. Several
times, after rainy periods, I would go out to the boat to find 3" of
water sloshing in the cockpit, which had to be manually pumped out.
This was stupid; however, I was frustrated, since I had fought with every
type of hose known to man over the past few years, and especially back in
January. Despite my large and comfortable cockpit access hatch, the
access was still ridiculous, and the space between the cockpit fittings
and the seacock nipples--and the variance in angles between the
two--prevented any sort of successful hose installation.
Nonetheless, I knew I had to deal with the
problem--and now. And, reluctantly, I thought I knew the
answer.
|
|
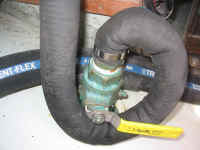
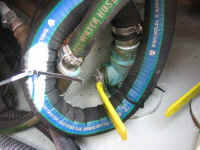
These photos show the port (left) and
starboard hoses just before I removed them for replacement with my new
short ones. The fact that both are pulled down so low is a result of
my attempts during the previous weeks to make the hoses work; pulling the
loops down seemed to help when first done, but didn't have any overall
helpful effect.
|
I had always eschewed the use of
automotive-type radiator hose for below-waterline fittings, believing that
it was normally better to chose one of the extra heavy-duty
marine-application hoses with their dense, thick rubber hardwalls and
stainless steel reinforcing helix--or even fabric reinforcing plies.
I felt--and still feel--that the stronger the hose, the better, and when
using the heaviest hose is a valid option, would always recommend it be
used.
However, it was pretty clear that in this
instance, I had no option: I had to search for a pre-formed rubber
automotive hose that might fit in the space. It seemed the only way
to make the curves and awkward angle transitions in the short space was to
use a hose that was already bent into a similar shape. Heavier hoses
simply could not be forced successfully into position on both ends, and
lightweight hoses tended to kink immediately when the bends became too
intense.
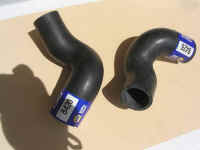 I
headed to the local Napa store, where I browsed a catalog featuring
hundreds of hoses displayed with small pictures. I looked through
the several pages of 1-1/2" hose sections, and identified a couple
types that looked like they might fit. I was looking for hoses that
more or less replicated the tortured curves that I knew would be required
beneath the cockpit, and eventually settled on hose # 8426, which featured
the two-directional curvature I was hoping for, and in approximately the
right length. These hose sections were about 8-3/4" in
length. The local store didn't have them, but fortunately two other
nearby locations did, so within a few hours the hoses had been delivered
to my local store--you have to love that about Napa. I
headed to the local Napa store, where I browsed a catalog featuring
hundreds of hoses displayed with small pictures. I looked through
the several pages of 1-1/2" hose sections, and identified a couple
types that looked like they might fit. I was looking for hoses that
more or less replicated the tortured curves that I knew would be required
beneath the cockpit, and eventually settled on hose # 8426, which featured
the two-directional curvature I was hoping for, and in approximately the
right length. These hose sections were about 8-3/4" in
length. The local store didn't have them, but fortunately two other
nearby locations did, so within a few hours the hoses had been delivered
to my local store--you have to love that about Napa.
|
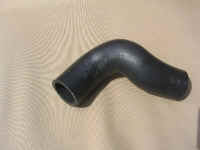 The
hoses did not come cheaply, however: $25 for the pair, though that's
certainly a very small price to pay when you consider that these hoses
would be the only thing between the vastness of the ocean and the tinyness
of my bilge. Never, ever skimp on your through-hull hoses and
clamps. The
hoses did not come cheaply, however: $25 for the pair, though that's
certainly a very small price to pay when you consider that these hoses
would be the only thing between the vastness of the ocean and the tinyness
of my bilge. Never, ever skimp on your through-hull hoses and
clamps.
The hoses feature an internal fabric
reinforcement, and, while much more flexible and softer than the hoses I
was used to, seemed fairly adequate.
|
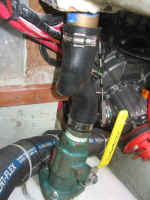 Out
at the boat, I prepared for the replacement by first holding one of the
new hoses roughly in place to check its potential fit. I didn't want
to remove the existing hoses till I was sure: even a malfunctioning
hose in good condition is better than no hose at all. It looked like
the new hoses were just the ticket, so I went ahead and removed the port
scupper hose first. (Yes, the seacocks were closed!) Out
at the boat, I prepared for the replacement by first holding one of the
new hoses roughly in place to check its potential fit. I didn't want
to remove the existing hoses till I was sure: even a malfunctioning
hose in good condition is better than no hose at all. It looked like
the new hoses were just the ticket, so I went ahead and removed the port
scupper hose first. (Yes, the seacocks were closed!)
With the old hose out of the way, I was
able to quickly twist the new hose into place, with a little trial and
error to decide which way was the best way, and which end should go
where. I was pleased how easily the hoses fit over both
ends--cockpit and seacock--and, with some minor effort, I soon had the
hose securely clamped in place and looking far better than anything I had
tried to date. I was thrilled!
|
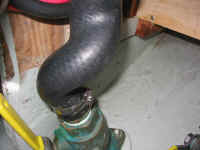 I
repeated the process on the starboard side, with similar results.
All told, replacing both sides took only 15 minutes or so--a far cry from
the hours of toil and discomfort I had endured several times over the past
several years, including my original hose installation way back in
2000--when I had the benefit of an empty boat, with far better access than
I had at any time since. I tugged firmly on all the connections to
ensure the hoses were well and tightly secured. I
repeated the process on the starboard side, with similar results.
All told, replacing both sides took only 15 minutes or so--a far cry from
the hours of toil and discomfort I had endured several times over the past
several years, including my original hose installation way back in
2000--when I had the benefit of an empty boat, with far better access than
I had at any time since. I tugged firmly on all the connections to
ensure the hoses were well and tightly secured.
Sometimes being a stubborn Mainer has its
disadvantages. But whatever the case, I had finally come around, and
was pleased with the results of my hose replacement. Still, I
planned to watch the lighter-weight hoses carefully, over the remainder of
the season and beyond
|
|