|
The New Boom and Gooseneck (Page 5)
This page was last updated on 13 April 2005.
|
|
<Back to Page 4 |
Final Boom Preparations
By the time I had the new boom painted, it
was late in the season. With only a few weeks remaining, I decided
that it would be easier to just wait to do the actual boom transfer till
the boat was at home, giving me lots of time to transfer the old
hardware, install the new gooseneck fitting on the mast, and so forth.
So I finished up the 2004 season using the original boom without
incident. |
 In
early April, on a beautiful, warm day, I pulled the two booms out of
storage and prepared to transfer all the old reefing and outhaul
hardware from the old boom to the new. Because I had liked the
original setup that I had, I had elected to not install internal reefing
equipment on the new boom, though I did have an internal sheave for the
outhaul. In
early April, on a beautiful, warm day, I pulled the two booms out of
storage and prepared to transfer all the old reefing and outhaul
hardware from the old boom to the new. Because I had liked the
original setup that I had, I had elected to not install internal reefing
equipment on the new boom, though I did have an internal sheave for the
outhaul. |
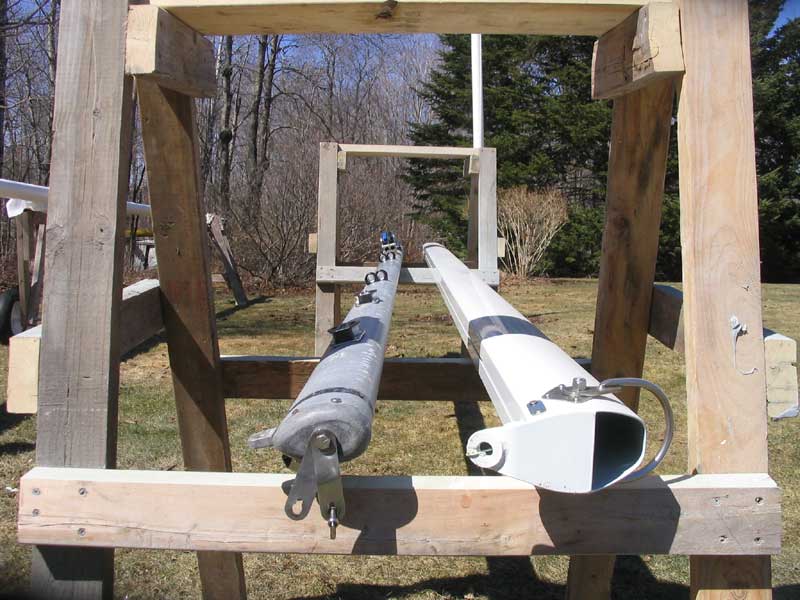
The new boom sure was nicer-looking than the old! I couldn't wait
to get it on the boat. To begin, I laid the two booms side by side
to see how things lined up. Even though, to the eye, the new boom
somehow appeared shorter (probably because it was of wider section), it
actually was longer than the original, so at least I had no worries
about fit. |
 I
began at the mast end and transferred the double line stopper and winch
pad to the new boom. I had ordered a winch pad along with the boom,
which I installed with a single screw through the provided hole; the
screws securing the actual winch would also pass through the pad, further
securing it in place. Beneath each piece of hardware, I applied a
thin bed of polysulfide caulk, mostly as a sort of gasket between the
various metals, in the hope that it would prevent any reactions between
the pieces and prolong the painted finish of the boom. I installed
all the hardware with stainless steel fasteners (the same as removed from
the old boom) into tapped holes in the new spar. I
began at the mast end and transferred the double line stopper and winch
pad to the new boom. I had ordered a winch pad along with the boom,
which I installed with a single screw through the provided hole; the
screws securing the actual winch would also pass through the pad, further
securing it in place. Beneath each piece of hardware, I applied a
thin bed of polysulfide caulk, mostly as a sort of gasket between the
various metals, in the hope that it would prevent any reactions between
the pieces and prolong the painted finish of the boom. I installed
all the hardware with stainless steel fasteners (the same as removed from
the old boom) into tapped holes in the new spar. |
Over a period of 3-4 hours, I carefully removed all the remaining
hardware--line stopper, small fairleads, outhaul blocks, and reefing line
track--and transferred each piece to the same position (roughly) on the
new boom. |
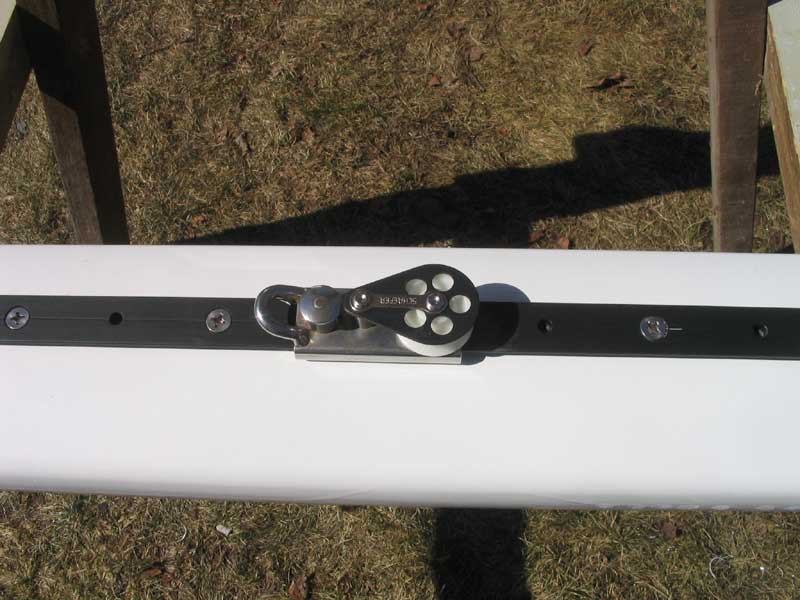
 On
the starboard side of the boom, my reefing setup had previously consisted
of a pair of cheek blocks, through which the reefing lines ran on their
way forward to the winch. These had required careful placement to
ensure that they would provide the correct lead for the reefing lines.
On the new boom, I installed a second length of T-track, similar to that
on the port side (where I had a track section with two movable eyes for
securing the bitter ends of the reefing lines), on which I placed two new
cheek block reefing cars that I had purchased. With the new setup, I
would be able to fine-tune each reefing point for the most advantageous
position, as well as allow for discrepancies in position should I get a
new mainsail in the future. On
the starboard side of the boom, my reefing setup had previously consisted
of a pair of cheek blocks, through which the reefing lines ran on their
way forward to the winch. These had required careful placement to
ensure that they would provide the correct lead for the reefing lines.
On the new boom, I installed a second length of T-track, similar to that
on the port side (where I had a track section with two movable eyes for
securing the bitter ends of the reefing lines), on which I placed two new
cheek block reefing cars that I had purchased. With the new setup, I
would be able to fine-tune each reefing point for the most advantageous
position, as well as allow for discrepancies in position should I get a
new mainsail in the future. |
Amazingly, I had to only run to the hardware store once, for additional
1/4-20 x 3/4" stainless steel flathead screws used to secure the second
set of T-track. I had a number in stock, but was short by about 6. |
 Finally,
I installed a new winch on the winch pad forward. Originally, I had
used an older Barlow winch for this purpose, which worked just fine but
was imperfect; the head of the drum was narrow, and with the winch mounted
horizontally, lines tended to try and come off the drum as it was turned.
A few years back, I had purchased a nice Lewmar #7 winch on Ebay, which I
had intended for use on the mast for the genoa halyard. I had never
gotten around to installing it, and decided that in any event it would be
of more use on the boom for the frequently-used reefing setup, rather than
the set-it-and-forget-it jib halyard. So I installed the new winch
on the base with five stainless steel machine screws, which I drilled and
tapped through the winch base and into the boom extrusion. Finally,
I installed a new winch on the winch pad forward. Originally, I had
used an older Barlow winch for this purpose, which worked just fine but
was imperfect; the head of the drum was narrow, and with the winch mounted
horizontally, lines tended to try and come off the drum as it was turned.
A few years back, I had purchased a nice Lewmar #7 winch on Ebay, which I
had intended for use on the mast for the genoa halyard. I had never
gotten around to installing it, and decided that in any event it would be
of more use on the boom for the frequently-used reefing setup, rather than
the set-it-and-forget-it jib halyard. So I installed the new winch
on the base with five stainless steel machine screws, which I drilled and
tapped through the winch base and into the boom extrusion. |
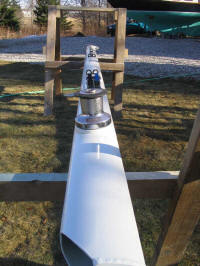
When I disassembled the mast for painting in the
fall, I had measured up to the old gooseneck location and noted the
measurement. Now, I marked that position on the spar in preparation
for locating the new fixed gooseneck.
 Using
the old bronze slide as a guide to help me locate the height of the
mainsail clew--since the boom, and my measurement, were actually slightly
lower than this--I positioned the new gooseneck on the spar in the correct
location. As it happened, a stainless eye strap that I needed for
securing an outhaul block was in the way of the new gooseneck, but with a
very minor adjustment I could incorporate one of the eye stray fasteners
into the gooseneck, so there was no major problem. Using
the old bronze slide as a guide to help me locate the height of the
mainsail clew--since the boom, and my measurement, were actually slightly
lower than this--I positioned the new gooseneck on the spar in the correct
location. As it happened, a stainless eye strap that I needed for
securing an outhaul block was in the way of the new gooseneck, but with a
very minor adjustment I could incorporate one of the eye stray fasteners
into the gooseneck, so there was no major problem. |
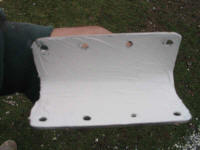
 I
drilled and tapped the mast for the eight 1/4-20 machine screws that
would secure the gooseneck, and after cleaning off the metal shavings, I
coated the back of the gooseneck with polysulfide and secured it
permanently to the mast. I removed the swivel and toggle for
safekeeping until the boom was ready for installation. I
drilled and tapped the mast for the eight 1/4-20 machine screws that
would secure the gooseneck, and after cleaning off the metal shavings, I
coated the back of the gooseneck with polysulfide and secured it
permanently to the mast. I removed the swivel and toggle for
safekeeping until the boom was ready for installation. |
Next: final fitting once the mast is stepped. That's coming on
May 18. |
|