|
Winter Cover: 2001-2002 (Page 2)
COVERING
THE BOAT--11/15/01
Well, about four weeks have passed since my
fall (by the way, the collapse of a gangway and winch system is what led to my
fall by pushing me off the pier--not idiocy on my part!). Finally, I am
back on my feet and going strong. Every day, as I sat inside (well, not
always--it wasn't that bad. I did have a walking cast and could get
around some, but couldn't really do boatwork, ladders, couldn't drive...you get
the point!) I was chomping at the bit waiting to get out and get my boat
covered. I had to send poor Heidi up a half dozen times to clean leaves
and stuff off for me...which wouldn't have been necessary if I had gotten it
covered earlier. Plus, I worried about early snowstorms, the batteries
were still on board and needed to come off...it was driving me crazy.
So, a mere day after being freed from my cast
(albeit with substantial ligament stiffness and some pain from the
not-really-healed bone--that's another story for another place and time), guess
what: I was up covering the boat! The weather forecast was perfect
for the job: sunny, light or nonexistent wind, and abnormal
temperatures nearing 60 degrees.
Before getting to work on the frame, I took
care of a couple nagging projects: winterize the bilge by pumping out as
much water as possible, and then pouring in some pink antifreeze so that I could
run it through the pump. I had to wait a little while for it to warm up
because the water in the bilge was slushed over from the cold night. Once
I got this done, I removed the batteries from their very tight storage areas in the
cockpit lockers--not a fun job. I lowered the batteries to the ground with
a length of line; I'll give them a charge before storing them, and will charge
them every month or so during the winter.
|
|
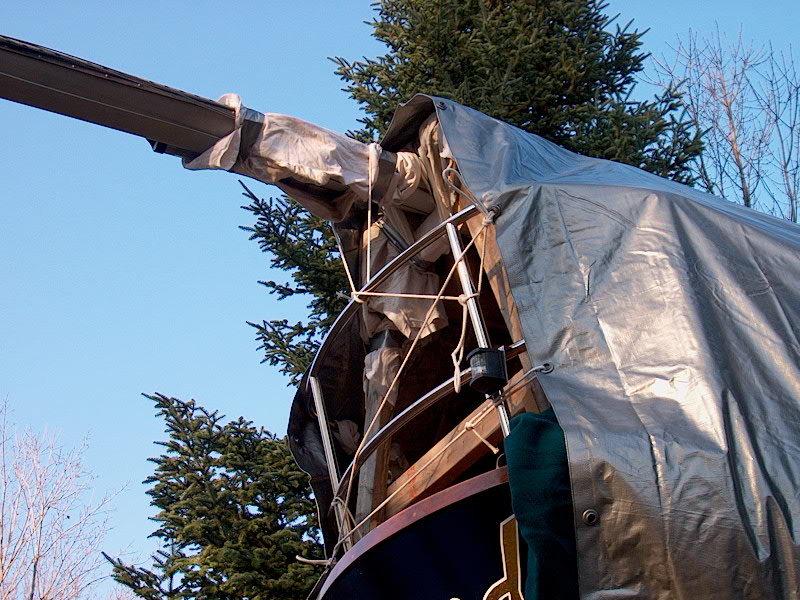
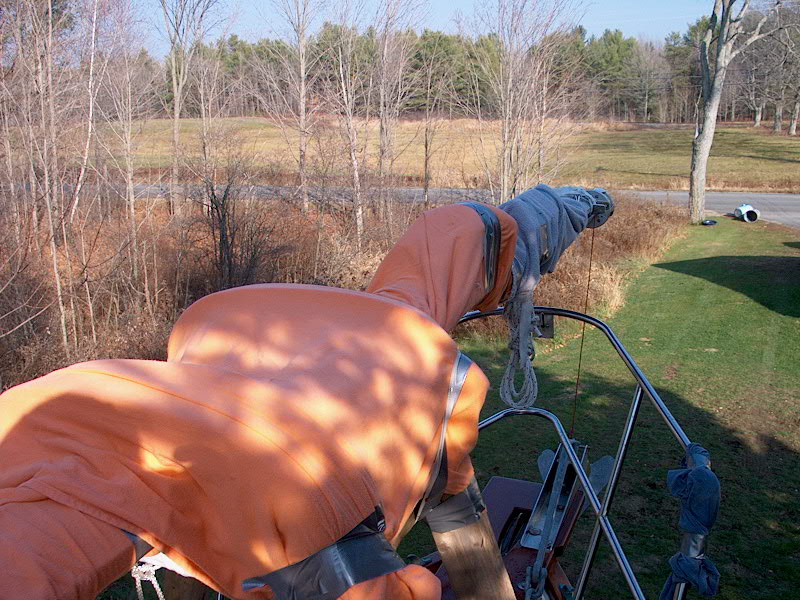 The
next thing to do was to cover the entire mast, which will act as my ridge pole
for the frame, with some old sheets. Because of my impeccable fashion
sense, these sheets had run their course--bright orange might have been nice in
the '70's, but in the 2000's it is relegated to rag status. I wrapped
these sheets around the mast and secured them with duct tape--only to
themselves, not directly to the mast. These cloths will just protect the
mast and cover from chafing. To really protect the cover from chafing on protruding
or sharp areas--for example, the two mast support horses, the halyard winch,
spreader bases, among others--I taped some The
next thing to do was to cover the entire mast, which will act as my ridge pole
for the frame, with some old sheets. Because of my impeccable fashion
sense, these sheets had run their course--bright orange might have been nice in
the '70's, but in the 2000's it is relegated to rag status. I wrapped
these sheets around the mast and secured them with duct tape--only to
themselves, not directly to the mast. These cloths will just protect the
mast and cover from chafing. To really protect the cover from chafing on protruding
or sharp areas--for example, the two mast support horses, the halyard winch,
spreader bases, among others--I taped some  thick
foam (left over from the interior cushions) over the sharp areas and covered the
foam with more cloths. Ugly? Yes...but of course it doesn't
matter. I covered the entire mast from pulpit to pulpit; the overhanging
parts will get covered with plastic bags or something a little later on. thick
foam (left over from the interior cushions) over the sharp areas and covered the
foam with more cloths. Ugly? Yes...but of course it doesn't
matter. I covered the entire mast from pulpit to pulpit; the overhanging
parts will get covered with plastic bags or something a little later on.
|
|
Next, I moved on to the frame itself.
Because of the height and sturdiness of the mast, a strong frame is really not
that crucial. A tarp draped over the mast and directly onto the hull would
shed snow just fine. The problem is, I didn't want a tarp rubbing against
the Awlgrip. This can (and does) abrade the paint. Therefore, I
spent a lot of time thinking through what I might do to prevent this. I
could have draped soft cloths all over, but to buy quality, soft cotton cloths
or flannel is very expensive--we priced it a couple years ago when I was
covering my Ensign, then freshly Awlgripped, for the first time. We ended
up with some relatively cheap blankets, but these did not fully protect the
hull. Not wanting that to happen again, I sought another solution.
Then I got an email from my friend Tim, who
checks in from time to time. He gave the at least the basis for the idea
that I used: plastic electrical conduit. Much of the process that I
am going to describe here was Tim's idea, although I modified things some for my
own situation. There will be some fine-tuning occurring over the next
couple days (and beyond); I'll post updates as required. The important
thing is that, for now, the boat is covered: now I can take a little time to see
how things work and make changes as necessary. It's definitely a learning
experience, and even now, only hours after doing the work, I know that I am
going to make some minor adjustments tomorrow or shortly thereafter.
|
|
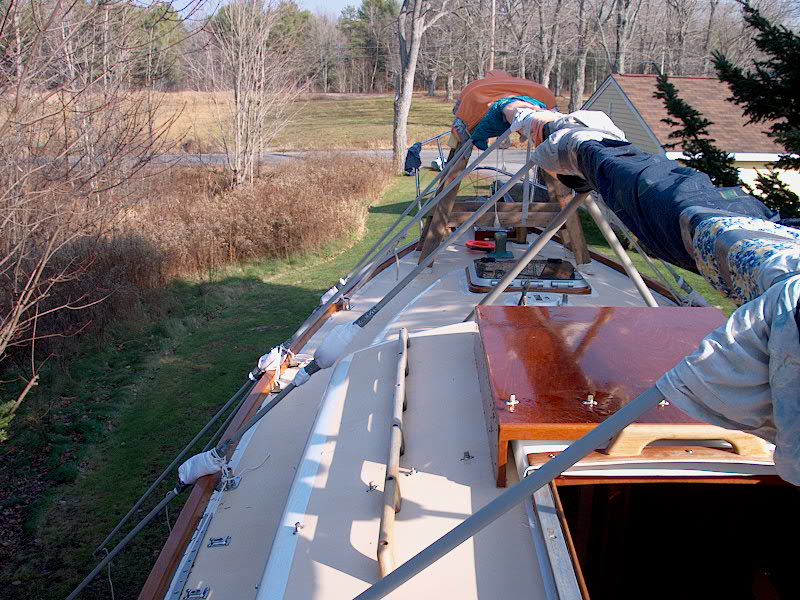 To begin, I ran a length of clothesline
through two 8-foot pieces of 1/2" ID conduit (I'm going to call them
"pipes" from now on--easier). I cut the line so that about 5-6
feet protruded from the end of each pipe, plus about 3-4 inches exposed in the
middle between the two pipes. I taped the line temporarily in place at the
bottom ends, and then draped the arrangement over the mast, with the exposed
line spanning the mast section. Each pipe then ran over the rail and
continued outward. I taped the center part over the mast to hold it in
place. Now, the idea with this setup is that
I would go down and sort of pull the pipes down a bit with the lines that ran
through them. The pipes don't really have to carry much load
ever; their main purpose is to project outward from the hull, so that the cover
will end up being held away from the paint. With the lines run through the
pipes, I can easily adjust the tension to fine tune things. To begin, I ran a length of clothesline
through two 8-foot pieces of 1/2" ID conduit (I'm going to call them
"pipes" from now on--easier). I cut the line so that about 5-6
feet protruded from the end of each pipe, plus about 3-4 inches exposed in the
middle between the two pipes. I taped the line temporarily in place at the
bottom ends, and then draped the arrangement over the mast, with the exposed
line spanning the mast section. Each pipe then ran over the rail and
continued outward. I taped the center part over the mast to hold it in
place. Now, the idea with this setup is that
I would go down and sort of pull the pipes down a bit with the lines that ran
through them. The pipes don't really have to carry much load
ever; their main purpose is to project outward from the hull, so that the cover
will end up being held away from the paint. With the lines run through the
pipes, I can easily adjust the tension to fine tune things.
|
|
 I
installed five sets of these frames, starting at the bow and moving aft.
Anywhere the pipes touched the toerail or cabin trunk (in the doghouse), I
wrapped some soft cloths around to protect the surfaces. Then, I tied the
frames in place at the rail. With the exception of one frame, the one just
forward of the cockpit, the spacing worked out in such a way that there was
always something convenient to tie off to--stanchion bases, chainplates, sheet
winches in the cockpit. For the one remaining frame, I had to run lines
fore and aft to the nearest tie off points to hold it in place. I
installed five sets of these frames, starting at the bow and moving aft.
Anywhere the pipes touched the toerail or cabin trunk (in the doghouse), I
wrapped some soft cloths around to protect the surfaces. Then, I tied the
frames in place at the rail. With the exception of one frame, the one just
forward of the cockpit, the spacing worked out in such a way that there was
always something convenient to tie off to--stanchion bases, chainplates, sheet
winches in the cockpit. For the one remaining frame, I had to run lines
fore and aft to the nearest tie off points to hold it in place.
|
|
 When
I had all five sets of frames complete, I was ready to move down to the ground
to complete the installation. The pipes bent easily as I pulled the lines
running through them tighter. Not knowing how much to tighten them, and
wanting to sort of stiffen up the structure, I pulled things pretty tight, but
left ample room between the hull and the imaginary plane of the tarp. The
pipes stuck out past the rail any where from three or four feet amidships to
nearly five feet near the bow. The pipes flopped around a bit even when I
had tied them off, so I ran lines between the bottom ends of the pipes all the
way around the boat. This may change later. In fact, I'm pretty
positive that, tomorrow, I am going to let the pipes spring back up a little, to
further tension the tarp and keep it farther away from the hull. It was
hard, at the time I was tensioning the lines the first time, to visualize how
the tarp was going to sit over the frames. Now the tarp is on (read on),
and I can see that some adjustments are necessary. Because you, faithful
reader, are getting the fastest updates possible, sometimes things will change
before I am ultimately satisfied. Of course, you'll be the first to know! When
I had all five sets of frames complete, I was ready to move down to the ground
to complete the installation. The pipes bent easily as I pulled the lines
running through them tighter. Not knowing how much to tighten them, and
wanting to sort of stiffen up the structure, I pulled things pretty tight, but
left ample room between the hull and the imaginary plane of the tarp. The
pipes stuck out past the rail any where from three or four feet amidships to
nearly five feet near the bow. The pipes flopped around a bit even when I
had tied them off, so I ran lines between the bottom ends of the pipes all the
way around the boat. This may change later. In fact, I'm pretty
positive that, tomorrow, I am going to let the pipes spring back up a little, to
further tension the tarp and keep it farther away from the hull. It was
hard, at the time I was tensioning the lines the first time, to visualize how
the tarp was going to sit over the frames. Now the tarp is on (read on),
and I can see that some adjustments are necessary. Because you, faithful
reader, are getting the fastest updates possible, sometimes things will change
before I am ultimately satisfied. Of course, you'll be the first to know!
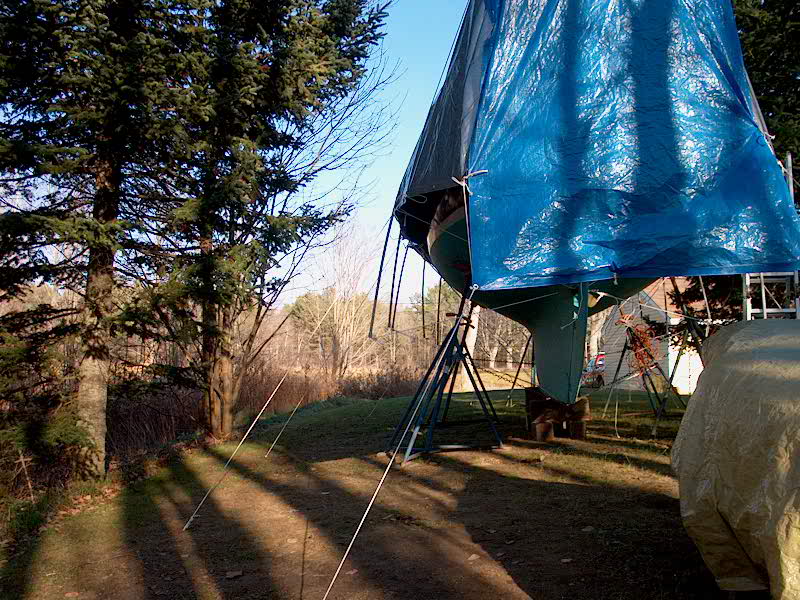
With all the frames on, it was time to put on
the tarp. Note that the frame work and such had taken about four hours,
give or take. I purchased a 15' x 30' heavy-duty silver tarp from Harpster
(www.tarpsonline.com),
about which I had heard good things. They offer a wide variety of tarps in
varying thickness, color and quality. I chose the silver because it was
the heaviest-duty available. First, though, I had to refold it.
Years ago, I was taught a great way to fold tarps for easy and controlled
deployment; if you're not doing this, you should.
Unfold the tarp (they come so tightly folded
from the manufacturer). Then, lengthwise, fold each long end into the
center of the tarp. Do this two or three or more times, depending on the
width of the tarp, until you have the thing folded longitudinally into about a
4-6' parcel. Now, roll from each end to the center. Now, when you
put this up on the boat, it's easy to unfold. Put the folded tarp on the
ridge more or less at the center of the boat, and unroll it lengthwise along the
ridge toward the bow and stern. Then, you can easily unfold the sides and
let them drop down, thanks to your accordion style (or whatever you want to call
it) fold. Trust me, this makes life sooooo easy. If my description
is somehow lacking, let me know.
|
|
 Once
I had refolded the tarp, I brought it up to the boat and, in about 1-1/2
minutes, had it unfolded and draped over the sides. Using the center
grommet, I tied the tarp bow and stern along the mast, tying to whatever I
could. Later, I may find some better tie points (especially at the stern)
and stretch the top of the tarp nice and tight. This ended the work I
needed to do on deck, so I climbed down. Once
I had refolded the tarp, I brought it up to the boat and, in about 1-1/2
minutes, had it unfolded and draped over the sides. Using the center
grommet, I tied the tarp bow and stern along the mast, tying to whatever I
could. Later, I may find some better tie points (especially at the stern)
and stretch the top of the tarp nice and tight. This ended the work I
needed to do on deck, so I climbed down.
Next, I tied the tarp up as required. I
found there were a few places where the tarp was a little closer to the hull
than I might have liked, which is why I know that I will be making some minor
adjustments. I also had to pad the hull at the stern and a little at the
bow to keep the tarp from bearing directly on the paint, but overall the tarp
and frame setup seemed to be working well, even though it needs some adjustment.
|
|
 I
found that my 30 foot tarp seemed quite a bit short, as I could barely stretch
it from bow to stern rails. I think on the transom here I will install a
small tarp to help close up the opening a little more--it's a little more open
then I would prefer. I like to have good airflow through, but this gaping
hole will allow snow to blow right into the cockpit and lazarette. I
found that my 30 foot tarp seemed quite a bit short, as I could barely stretch
it from bow to stern rails. I think on the transom here I will install a
small tarp to help close up the opening a little more--it's a little more open
then I would prefer. I like to have good airflow through, but this gaping
hole will allow snow to blow right into the cockpit and lazarette.
I think my next step will be to allow the
pipes to spring back out a bit, and see if I can tension the tarp a bit more
without it hitting the hull. I'm also going to get some tent stakes and
use them for tie points away from the boat to pull things out a bit more.
Details to follow.
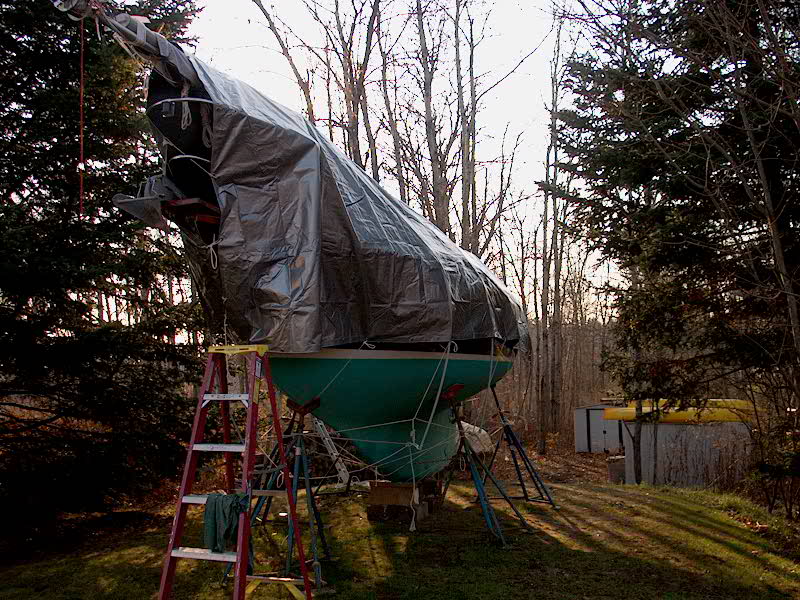
But--the boat is covered! I'll
post some details on the adjustments I make in the near future, as well as any
updates that may be required. (Scroll down..)
|
|
|
|
UPDATE! 11/16/01
So, after only one night, I went back out to
mess around a bit and see if I could improve the overall arrangement of the
cover and frame. I removed the lines I had tied horizontally between the
bottoms of all the frame members, as these just restricted things too much and,
I discovered, really weren't necessary when the cover was in place. Then,
I loosened all the lines running through the pipes and under the boat; this
allowed the pipes to spring back outwards a bit, pulling the cover farther away
from the hull. I rerouted a couple of the tie-downs on the cover to better
take advantage of the frames' ability to hold things away from the boat. (See
the detail photos below--click on the thumbnails.)
|
 |
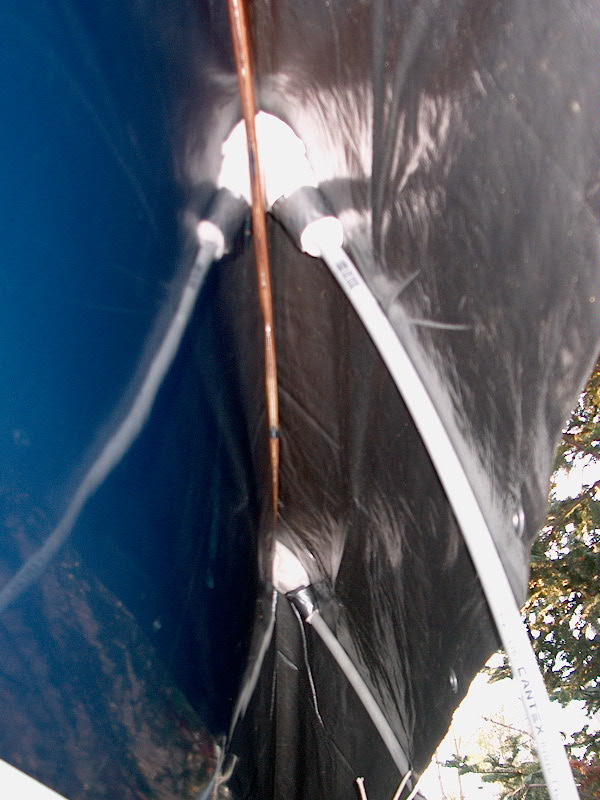
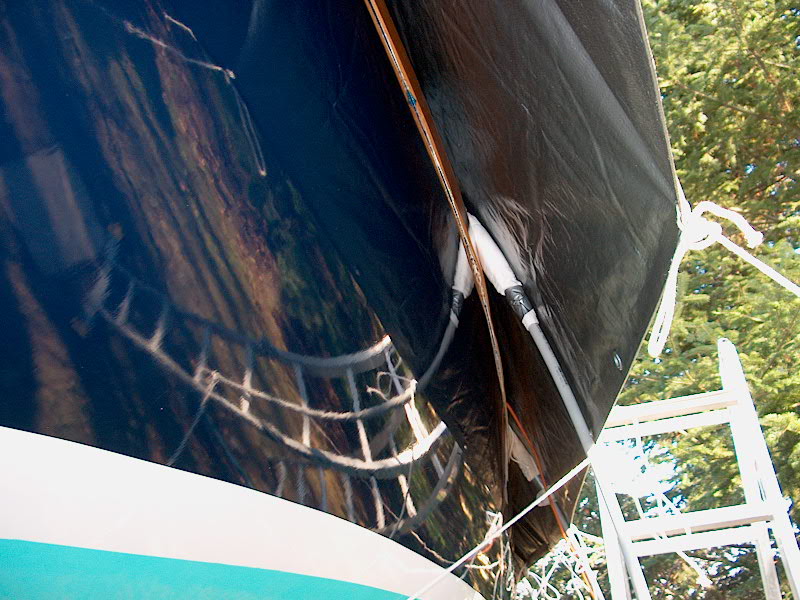
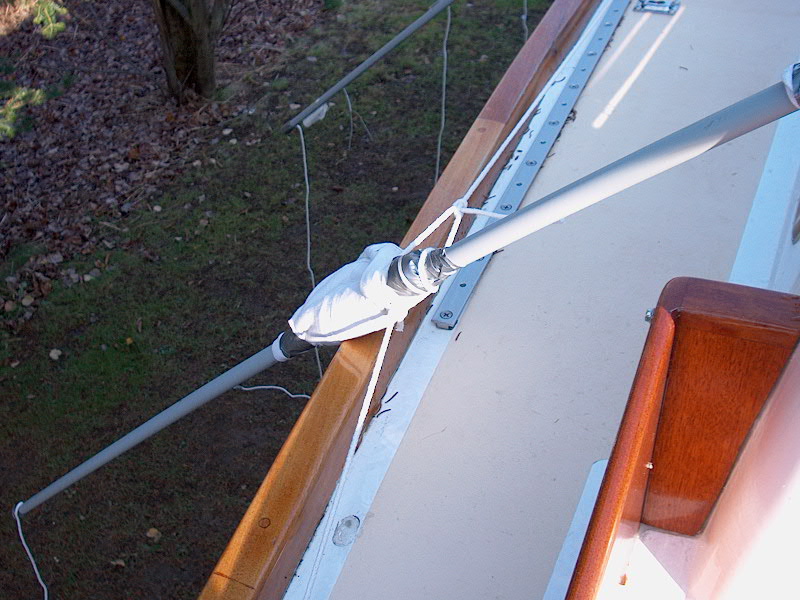
A detail photo showing how far away from
the hull the tensioned pipes hold the tarp. This photo was taken
near amidships on the port side; the camera is facing aft. The
lines securing the tarp run beneath the boat and to the corresponding
grommet on the other side, and do not touch the boat at all except below
the waterline. |
|
 |
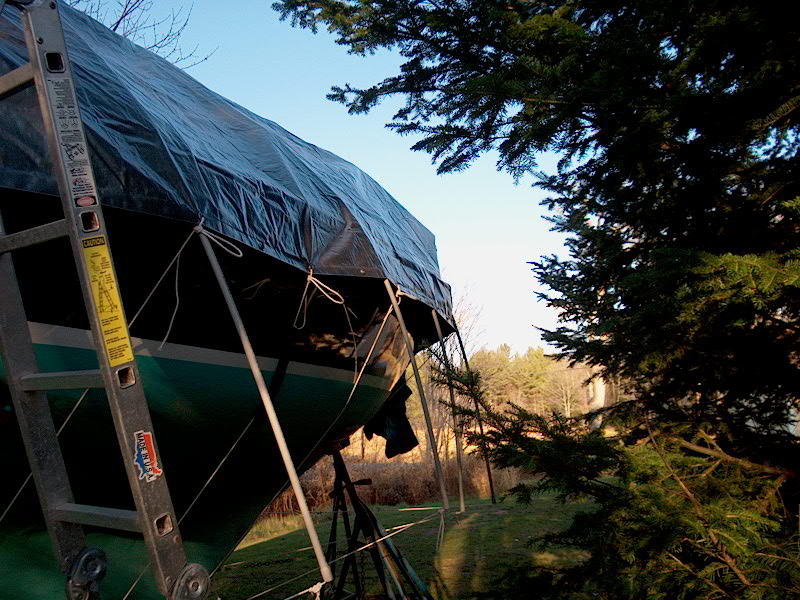
This photo shows the starboard side.
You can see how far away from the hull the supporting poles end up; they
are held in this position by the lines that run through the pipes, as
described above. I am able to get decent tension on the cover
against these poles, but some additional lines running to some tent
stakes (still to come) will help. |
|
 |
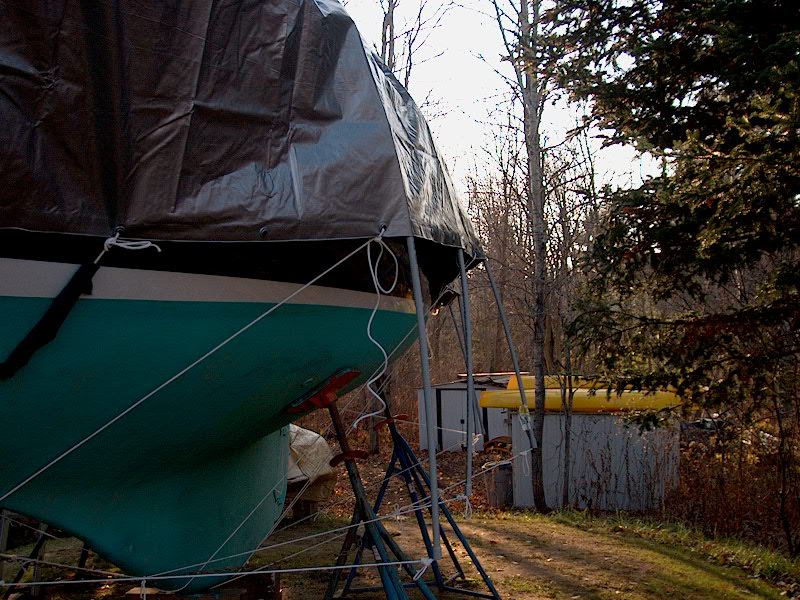
The port side. The first photo above
was taken between the second and third pipes you see here. You can
see a little bit of chafing gear I had to put on one line (at the left
side of the photo) because the line just barely touches the hull at the
boottop. The cover looks loose, but much of this appearance is
because it is a new, stiff tarp. It's really not as baggy as all
that. |
The next improvement will be to install some
lines attached to tent stakes that I will drive into the ground away from the
boat. This way, I will be able to pull parts of the cover off the boat,
since the lines will be leading outward. Stay tuned for updates on how
this works.
|
|
UPDATE! 11/18/01
I think I'm done, finally. I picked up
some tent stakes and spent an hour or two making some final adjustments to the
cover. I am pleased with how things turned out. The cover is tight,
and is pulled away from the boat in all areas. The only test remaining
will be a good windstorm, to make sure that the tent stakes hold and that the
wind doesn't get underneath the cover too much and pull anything apart. I
used about 10 tent stakes all around the boat--several at the stern, several at
the bow, and a couple on each side. I also installed a small tarp over the
large opening at the stern pulpit--I just wanted to close the bulk of this area
off to prevent too much snow and rain/ice from getting inside during the
winter. There is still air flow through the boat. Please click on
the thumbnails below to see the final results of the cover efforts.
 |
A close up shot showing how far away from
the hull the tarp ends up with the lines running to the tent stakes
driven into the ground. |
 |
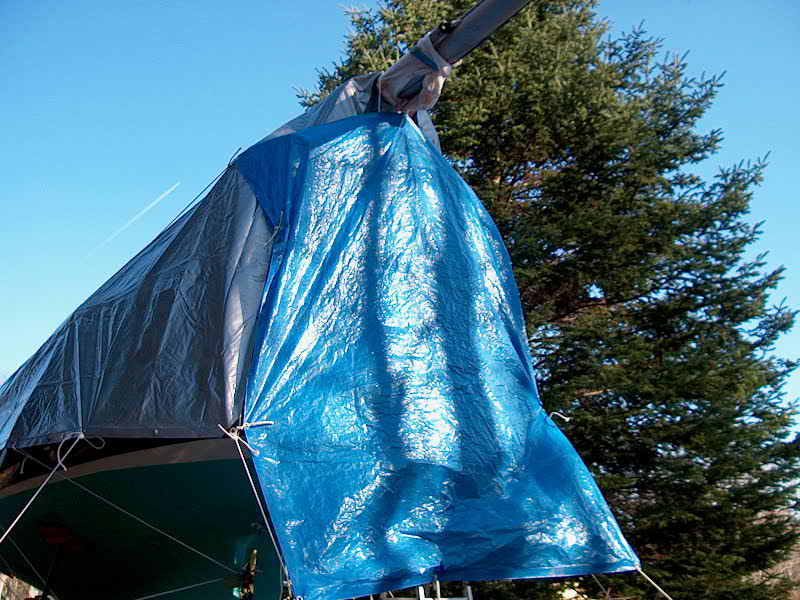
The small tarp I strung over the open area
at the stern. I tied it to the back of the silver tarp, and
attached the bottom corner grommets to the aftermost lines running to
tent stakes from the main cover. |
 |
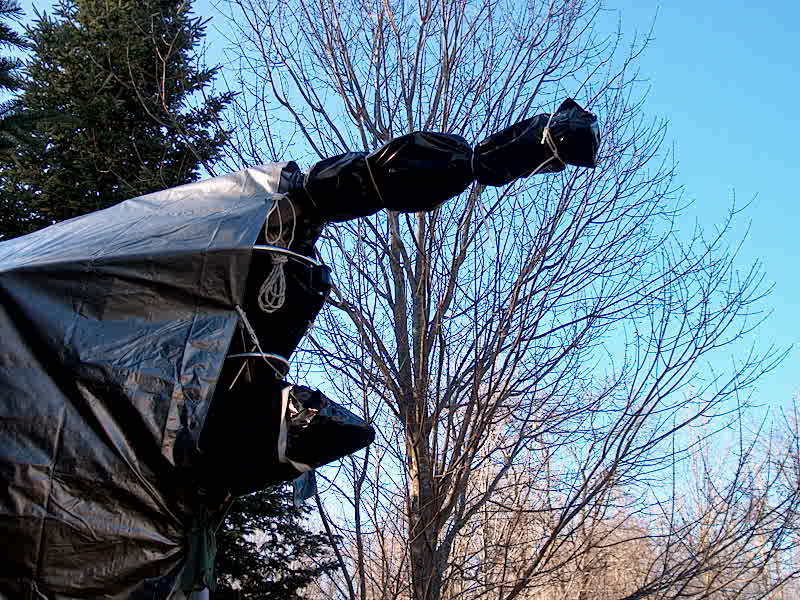
I covered the protruding part of the mast
and the varnished anchor platform with plastic bags to protect them from
the weather. |
 |
Some of the lines used at the stem to hold
the loose flaps of the cover away from the hull. A small portion
of the tarp rubs against the stem proper and I padded this area with
soft cloths. |
 |
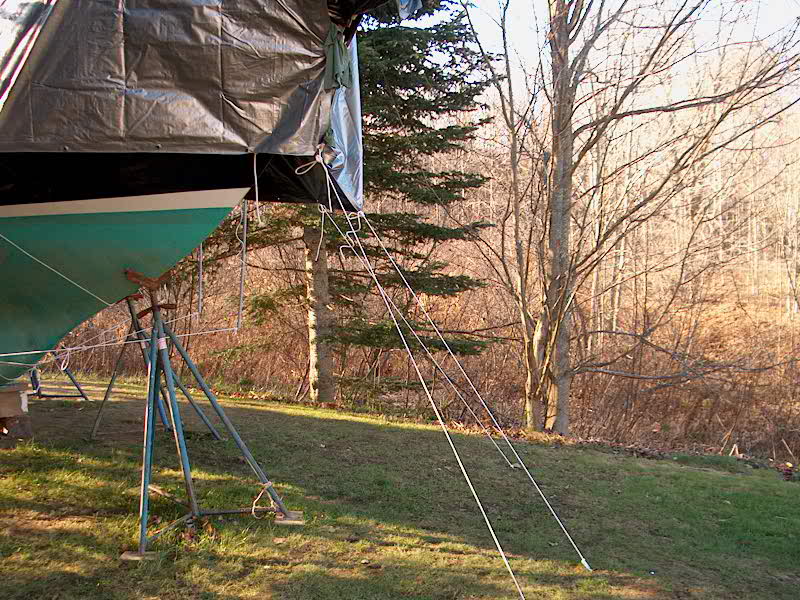
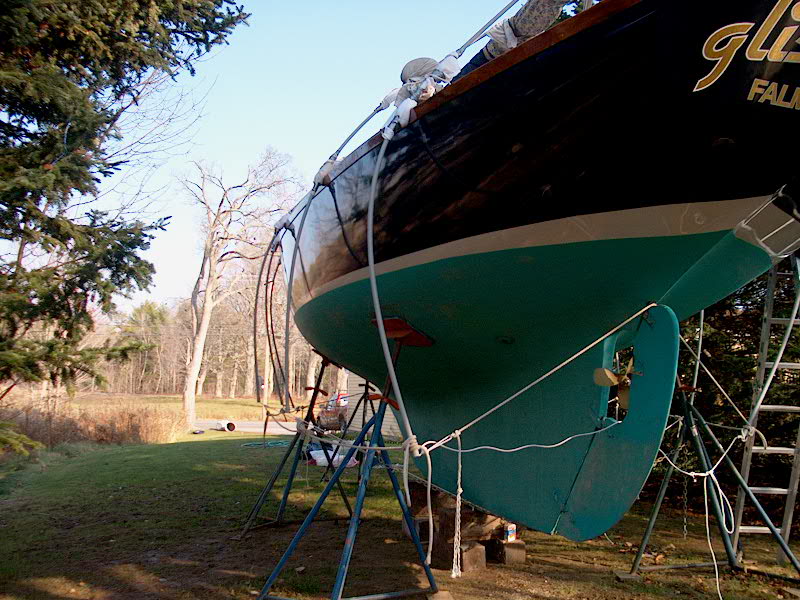
A view showing the general setup and some
of the lines running off the tarp to tent stakes. (Port side
shown) |
 |
The same thing on the starboard side.
To get into the boat during the winter, all I have to do is release the
tarp lines from the transom to just forward of the ladder.
These lines are all tied at the tarp grommets with easily-undone knots. |
 |
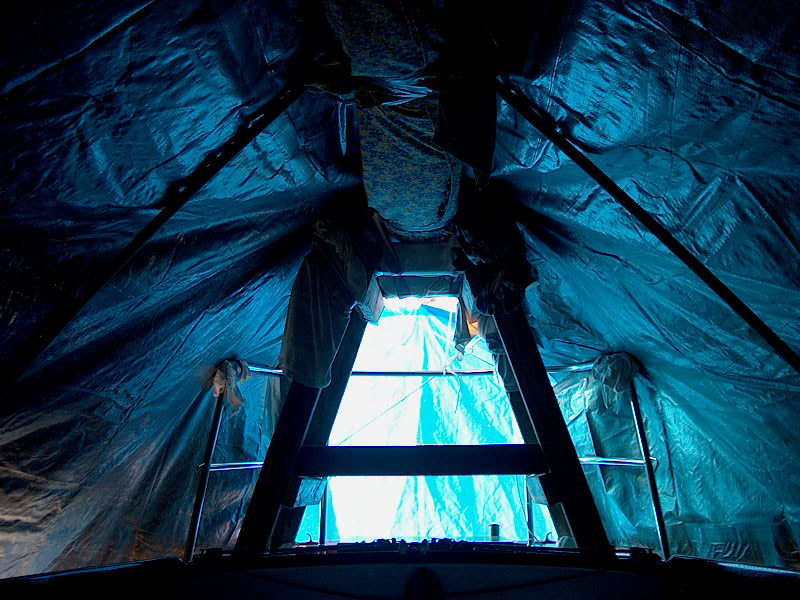
Inside the cover looking aft. It's
pretty dark inside, but gets nice and warm on a sunny day. |
 |
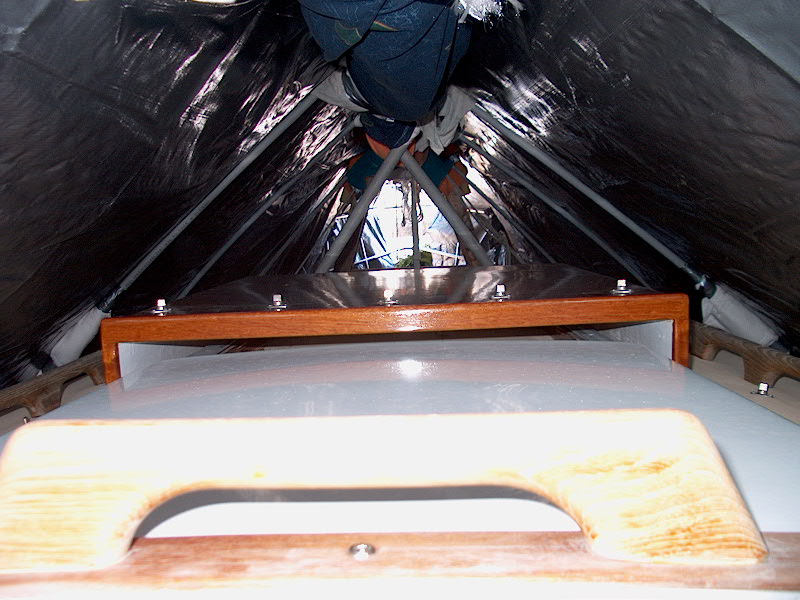
Inside the cover looking forward. |
|
|
|
|