|
Mast Rake
Adjustment
This page was last updated
on 16 May 2004.
|
It only took three full seasons, but I
finally got around to checking--and then adjusting--the rake of the
mast. Like many Triton owners, I had experienced some significant
weather helm in certain sailing conditions, mainly sailing upwind in
winds of 14 knots or higher under full sail. Reefing the main at
about 15 knots always had an instant and pleasing effect on both weather
helm and heel angle, but the helm was more than it should have been in
those ideal sailing winds of 10-15 knots.
There has been much discussion amongst
Tritons owners about the balance, or lack thereof, of the sailplan, and
one of the more common adjustments involved tightening the headstay so
as to pull the masthead forward. Simple enough, right?
Well, when you have a roller furler
installed on the headstay, the turnbuckle becomes less than easily
accessible. All modern furlers are designed to allow access
to the turnbuckle, but this involves some significant disassembly of the
drum and lower furler tubes--not an insurmountable problem, but one that
is easily put off because of its inconvenience. And the adjustment
can only be made with the boat in the water and the mast stepped, of
course...but in the flurry of excitement that surrounds each new season,
all that seemed to matter was getting the sails bent on and going
sailing. Rig adjustments tend to be put off, especially once the
roller furling jib is installed, which makes accessing the turnbuckle
even more of a hassle.
Three years earlier, when I had rigged my
mast for the first time with all new rigging, I left the headstay
turnbuckle opened as far as it would go, the thought being that I didn't
know if it would be too long or too short, but it needed to be extended
fully for the initial stepping. Of course I never got around to
changing it. |
 Finally,
in spring 2004, I decided the time had come. While I still had the
mast stored on horses at my house, I disassembled the furler drum and
lower torque tube (part of the furling system) to expose the turnbuckle
for inspection and adjustment. Because of the design of my anchor
platform, which surrounded the headstay chainplate on the stem, I had
always had difficulty inserting the clevis pin beneath the furler drum
when the mast was stepped or unstepped, mostly because of the tight
clearance between the anchor rollers. To increase the height, I
planned to install an extra toggle on the stem, so my first step was to
tighten the turnbuckle an amount roughly equal to the height of the new
toggle. Once that was done, I reassembled the torque tube but left
the furling drum disassembled, only to be reinstalled after the mast was
stepped and, finally, retuned. Finally,
in spring 2004, I decided the time had come. While I still had the
mast stored on horses at my house, I disassembled the furler drum and
lower torque tube (part of the furling system) to expose the turnbuckle
for inspection and adjustment. Because of the design of my anchor
platform, which surrounded the headstay chainplate on the stem, I had
always had difficulty inserting the clevis pin beneath the furler drum
when the mast was stepped or unstepped, mostly because of the tight
clearance between the anchor rollers. To increase the height, I
planned to install an extra toggle on the stem, so my first step was to
tighten the turnbuckle an amount roughly equal to the height of the new
toggle. Once that was done, I reassembled the torque tube but left
the furling drum disassembled, only to be reinstalled after the mast was
stepped and, finally, retuned. |
|
Headstay turnbuckle
|
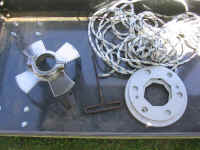
Disassembled furler parts
|
 Later,
on the day after launching (it was too windy and bouncy on launch day to
work on the myriad small parts of the furler whilst hanging over the
bow), I turned to the task of checking mast rake and, if necessary,
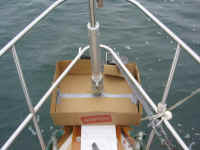
adjusting the headstay. To determine the extent of the mast rake,
I hung a heavy wrench from the main halyard and let it dangle above the
deck, a sort of rudimentary plumb bob. I was amazed to find that
the wrench hung nearly 18" aft of the mast step--far more than I
would have ever guessed. No wonder I had weather helm issues. Later,
on the day after launching (it was too windy and bouncy on launch day to
work on the myriad small parts of the furler whilst hanging over the
bow), I turned to the task of checking mast rake and, if necessary,
adjusting the headstay. To determine the extent of the mast rake,
I hung a heavy wrench from the main halyard and let it dangle above the
deck, a sort of rudimentary plumb bob. I was amazed to find that
the wrench hung nearly 18" aft of the mast step--far more than I
would have ever guessed. No wonder I had weather helm issues. |
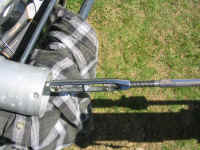
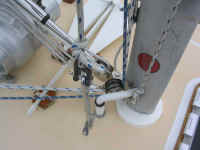
 To
adjust the headstay, I first used the jib halyard to support the
headfoil and prevent it from sliding down when I disassembled the torque
tube and lower assembly. I wrapped the halyard around the stay
beneath the luff feeder and tied several knots to hold it securely, then
added some tension just to hold it. To
adjust the headstay, I first used the jib halyard to support the
headfoil and prevent it from sliding down when I disassembled the torque
tube and lower assembly. I wrapped the halyard around the stay
beneath the luff feeder and tied several knots to hold it securely, then
added some tension just to hold it. |
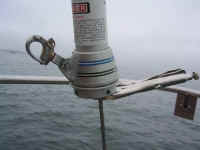
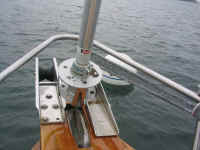
 Next,
according to the instructions in my Schaefer manual, I loosened the Allen
screws holding clamp at the top of the torque tube, and then removed the
retaining pin (on top of which the furler extrusions rest. By
increasing the halyard tension, I easily pulled the extrusions up
slightly, where I left them. Now, I placed a large cardboard box
around the base of the headstay to hopefully collect any tools or
fasteners that I hoped not to drop, and continued with the disassembly
of the lower torque tube, which was held in place with four screws on
what is functionally the inside of the furling drum. Please
forgive the inadvertent product placement...I should have blanked that
out in Photoshop, but didn't think of it. (I hate product
placement and the invasiveness of advertising in society, but that's
really a rant for another time and place.) Next,
according to the instructions in my Schaefer manual, I loosened the Allen
screws holding clamp at the top of the torque tube, and then removed the
retaining pin (on top of which the furler extrusions rest. By
increasing the halyard tension, I easily pulled the extrusions up
slightly, where I left them. Now, I placed a large cardboard box
around the base of the headstay to hopefully collect any tools or
fasteners that I hoped not to drop, and continued with the disassembly
of the lower torque tube, which was held in place with four screws on
what is functionally the inside of the furling drum. Please
forgive the inadvertent product placement...I should have blanked that
out in Photoshop, but didn't think of it. (I hate product
placement and the invasiveness of advertising in society, but that's
really a rant for another time and place.) |
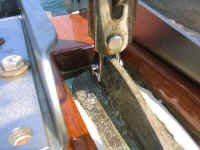
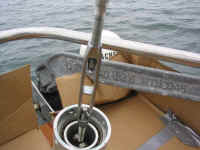
 With
the various fasteners removed, I slid the torque tube up out of the way
and held it in place with some vice grips. The turnbuckle was now
exposed, and I spent several minutes going back and forth between the
headstay, backstay, and mast to adjust the turnbuckles and slowly pull
the masthead forward. With
the various fasteners removed, I slid the torque tube up out of the way
and held it in place with some vice grips. The turnbuckle was now
exposed, and I spent several minutes going back and forth between the
headstay, backstay, and mast to adjust the turnbuckles and slowly pull
the masthead forward. |
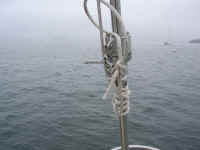
 Eventually,
I had taken up all the adjustment space there was on the headstay, and
found that the wrench at the end of my "plumb bob" had moved
forward significantly and was nearly in line with the aft side of the
mast, indicating that the mast was now straight, rather than raked
back. (Photo to the right taken before I adjusted the turnbuckle) Eventually,
I had taken up all the adjustment space there was on the headstay, and
found that the wrench at the end of my "plumb bob" had moved
forward significantly and was nearly in line with the aft side of the
mast, indicating that the mast was now straight, rather than raked
back. (Photo to the right taken before I adjusted the turnbuckle)
For comparison purposes, I have included
both the before picture and after picture below. |
|

|
|
|
Mast rake before (wrench
position) |
Mast rake after (wrench position) |
 Now
I carefully reassembled the torque tube and then the furling drum,
taking great pains to avoid dropping anything important overboard.
Success was mine, however, and presently I had the drum all reassembled
and ready for bending on the genoa. Now
I carefully reassembled the torque tube and then the furling drum,
taking great pains to avoid dropping anything important overboard.
Success was mine, however, and presently I had the drum all reassembled
and ready for bending on the genoa.
All that remained was to go sailing and
see what a difference the adjustment made! |
|


