|
Potable Water
Systems
This page was last
updated 18 March 2003.
Galley
Water Systems
|
|
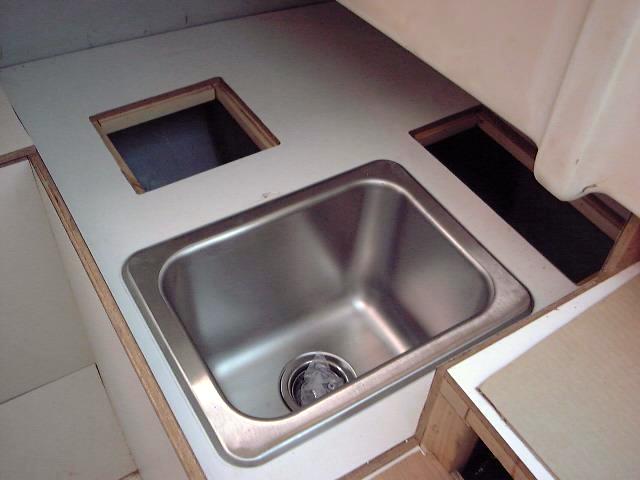 With
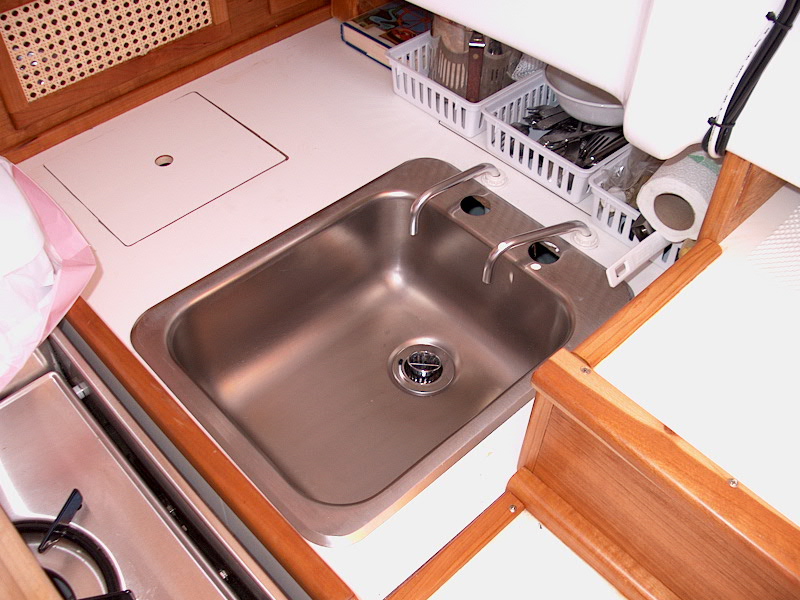
the countertop installed and covered in Formica, I ordered a deep sink.
The basin is 13" x 17" and is over 9" deep. When the sink
arrived, I laid out for the cutout, applied masking tape (to prevent splintering
and abrasion damage to the laminate) and cut out the hole, The sink is now
loosely in place, awaiting final plumbing before attaching it permanently with
the supplied brackets and caulk. With
the countertop installed and covered in Formica, I ordered a deep sink.
The basin is 13" x 17" and is over 9" deep. When the sink
arrived, I laid out for the cutout, applied masking tape (to prevent splintering
and abrasion damage to the laminate) and cut out the hole, The sink is now
loosely in place, awaiting final plumbing before attaching it permanently with
the supplied brackets and caulk.
At some point after the sink had
been installed, but before the boat was launched, I awoke in the middle of the
night with a thought: would the new sink, being as deep as it is, be above
the waterline of the boat? It would be close, to be sure. All I
could do was wait and find out.
Of course, the sink ended up
being too deep for its location. The bottom of the sink ended up being a
couple inches below the waterline of the boat, which, of course, means that
there was always a couple inches of water in the bowl. This was
unacceptable, of course. One reason for this is because I lowered the
countertop in the galley area by several inches when I rebuilt. This was
to provide more clear space above the countertop where it extends beneath the
cockpit bridgedeck; before, there was a scant few inches, far to tight to utilize
the space for any real storage, or even to use the space beneath the countertop
effectively since there was no real way to access it from the top.
|
|
 Now I was faced with a
problem: I had to replace the sink. I was not pleased with this
development, since I was looking forward to the deep sink for washing dishes,
storing things during the day while sailing, etc. Now I had to find a sink
with the same flange dimensions, but with a bowl no deeper than 5".
This proved to be difficult! I searched low and high on the Internet and
finally found what I needed at The
Plumbing Store, with one minor exception: the flange had two holes cut
out for faucet installation. I had already installed my fresh and salt
water taps through the countertop, so this meant that the holes in the
sink flange were redundant. Oh well...for now, I'll leave it be and
address the situation more permanently in the future. I may try and
install the two taps through those flange holes, and then patch the holes in the
countertop through which they are currently installed. Now I was faced with a
problem: I had to replace the sink. I was not pleased with this
development, since I was looking forward to the deep sink for washing dishes,
storing things during the day while sailing, etc. Now I had to find a sink
with the same flange dimensions, but with a bowl no deeper than 5".
This proved to be difficult! I searched low and high on the Internet and
finally found what I needed at The
Plumbing Store, with one minor exception: the flange had two holes cut
out for faucet installation. I had already installed my fresh and salt
water taps through the countertop, so this meant that the holes in the
sink flange were redundant. Oh well...for now, I'll leave it be and
address the situation more permanently in the future. I may try and
install the two taps through those flange holes, and then patch the holes in the
countertop through which they are currently installed.
Removing the old sink was a
little bit of a trick, as the polysulfide bedding I used to secure it was
holding fast. I finally got it out, and cleaned up the countertop in
preparation for the new sink. Then, I installed the new sink in a
bed of polysulfide and weighted it down all around to hold it in place while the
adhesive cured. Then, it was a matter of reattaching my drain hose,
and the installation was complete. The new sink functions well; after a
season of use, I moved the faucets so that they came up through the holes in the
sink flange, which broadened their reach and made things function much better.
At the start of the
second season with the new sink, a new problem developed, in part because the
boat was more heavily loaded and therefore sitting lower in the water: the
sink did not drain properly. At rest, the water level in the drain hose
(equal to the level of the waterline outside) was just below the bottom of the
sink. Weight in the cockpit would cause water to flow into even the
shallower sink, and if the seacock was not closed, water would flood into the
sink when sailing on port tack. Dishwater would stagnate in the sink and
leave a disgusting residue when it finally drained overnight. Clearly, a
solution was needed.
See
the original solution to this problem here.
|
Update: 2008
After dealing with a variety of ultimately unsuitable modifications to the
galley sink setup, I decided to completely reconfigure the system, reverting to
a deep sink and locating a new sump chamber in the bilge, far removed from the
sink itself so as to address several issues with the "third try's a charm"
semi-original setup that I installed in 2003.
Read more about the newest changes in the
winter 2008
refit log. |
|
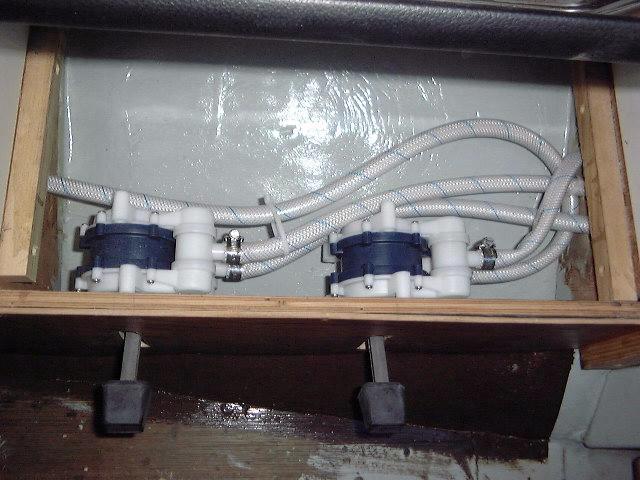
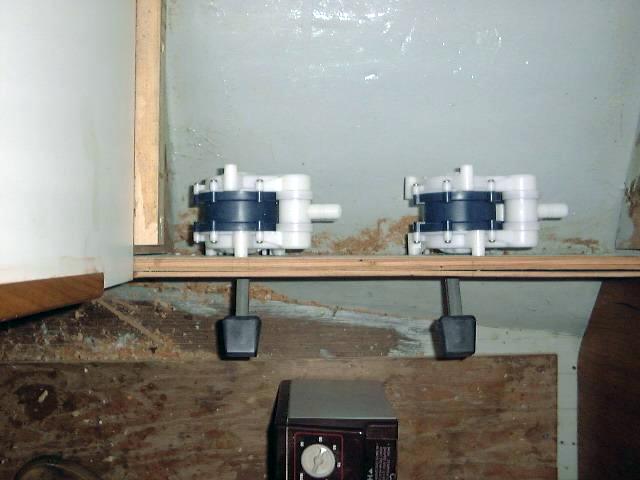 We are, for the moment at least,
keeping things simple by installing only foot manual pumps for water. In
addition, manual pumps help conserve water on board, an important consideration
with only 23 gallons in the forward tank. I installed two Whale gusher
foot pumps in the space beneath the stove, hidden behind the settee
cabinetry. There is access for future service by removing the bottom panel
of the stove enclosure, which is possible even with the stove installed. The foot pedals protrude into the
cabin for use. To
cut the slots through the cabinets for the pedals, I first cut 5/8" holes
top and bottom with a Forstner bit, then connected the holes with my jig
saw. The pumps were installed from the inside with screws through the
holes provided; access was tight because of the curvature of the hull, so I had
to use a hand screwdriver. (The horror...the horror!) One pump is
for fresh water, the other for a salt water spigot. We are, for the moment at least,
keeping things simple by installing only foot manual pumps for water. In
addition, manual pumps help conserve water on board, an important consideration
with only 23 gallons in the forward tank. I installed two Whale gusher
foot pumps in the space beneath the stove, hidden behind the settee
cabinetry. There is access for future service by removing the bottom panel
of the stove enclosure, which is possible even with the stove installed. The foot pedals protrude into the
cabin for use. To
cut the slots through the cabinets for the pedals, I first cut 5/8" holes
top and bottom with a Forstner bit, then connected the holes with my jig
saw. The pumps were installed from the inside with screws through the
holes provided; access was tight because of the curvature of the hull, so I had
to use a hand screwdriver. (The horror...the horror!) One pump is
for fresh water, the other for a salt water spigot.
|
|
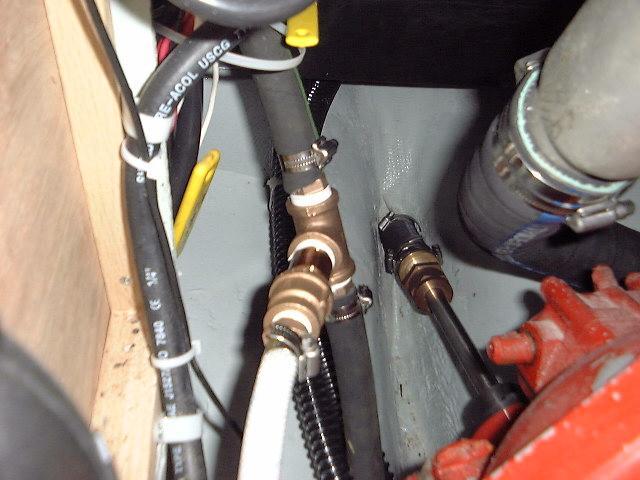
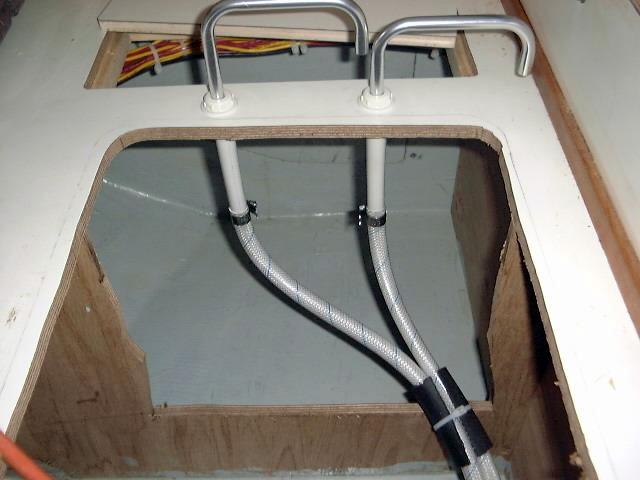
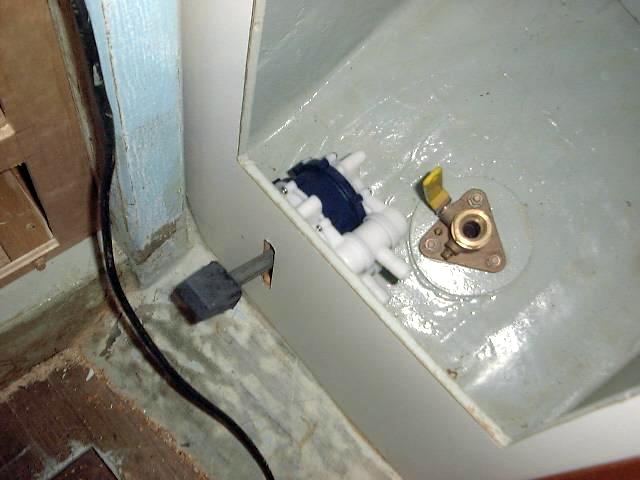
 Later,
I installed some of the hoses for the water system. First, I installed the
two spigots at the galley sink by drilling holes through the counter in the
proper location and inserting the faucets, which are secured from beneath with a
plastic nut. Then, I ran some hoses, beginning with the salt water
line. For this, I teed off the engine raw water intake with a bronze
3/4" tee fitting, which I inserted in the line after cutting out a section
of Later,
I installed some of the hoses for the water system. First, I installed the
two spigots at the galley sink by drilling holes through the counter in the
proper location and inserting the faucets, which are secured from beneath with a
plastic nut. Then, I ran some hoses, beginning with the salt water
line. For this, I teed off the engine raw water intake with a bronze
3/4" tee fitting, which I inserted in the line after cutting out a section
of   hose.
On one side of the tee, I installed a threaded nipple with a 3/4" -
1/2" reducer installed, so that I could install a 1/2" nipple for the
smaller water hose. Then, I ran the line to one of the pumps in the
galley, and another from the pump up to the faucet. I also ran the lines
for the fresh water pump, running them beneath the starboard settee from the
head vanity. All hoses are secured with all 316 stainless solid banded
clamps. (AWAB) hose.
On one side of the tee, I installed a threaded nipple with a 3/4" -
1/2" reducer installed, so that I could install a 1/2" nipple for the
smaller water hose. Then, I ran the line to one of the pumps in the
galley, and another from the pump up to the faucet. I also ran the lines
for the fresh water pump, running them beneath the starboard settee from the
head vanity. All hoses are secured with all 316 stainless solid banded
clamps. (AWAB)
|
|
Head
Water Systems
 I also installed a
foot pump in the head, in the new vanity, using the same method described above.
I made a mistake, and placed it a little too far aft so that the seacock handle
hits the pump when I tried to close it. Oops! To fix this, I removed
the handle and bent the end 90 degrees; this enables the handle to clear the
pump body, yet still makes it easy to turn. I also installed a
foot pump in the head, in the new vanity, using the same method described above.
I made a mistake, and placed it a little too far aft so that the seacock handle
hits the pump when I tried to close it. Oops! To fix this, I removed
the handle and bent the end 90 degrees; this enables the handle to clear the
pump body, yet still makes it easy to turn.
I installed the
spigot at the head sink the same way as described above. Then, I connected
more hoses as necessary, running from the tank to a T fitting in the line, then
to the head pump and beyond to the galley pump. I cleaned the water tank,
filled it, and we were ready to go.
Rather than install
a complicated and water-hungry shower and/or electric pump, we chose to stay
simple. For a shower, we use a regular garden sprayer--the kind with a
tank that you pump up for pressure. Believe it or not, the very fine
spray from this works great as a shower, or to rinse off after a swim in salt
water--and it uses very little water. For privacy, we have a Sunshower
enclosure that we can hang from the boom.
During the course of installing the
new holding tank and plumbing, I had to make a small modification to the water tank. The Triton, as
delivered, did not have a deck fill pipe for the water tank. This is
inconvenient. Last year, I filled the tank by running a hose into the
large inspection port in the tank that I installed. Less than
perfect. My sanitation plans call for a manual waste pump to be located
just forward of the holding tank, on a platform over the existing water
tank. This will make access to the tank even less convenient (though still
possible if necessary), so I thought I would take a moment and address the
issue. I discovered that the 1-1/2" PVC threaded fittings that came
with my holding tank fit perfectly into the threads of a standard waste deck
pipe. So, I drilled a hole in the tank and installed one of these in a
thick bed of 3M 101, holding it in place with screws. Later, I
installed a simple straight nipple, one end threaded (1-1/2") and the
other end barbed, and secured a length of flexible bilge pump hose to it with a
hose clamp. I ran the hose forward beneath the vee berth into the chain
locker, then up to a new deck
fitting. Voila! A new remote water
tank fill.
|
|
|
|