|
The Galley:
Demolition
August 30, 1999
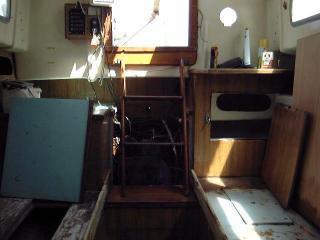 The galley as provided from the builder leaves much to be desired--not to mention being ugly! Our
galley featured blue-green/aqua (or something) patterned
Formica over the horrible, fake-wood grain Formica on the cabinets.
Puke. Plus, the layout is horrible, with no provision for a good stove, limited storage, and a silly side-loading icebox on the port side--complete with through-the-cockpit hatch. This all had to go. The galley as provided from the builder leaves much to be desired--not to mention being ugly! Our
galley featured blue-green/aqua (or something) patterned
Formica over the horrible, fake-wood grain Formica on the cabinets.
Puke. Plus, the layout is horrible, with no provision for a good stove, limited storage, and a silly side-loading icebox on the port side--complete with through-the-cockpit hatch. This all had to go.
Removing the galley was one of
the first projects undertaken during the refit. On a warm Sunday afternoon
a few days after the boat arrived home, I went to town with wrecking bar and
sledge. Removing the galley, besides being generally satisfying, would
allow much improved access to the engine compartment so that removal of the
engine would be easier, among other things. Plus, it was too ugly to live.
|
|
 I started with the icebox. The shelf on top came off
easily with only a couple little smacks with the hammer, and I tossed it over
the side to the ground. Moving on, I tackled the bottom portion of the
unig. I had read in Daniel Spurr's Upgrading the Cruising Sailboat (a
must-have for any Triton owner, as most of the projects were taken from
Dan's time as a Triton owner) about the removal of the Triton icebox, and it indicated that there were screws behind the fake-wood
Formica. I ripped some off and found very rusty screws behind which would not accept a screwdriver, so it was easier to just begin tearing the thing out by force.
Looking back now, I don't know why I even bothered with this silly attempt at
finesse--it was all to be trashed anyway. Why bother with screws? I started with the icebox. The shelf on top came off
easily with only a couple little smacks with the hammer, and I tossed it over
the side to the ground. Moving on, I tackled the bottom portion of the
unig. I had read in Daniel Spurr's Upgrading the Cruising Sailboat (a
must-have for any Triton owner, as most of the projects were taken from
Dan's time as a Triton owner) about the removal of the Triton icebox, and it indicated that there were screws behind the fake-wood
Formica. I ripped some off and found very rusty screws behind which would not accept a screwdriver, so it was easier to just begin tearing the thing out by force.
Looking back now, I don't know why I even bothered with this silly attempt at
finesse--it was all to be trashed anyway. Why bother with screws?
Some cutting with a sawz-all was required, as well as brute force with a prybar and large crowbar. It turns out that the icebox is a single molded unit, and it came out with only a little difficulty. The most stubborn part was the section connected to the opening hatch in the cockpit.
This took a lot of grunting and shoving on my part, but, finally, it let go with a bang,
enveloping me in a cloud of noxious dust.
|
|
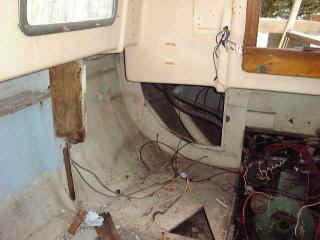
 The icebox was surrounded by low density
Styrofoam, and only a couple inches. I never used the icebox on the boat, but I have heard that they are inefficient--no surprise. Now the trick
was to get the thing through the companionway--with various spacers and trim pieces still attached, it would not fit. I hacked away at it till it slid through and out into the cockpit. A little trimming of some old tabbing on the hull side where the icebox had been attached, and the space was clear. Too bad anything has to go back! The cabin felt very spacious.
I tossed all the disgusting old junk over the side, where a pretty sizeable pile
of Triton parts was accumulating. The icebox was surrounded by low density
Styrofoam, and only a couple inches. I never used the icebox on the boat, but I have heard that they are inefficient--no surprise. Now the trick
was to get the thing through the companionway--with various spacers and trim pieces still attached, it would not fit. I hacked away at it till it slid through and out into the cockpit. A little trimming of some old tabbing on the hull side where the icebox had been attached, and the space was clear. Too bad anything has to go back! The cabin felt very spacious.
I tossed all the disgusting old junk over the side, where a pretty sizeable pile
of Triton parts was accumulating.
|
|
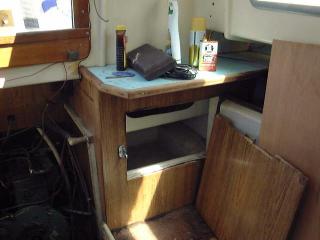
 Next, I turned to the starboard side, the main part of the galley. The first order of business was to rip out the cheap,
thin, warped plywood making up the over-counter storage area--this took about two
seconds, and I added it to the sloppy pile on the ground. Next, I turned to the starboard side, the main part of the galley. The first order of business was to rip out the cheap,
thin, warped plywood making up the over-counter storage area--this took about two
seconds, and I added it to the sloppy pile on the ground.
The Triton galley module is
designed to be removable, which allows better access to the engine and also
allows the fuel tank, located in the starboard cockpit locker, to be
removed. What is true in theory is not necessarily true in practice.
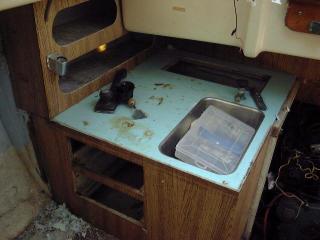
In practice, if the galley has never been moved in 37 years, the el-cheapo
screws will be completely rusty, guaranteeing that the first turn of a
screwdriver will strip whatever remains of a slot right out.
Fortunately, I didn't
particularly care about moving the galley in one piece, since I had no
intentions of reusing it. So, moving ahead with ripping it out, I made my
first attempt to remove the sink. Easier said than done, since the bowl
was mounted with its flange below the Formica on the countertop (allowing a
little sink cover thing to sit flush over the opening) and secured with more of
that el-cheapo clamping hardware. There was no chance of removing those
clamps. I tried to remove the drain hose from the sink. Of course,
the hose clamps securing the hose were rusted closed, preventing easy removal of the hose--which was pretty much the only thing really holding the sink and countertop down.
In addition, there was no real access to the hose or the underside of the
sink. So, I performed delicate surgery on the side of the cabinet inboard of the sink
with my Sawz-all and wrecking bar until I could get in there to cut the dumb
drain hose. Once this was done, the remainder of the galley came out easily, with a little grunting and prying.
It was fun to watch it crash to the ground below, making a wonderful
racket.
|
|
|
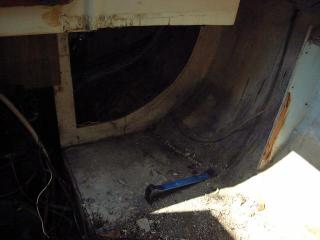
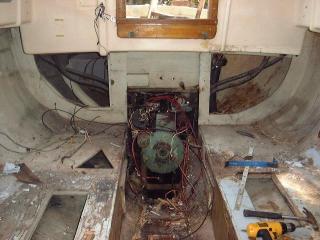
 Removal of the galley left me with an open,
empty space, with a view of some even more disgusting paint than was already
visible elsewhere. A mass of wires and junk surrounded the engine--wires
that , thinking I would reuse them when I reinstalled the Atomic 4, I had
carefully removed from some of the galley pieces earlier. (See the Atomic
4 removal page for a description of this.) Removal of the galley left me with an open,
empty space, with a view of some even more disgusting paint than was already
visible elsewhere. A mass of wires and junk surrounded the engine--wires
that , thinking I would reuse them when I reinstalled the Atomic 4, I had
carefully removed from some of the galley pieces earlier. (See the Atomic
4 removal page for a description of this.) |
|
|
To
move forward in the process and see the new galley installed, click here. |
|
