|
Constructing a New Galley
This page was last updated on 30 January 2002
Layout
and construction of a new, super-insulated icebox | Layout
and construction of the engine box and companionway ladder
Layout
and construction of the galley countertop, stove enclosure, and storage
| Rebuilding
the Other Parts of the Interior
Installing
the Stove and LPG System | Galley
Water Systems
|
|
Please note that each section of this page details a single
portion of the galley construction from start to finish, or nearly so.
Therefore, while each individual section may be chronological in terms of that
part of the project, in most cases several of the projects were underway at the
same time, and were more or less at a consistent level of completion with one
another. |
|
Engine
Box and Companionway
I began rebuilding the galley and
interior with the enclosure around the
engine, so that I can finally get some proper steps down into the cabin and
get rid of the milk crate I have been using for the past few months.
Plus, building around the engine to give it the necessary space is one of the
most important considerations in the new interior design.
The first thing to do was to cut out the
settee on the port side where the icebox will eventually reside, to make it as
big as possible, and to allow for the 4" of insulation I will be
installing. See details here.
I did this first so that I would have the best access to make the cut.
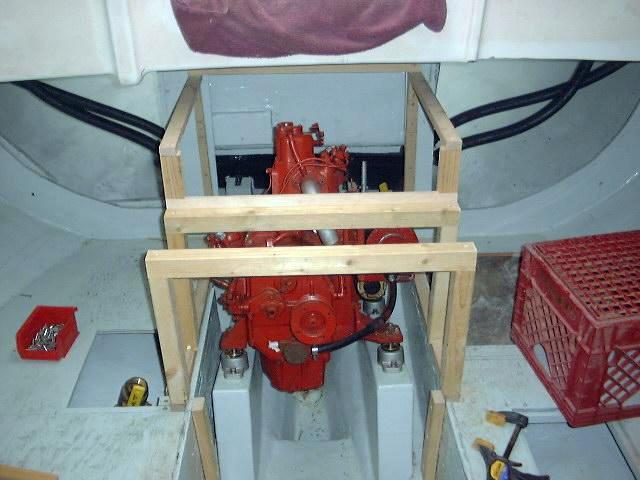 Next,
I constructed a framework around the engine, incorporating two different
levels, the lower of which will be the same height as the adjacent galley
countertop (30" from the cabin sole). These staggered platforms are
necessary to take into account the physical dimensions of the engine,
but also work out well for steps. The two athwartships cross braces,
designed to support the weight of the step, are easily removable for wide open
engine access by removing four screws from the top. I used a combination
of oak, cypress, and fir that I had in my scrap collection, all secured with
#8 x 1 1/2" stainless steel screws. Next,
I constructed a framework around the engine, incorporating two different
levels, the lower of which will be the same height as the adjacent galley
countertop (30" from the cabin sole). These staggered platforms are
necessary to take into account the physical dimensions of the engine,
but also work out well for steps. The two athwartships cross braces,
designed to support the weight of the step, are easily removable for wide open
engine access by removing four screws from the top. I used a combination
of oak, cypress, and fir that I had in my scrap collection, all secured with
#8 x 1 1/2" stainless steel screws.
|
|
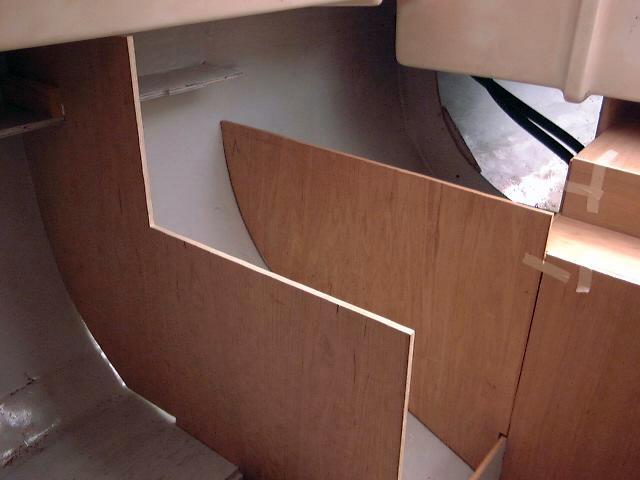
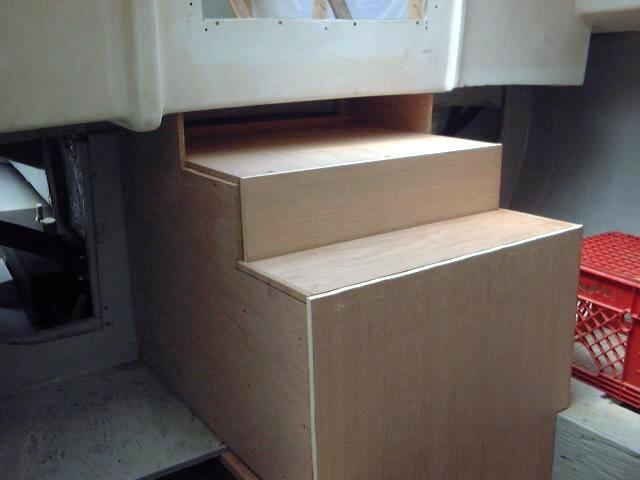 The
next step was to cut and install plywood as necessary to cover the sides of
the engine box, as well as the steps and front. To do this, I made
patterns (click here for a brief lesson in pattern
making), transferred the lines to the plywood, and cut the pieces out. I
used 9mm merranti marine plywood, a high quality, void-free, 7-ply product,
for the areas that will be hidden or covered with Formica, and 1/2"
cherry plywood for the vertical step riser and the large panel at the front of
the engine box. The various panels are designed for easy removal to gain
quick and simple access to the engine for inspection or service.
Eventually, the edges of the panels will be hidden behind solid cherry trim
pieces, which will also act as channels into which the panels can slide.
All the pieces are loosely installed at the moment, but as the adjacent
cabinetry is installed things will fall into place. The
next step was to cut and install plywood as necessary to cover the sides of
the engine box, as well as the steps and front. To do this, I made
patterns (click here for a brief lesson in pattern
making), transferred the lines to the plywood, and cut the pieces out. I
used 9mm merranti marine plywood, a high quality, void-free, 7-ply product,
for the areas that will be hidden or covered with Formica, and 1/2"
cherry plywood for the vertical step riser and the large panel at the front of
the engine box. The various panels are designed for easy removal to gain
quick and simple access to the engine for inspection or service.
Eventually, the edges of the panels will be hidden behind solid cherry trim
pieces, which will also act as channels into which the panels can slide.
All the pieces are loosely installed at the moment, but as the adjacent
cabinetry is installed things will fall into place.
|
|
 With
the basic pieces of the engine box and steps in place, and after completing some of the adjacent cabinetry (see other sections of this page for
descriptions), I installed satin white Formica on the horizontal surfaces.
To protect the surfaces during the remainder of construction, I laid cardboard
over the vulnerable areas. With
the basic pieces of the engine box and steps in place, and after completing some of the adjacent cabinetry (see other sections of this page for
descriptions), I installed satin white Formica on the horizontal surfaces.
To protect the surfaces during the remainder of construction, I laid cardboard
over the vulnerable areas.
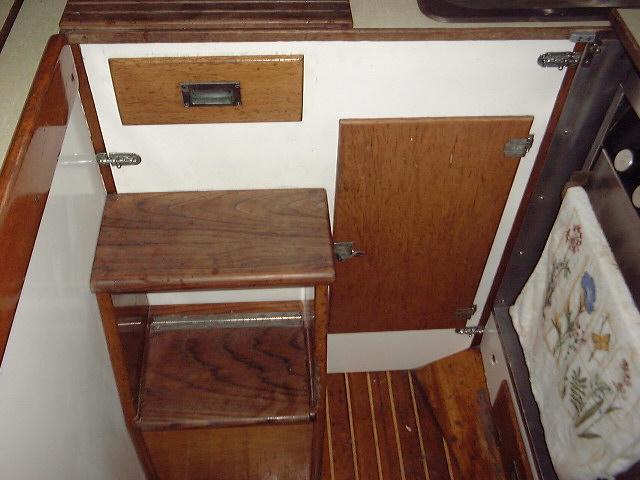
With only the two steps
built into the top
portion of the engine box, I spent several months climbing in and out of the
boat by stepping down on to the port settee--acceptable during construction,
but of course not good enough for the long haul.  Some
sort of steps at the lower engine box were needed. Last summer, I saw a nice,
simple set of removable steps on a Hinckley Pilot (seen in the thumbnail to
the right), and thought a similar setup would work well on Glissando.
Basically, the steps are a self-contained unit, secured with simple latches,
that can be easily removed to gain access to the engine or if more space is
required in the galley. I designed the steps to be narrow enough to
allow galley access in the narrow Triton cabin, and also to allow the oven
door to be opened when they are in place. A normal, centerline ladder
would have been continually in the way. The new step unit will be
installed on the port side, nestled against the settee, leaving a foot or so
of open space in front of the stove and galley. Some
sort of steps at the lower engine box were needed. Last summer, I saw a nice,
simple set of removable steps on a Hinckley Pilot (seen in the thumbnail to
the right), and thought a similar setup would work well on Glissando.
Basically, the steps are a self-contained unit, secured with simple latches,
that can be easily removed to gain access to the engine or if more space is
required in the galley. I designed the steps to be narrow enough to
allow galley access in the narrow Triton cabin, and also to allow the oven
door to be opened when they are in place. A normal, centerline ladder
would have been continually in the way. The new step unit will be
installed on the port side, nestled against the settee, leaving a foot or so
of open space in front of the stove and galley.
|
|
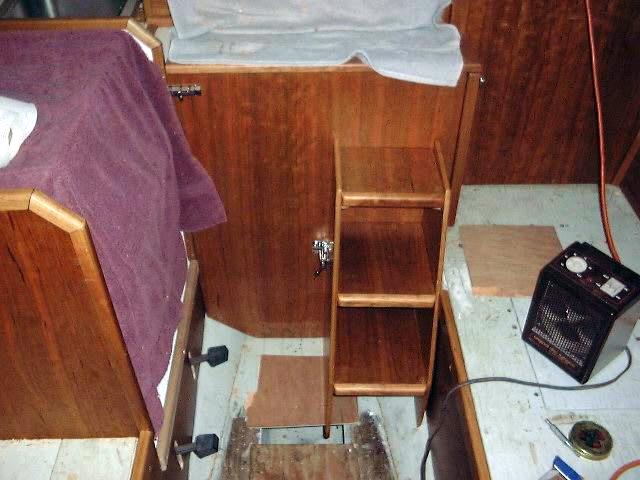
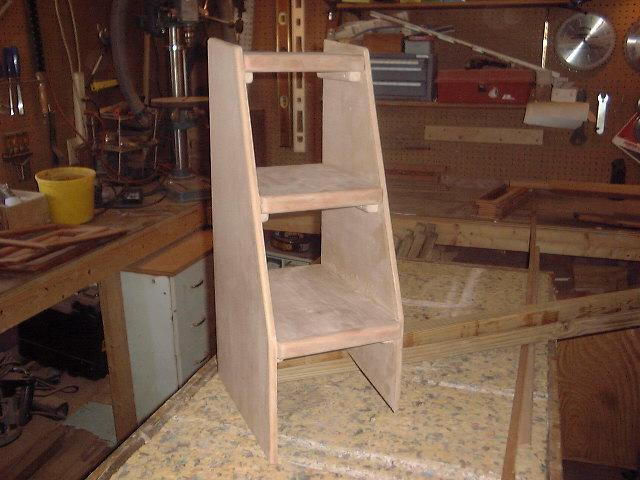 To
build the removable steps, I
determined the size necessary--there are three steps, with an 8" rise,
and the treads are 8" wide--and cut the various pieces to size.
Each succeeding step is 3" deeper than the one above. I made the
unit from 1/2" cherry plywood with solid cherry trim. The treads
are two layers of 1/2" plywood glued together and screwed to cleats
attached to the insides of the plywood sides. I plan to install the
steps with draw latches for a tight, secure fit, but they'll be easily
removable when necessary. The steps will be finished to match the
surrounding woodwork. One side of the frame is shorter than the other to
accommodate the curvature of the hull where the steps will be mounted. To
build the removable steps, I
determined the size necessary--there are three steps, with an 8" rise,
and the treads are 8" wide--and cut the various pieces to size.
Each succeeding step is 3" deeper than the one above. I made the
unit from 1/2" cherry plywood with solid cherry trim. The treads
are two layers of 1/2" plywood glued together and screwed to cleats
attached to the insides of the plywood sides. I plan to install the
steps with draw latches for a tight, secure fit, but they'll be easily
removable when necessary. The steps will be finished to match the
surrounding woodwork. One side of the frame is shorter than the other to
accommodate the curvature of the hull where the steps will be mounted.
|
|
 For
easy removal, as well as a tight, secure fit in place, I installed the steps
with draw clamps. When latched, these draw the two pieces together for a
tight fit. I used two of these on the steps, and they work pretty well,
but, because of the curvature of the hull and the short leg's tendency to want
to slip down the angle, some further restraint is needed. To prevent
movement and help lock the steps into place, I installed a wooden cleat on the
angled portion of the hull. The side of the step fits between this cleat
and the side of the settee, effectively preventing it from its tendency to
slide down. To allow for the
new cabin sole that will be installed in a couple months, I placed a scrap of
plywood the same thickness as the new sole beneath the steps before installing
the hardware. I also had to cut away a small portion of the settee
fiddle on the port side aft, so that the steps could fit tightly against the
settee. For
easy removal, as well as a tight, secure fit in place, I installed the steps
with draw clamps. When latched, these draw the two pieces together for a
tight fit. I used two of these on the steps, and they work pretty well,
but, because of the curvature of the hull and the short leg's tendency to want
to slip down the angle, some further restraint is needed. To prevent
movement and help lock the steps into place, I installed a wooden cleat on the
angled portion of the hull. The side of the step fits between this cleat
and the side of the settee, effectively preventing it from its tendency to
slide down. To allow for the
new cabin sole that will be installed in a couple months, I placed a scrap of
plywood the same thickness as the new sole beneath the steps before installing
the hardware. I also had to cut away a small portion of the settee
fiddle on the port side aft, so that the steps could fit tightly against the
settee.
|
|
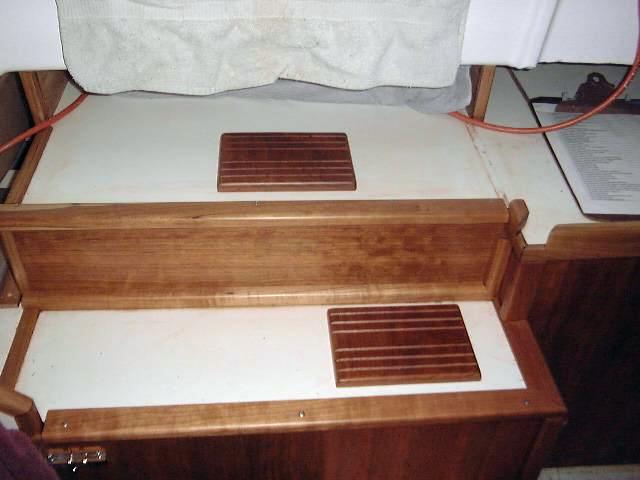 To
protect the top two countertop surfaces, I installed two cherry step pads for the
upper steps. The pads are about 5" by 4", and feature a
grooved top surface for traction. These will prevent all the footfalls
from landing directly on our sandwiches or on the steps, which are going to end up being a useful
part of the galley countertop. I installed the pads with screws from
beneath. To
protect the top two countertop surfaces, I installed two cherry step pads for the
upper steps. The pads are about 5" by 4", and feature a
grooved top surface for traction. These will prevent all the footfalls
from landing directly on our sandwiches or on the steps, which are going to end up being a useful
part of the galley countertop. I installed the pads with screws from
beneath.
I've found that it often works best to come
down the first two steps and then turn around and back down the last three
steps. This is because the steps are so narrow and shallow, and therefore
work best when the front part of your foot extends into the opening. With
the heel, there's only a few inches of bearing surface, and it's a little more
awkward.
To complete the engine box portion of the
galley, I installed a number of various trim
pieces on the steps, engine box and around the galley. Details on the
trim can be found here.
|
|
Galley
Countertop and Stove
 The
Triton was lacking a well-found galley in the original design, and one of the
first things I did was rip the old junk out.
Now, almost a year later, the time came to begin rebuilding. We
purchased a 2 burner stove with oven, and to accommodate it's size, come changes
needed to be made to the general cabin layout. The
Triton was lacking a well-found galley in the original design, and one of the
first things I did was rip the old junk out.
Now, almost a year later, the time came to begin rebuilding. We
purchased a 2 burner stove with oven, and to accommodate it's size, come changes
needed to be made to the general cabin layout.
In order for our new stove to fit, it was
necessary to shorten the starboard berth somewhat, and also to cut out the
settee platform to allow the stove to sit at the proper height. Using
the dimensions provided with the unit, I marked the settee where cuts were
necessary, and cut it out with a jigsaw.
|
|
 With
the cutout made, I used a tick strip to measure
and make patterns for the two bulkheads that will go on either side. The
forwardmost bulkhead will be seen and was cut from 1/2" cherry plywood;
the after bulkhead will not be seen in the final installation and was cut from
marine merranti plywood. With
the cutout made, I used a tick strip to measure
and make patterns for the two bulkheads that will go on either side. The
forwardmost bulkhead will be seen and was cut from 1/2" cherry plywood;
the after bulkhead will not be seen in the final installation and was cut from
marine merranti plywood.
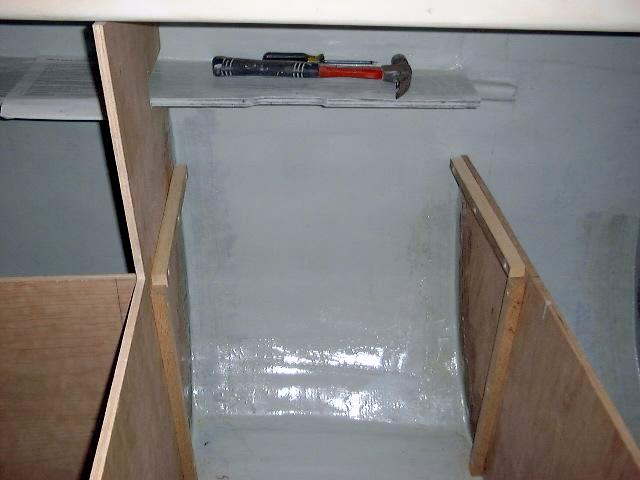
To install the bulkheads, I added cleats
where necessary, and, when I was sure of their position, I glassed portions of
the bulkheads to the hull. Because I had previously painted nearly the entire
inside of the hull and lockers with Bilgekote, knowing that some areas would
become inaccessible as I constructed the interior, it was necessary to grind off
any paint that was located where I needed to install fiberglass tabbing.
|
|
 To
help support the galley countertop, and also to subdivide the large space
beneath, I installed a small bulkhead/divider there. Because it is lower
than the one in the picture, you can't really see it in this view. It can
be seen in some of the other pictures in this section, though. To
help support the galley countertop, and also to subdivide the large space
beneath, I installed a small bulkhead/divider there. Because it is lower
than the one in the picture, you can't really see it in this view. It can
be seen in some of the other pictures in this section, though.
|
|
 Next, I continued the stove enclosure by
adding a bottom and back to the opening. After consulting the owners
manual for the stove again, with its measured drawing, I screwed cleats to the
sides of the enclosure where necessary to support the new pieces. This
includes an angles section at the back of the bottom in order to conform to
the hull. Then, I cut plywood to fit the spaces; the plywood will later
be covered with Formica. This created a nice pan storage area
immediately behind the stove, beneath the partial countertop. Next, I continued the stove enclosure by
adding a bottom and back to the opening. After consulting the owners
manual for the stove again, with its measured drawing, I screwed cleats to the
sides of the enclosure where necessary to support the new pieces. This
includes an angles section at the back of the bottom in order to conform to
the hull. Then, I cut plywood to fit the spaces; the plywood will later
be covered with Formica. This created a nice pan storage area
immediately behind the stove, beneath the partial countertop.
|
|
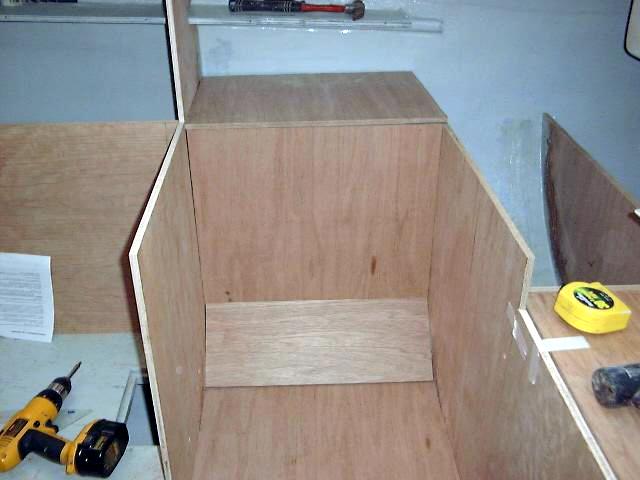 This
shows the new stove enclosure after installing the various plywood pieces over
the cleats I installed. The two pieces on the eh bottom will remain
removable to provide access to the plumbing that will be installed underneath
a little later on. This
shows the new stove enclosure after installing the various plywood pieces over
the cleats I installed. The two pieces on the eh bottom will remain
removable to provide access to the plumbing that will be installed underneath
a little later on.
|
|
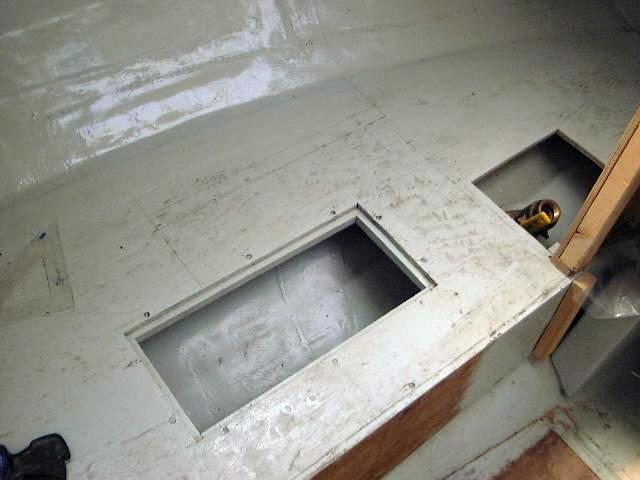
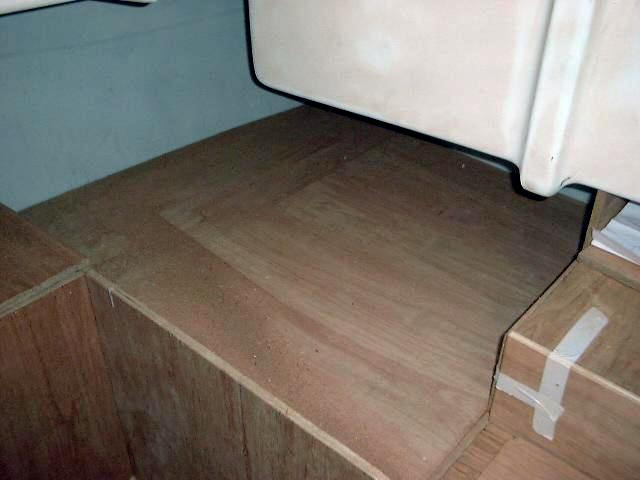 I
cut two pieces of plywood to fit over the galley area. Once I determine
the sink I am using, and cut a couple access hatches to the storage areas
beneath, the plywood can be permanently installed and covered with
Formica. I
cut two pieces of plywood to fit over the galley area. Once I determine
the sink I am using, and cut a couple access hatches to the storage areas
beneath, the plywood can be permanently installed and covered with
Formica.
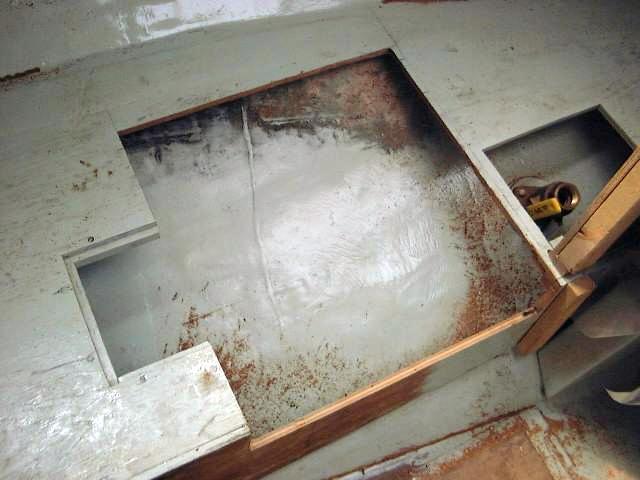
First, though, I had to cut some access hatches
for the storage areas that were created beneath the new countertops. I
marked off the size of the openings I wanted and cut them with a jigsaw, and
screwed wooden cleats around each opening to support the flush hatches.
|
|
 With
that out of the way, I went ahead and installed more satin white Formica over
the surfaces of the galley, including the inside of the stove enclosure.
Later, the exposed edges of plywood and other junctures will get covered
with pieces of solid cherry trim. Please visit the interior
trim page to see details on this trim work. With
that out of the way, I went ahead and installed more satin white Formica over
the surfaces of the galley, including the inside of the stove enclosure.
Later, the exposed edges of plywood and other junctures will get covered
with pieces of solid cherry trim. Please visit the interior
trim page to see details on this trim work.
|
|
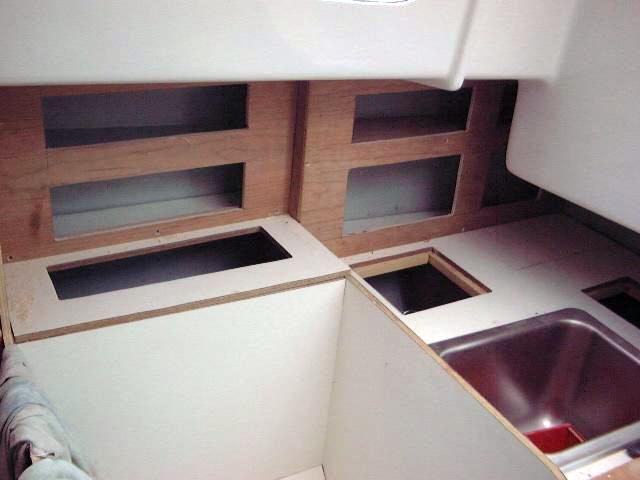 I enclosed the final remaining areas behind
the stove and aft portion of the galley countertop with cherry plywood, cutting
it to fit as necessary. I cut openings in the face to allow access to the
compartments behind. The placement and general configuration of these was
determined arbitrarily by eye, and everything is installed with screws and
wooden cleats as needed. The cabinets outboard of the countertop,
especially the after two, are difficult to reach because of the cockpit molding;
I don't expect to use them for important items. I will still be able to
reach inside the upper cabinets in order to install the genoa track and any other
deck hardware in the area. I enclosed the final remaining areas behind
the stove and aft portion of the galley countertop with cherry plywood, cutting
it to fit as necessary. I cut openings in the face to allow access to the
compartments behind. The placement and general configuration of these was
determined arbitrarily by eye, and everything is installed with screws and
wooden cleats as needed. The cabinets outboard of the countertop,
especially the after two, are difficult to reach because of the cockpit molding;
I don't expect to use them for important items. I will still be able to
reach inside the upper cabinets in order to install the genoa track and any other
deck hardware in the area.
|
|
Please click
here to continue the galley construction project.
For more information on finish work in the
galley, please visit the following pages:
Trim details
Galley Sink and
Water Systems
Installing the
Stove and LPG Supply System
|
|