|
Electronics (Page
2)
This page was last
updated on 9 May 2002.
Knotmeter/Depthsounder
GPS VHF
Radar Laptop Computer
and GPS Interface
Return
to Page 1
|
|
Radar
After a winter of hemming and
hawing on the whole radar issue, spring arrived and we still didn't know what we
were going to do. Certainly having a radar could be nice, especially given
our plans for our long cruise in the summer of 2002. While we don't plan
to head out from a safe port into the fog, there is the likelihood that we will
eventually be caught in the fog at some time, and the radar gives that added
security of being able to see other boats around, as well as buoys and
shoreline.
I started pricing things
out. The small radar units aren't really that horribly expensive in the
scheme of things. What shocked me was the prices for the simple
brackets--whether mast or stern-mounted pole, the prices seemed
ridiculous. On top of any radar purchase, we were looking at upwards of
$300-$400 for the simplest pole available, and close to $300 for a mast
mount. Premium poles command prices between $600 and $1000.
Yikes! We decided that we just didn't need it that much. I had
decided that a small pole mount at the stern made more sense for us because of
the added complexity of running cables up the mast, plus needing to have a
disconnect somehow so the mast could be unstepped each year. With a
deck-stepped mast and no good places to hide heavy radar cable, I just couldn't
see putting the dome on the mast. Plus, the foretriangle is so narrow by
the time you get to theoretical dome-mounting height that I thought the dome
would just get in the way of the genoa all the time. Even though the stern
is small as it is, I though a pole made more sense when all things were
considered.
The
Radar Decision
In April, two separate events
conspired to lead to our eventual decision to purchase and install radar on
board. The first thing was a rebate offer on the Furuno 1622 radar, the
unit that I had pretty much decided had the quality, features, and reasonable
price that would meet our needs. I had already decided that paying a small
premium for a 2.2 kW Furuno radar instead of going with the dirt-cheap JRC units
(only 1.5 kW, and very basic) was well worth it. I liked the Furuno
instead of Raymarine because its radome is smaller, and the unit offers similar
features and performance for less money. However, even with the rebate
offer, it seemed that the prices of mounts and such would keep the project out
of reach.
The second event, the one that
was the clincher, was one of the more random events I can remember. A
message came across one of the email lists I monitor, offering a small aluminum
radar pole for sale. Intrigued, I emailed the owner and requested more
information--condition, price, and where the thing was located. I
mentioned I was in Maine. To my amazement, he emailed back telling me
that, not only was the pole in Maine, but was at a boatyard about 5 miles from
my house. On top of that, the price he requested was low and extremely
reasonable, and suddenly made the pole a viable alternative. I jumped and
told him I would take it, subject to condition.
|
|
 This ended up being one of the
quicker, and weirder, purchases I have ever made. When I asked the owner
when he would like to meet and show the pole, and finalize the deal, he replied
that I should just go down to the boatyard and check it out myself, and, if I
liked it, remove his radome from the top and take the pole, leaving a check with
the boatyard. (The pole had already been removed from the boat.)
However, this email was copied to another potential buyer as well...it seemed I
had competition. I wasn't about to lose my bargain pole when everything
seemed meant to be, so I dropped everything and drove immediately to the
boatyard, armed with tools. After explaining what I was up to, I was told
where the boat and pole were (in a shed undergoing some varnish work).
Feeling somehow criminal, I found the pole, decided it was fine for the price,
and proceeded to remove the JRC dome from the top (4 bolts). I left a
check in the office and drove home with my new pole. Elapsed time from the
initial email that morning till I returned home with the pole: about 1
hour. This ended up being one of the
quicker, and weirder, purchases I have ever made. When I asked the owner
when he would like to meet and show the pole, and finalize the deal, he replied
that I should just go down to the boatyard and check it out myself, and, if I
liked it, remove his radome from the top and take the pole, leaving a check with
the boatyard. (The pole had already been removed from the boat.)
However, this email was copied to another potential buyer as well...it seemed I
had competition. I wasn't about to lose my bargain pole when everything
seemed meant to be, so I dropped everything and drove immediately to the
boatyard, armed with tools. After explaining what I was up to, I was told
where the boat and pole were (in a shed undergoing some varnish work).
Feeling somehow criminal, I found the pole, decided it was fine for the price,
and proceeded to remove the JRC dome from the top (4 bolts). I left a
check in the office and drove home with my new pole. Elapsed time from the
initial email that morning till I returned home with the pole: about 1
hour.
UPDATE/BONUS:
This guy never even cashed my check, so the pole ended up being a FREEBIE!
I figured buying the pole was a
good investment whether or not we bought radar immediately; I figured I could
probably resell it on Ebay for a profit if we decided not to use it.
However, given the relative cheapness of the radar (with the rebate) and the
cheap pole, we decided to go ahead and order a Furuno 1622 radar. I found
the best price online (all vendors were within about $30) at Pyacht.com and
placed the order.
The pole needed just a bit of
cleanup and work to make it look a little better. It is a basic
aluminum tube, partially polished but a little rough. That's OK, but I
still wanted to remove some of the pitting and make it look as nice as
possible. I used some metal cleaner that I had on hand to polish the pole
once, and it had a pretty good effect. I will do some more
soon.
|
|
I also ordered some Rupp
Aluma-Guard protectant. I remember this stuff from my fishing boat days--I
used to use it to polish up towers, outriggers, and other aluminum
equipment. It leaves a nice satin shine on aluminum and will be just
the ticket for my radar pole.
A mere two days after placing my
order, I received the radar VIA UPS. (That was regular shipping, not any
upgrade, by the way). I have to say that I am impressed with Pyacht.com's
performance on this order. Thank you! The only thing they don't do
is send tracking information automatically by email...but when I called, I was
answered by a real person in only three rings (no voice mail) and was told,
coincidentally, that my order had not only shipped, but was scheduled for
delivery later the same afternoon of my call. Pretty good! Anyway, I
though I would give credit where it is due, after some of my rants on this
website about certain other vendors. Good service deserves a mention.
I'm pretty excited now about the
radar. I played around a bit with possible mounting locations for the
radar pole, and figured out a good spot, I think. Space is definitely
tight on the poop deck, and I also ran into the issue that the stern rail is
angled back, so the rail clamp on the pole (a critical item for strength and
stability) would not reach the top rail. I discovered that the pole would
fit behind the stern rail, freeing up valuable deck space, reducing
clutter, and allowing the rail clamp to work properly. However, to make
this work I'll have to build a bracket to support the base, since most of it
overhangs the taffrail. A simple wooden bracket will do the trick.
|
|
Installing
the Radar Pole
and Radome
 Once
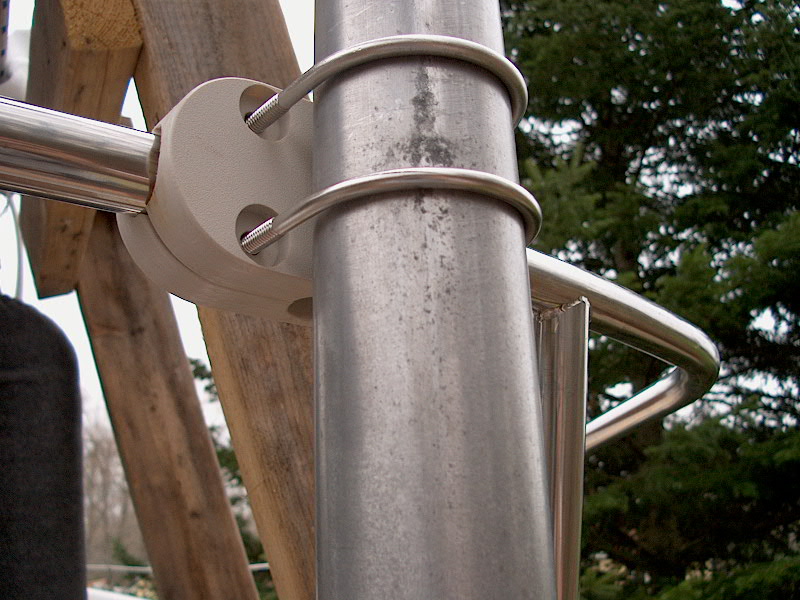
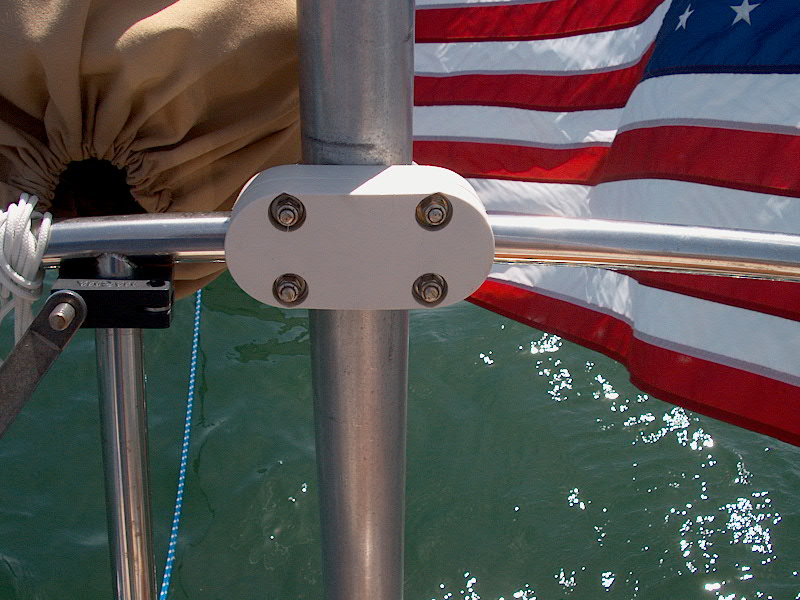
I had determined the best location for the pole, I installed the pulpit bracket
and clamped the pole to the stern pulpit, leaving the bolts just a tiny bit
loose so that I could adjust the pole. Using a sample board the same
thickness as my new support bracket will be when complete, I set the pole base
on the board and adjusted the pole till it was plumb and level in both
directions. I did this first by eye, stepping off the ladder to view the
pole from a few directions behind and beside the boat (to make sure that it
"looked" right), and then placing a level on the pole and fine-tuning
the position. I tightened the pulpit bracket and double checked the plumb
with my level and, again--and most importantly--by eye from a slight distance
away. All looked well. Once
I had determined the best location for the pole, I installed the pulpit bracket
and clamped the pole to the stern pulpit, leaving the bolts just a tiny bit
loose so that I could adjust the pole. Using a sample board the same
thickness as my new support bracket will be when complete, I set the pole base
on the board and adjusted the pole till it was plumb and level in both
directions. I did this first by eye, stepping off the ladder to view the
pole from a few directions behind and beside the boat (to make sure that it
"looked" right), and then placing a level on the pole and fine-tuning
the position. I tightened the pulpit bracket and double checked the plumb
with my level and, again--and most importantly--by eye from a slight distance
away. All looked well.
|
|


|
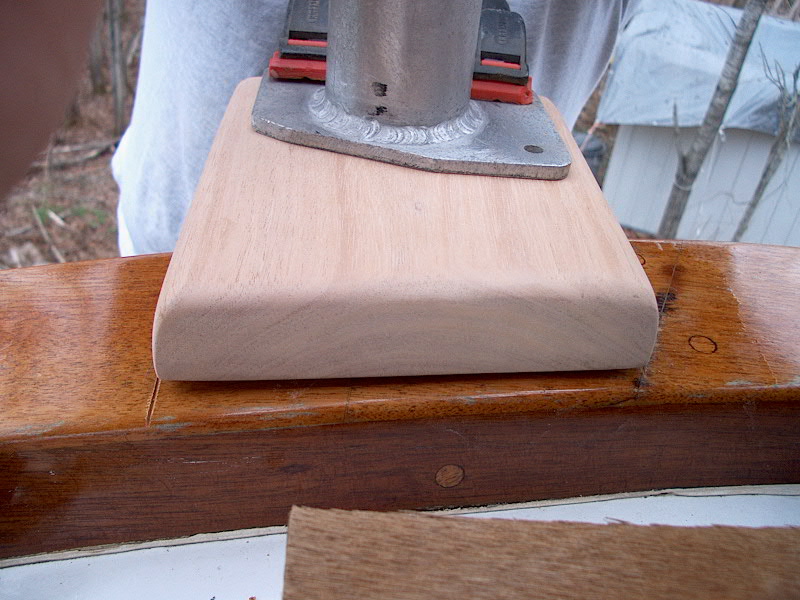
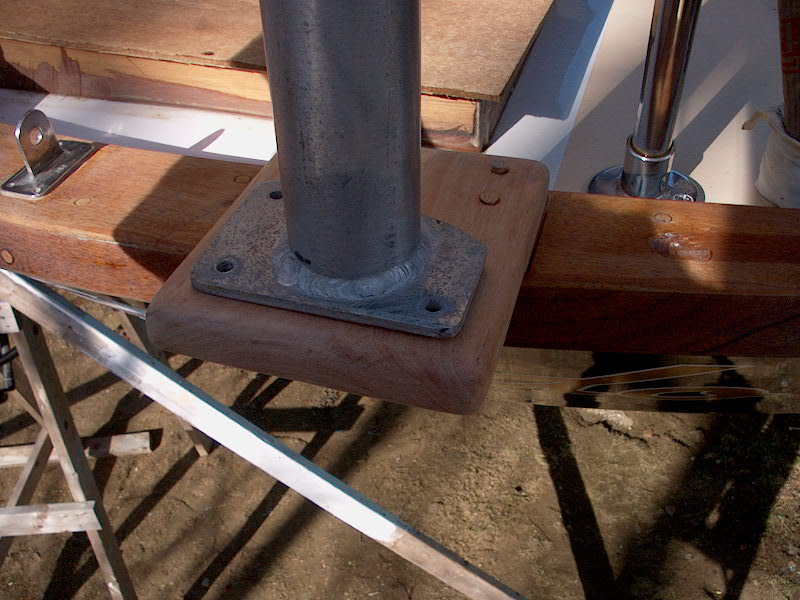
Armed with a new 6/4 rough
mahogany board cut roughly to the size I needed, I laid out the shape of the new
bracket (for lack of a better term) and marked it for position. Back in
the shop, I cut it to size and, after a test fit, routed all the corners with a
1/2" roundover and sanded the whole thing smooth and with  no
sharp edges. I angled the forward side in two directions to match the
curve and angle of the taffrail beneath. To prepare for mounting the
bracket on the boat, I scraped the varnish off the taffrail to expose bare
wood. After drilling four screw holes in the bracket, and counterboring
for 3/8" wood plugs, I mixed up a small batch of epoxy thickened slightly
and colored by some teak/mahogany wood flour that I saved from some sanding
operation. This colored the epoxy nicely brown. I applied a coat of
the epoxy to the bottom of the bracket, and screwed it into the taffrail (a
wood/epoxy composite) with four #10 x 1-1/2" stainless steel
screws. These are mainly to add support while the epoxy cures; the
epoxy will provide the ultimate strength. no
sharp edges. I angled the forward side in two directions to match the
curve and angle of the taffrail beneath. To prepare for mounting the
bracket on the boat, I scraped the varnish off the taffrail to expose bare
wood. After drilling four screw holes in the bracket, and counterboring
for 3/8" wood plugs, I mixed up a small batch of epoxy thickened slightly
and colored by some teak/mahogany wood flour that I saved from some sanding
operation. This colored the epoxy nicely brown. I applied a coat of
the epoxy to the bottom of the bracket, and screwed it into the taffrail (a
wood/epoxy composite) with four #10 x 1-1/2" stainless steel
screws. These are mainly to add support while the epoxy cures; the
epoxy will provide the ultimate strength. |
|
|
|
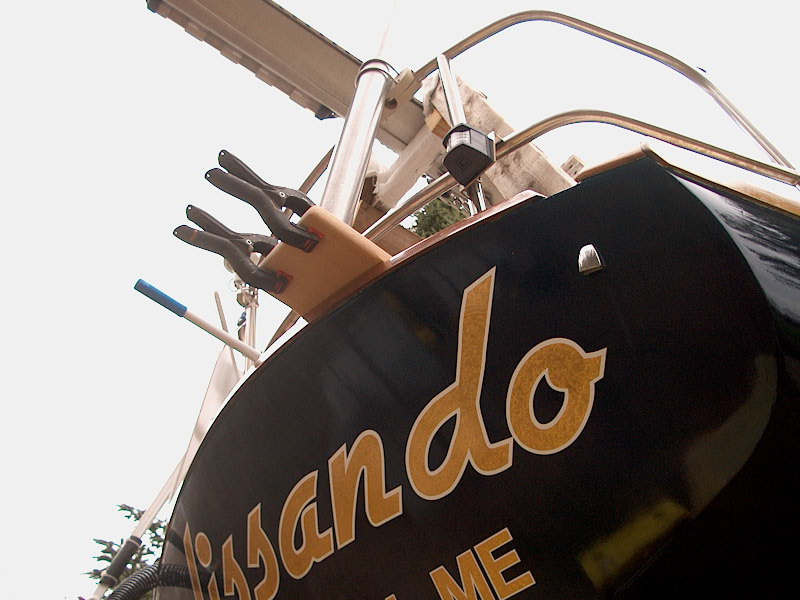
 The
bracket extends approximately 4-5" beyond the taffrail, leaving room
beneath the pole to easily secure the base with bolts. Those clamps
are there just to hold the pole in the proper location during one of my bracket
mock-ups. I secured the base temporarily to the bracket with four
stainless steel bolts; I'll have to remove the pole so that the boat can be
transported over the road. More on this later. The
bracket extends approximately 4-5" beyond the taffrail, leaving room
beneath the pole to easily secure the base with bolts. Those clamps
are there just to hold the pole in the proper location during one of my bracket
mock-ups. I secured the base temporarily to the bracket with four
stainless steel bolts; I'll have to remove the pole so that the boat can be
transported over the road. More on this later.
|
 A
couple days later, I tackled the attachment of the radome to the top of the
post, and wiring in the cable. Following the supplied directions, I
attached the antenna cable to the appropriate parts inside the radome.
This wasn't too bad a job, despite the tiny screws inside that I had to
remove. I carefully followed the directions and was done in a few
minutes. Then, I attached the dome to the radar pole with the four stainless
steel machine screws that were supplied with the dome. Amazingly, the bolt
spacing that already existed on the flat plate at the top of the dome was
correct for the new radar--I did have to ream one or two of the holes out
slightly, though. A
couple days later, I tackled the attachment of the radome to the top of the
post, and wiring in the cable. Following the supplied directions, I
attached the antenna cable to the appropriate parts inside the radome.
This wasn't too bad a job, despite the tiny screws inside that I had to
remove. I carefully followed the directions and was done in a few
minutes. Then, I attached the dome to the radar pole with the four stainless
steel machine screws that were supplied with the dome. Amazingly, the bolt
spacing that already existed on the flat plate at the top of the dome was
correct for the new radar--I did have to ream one or two of the holes out
slightly, though. |
|
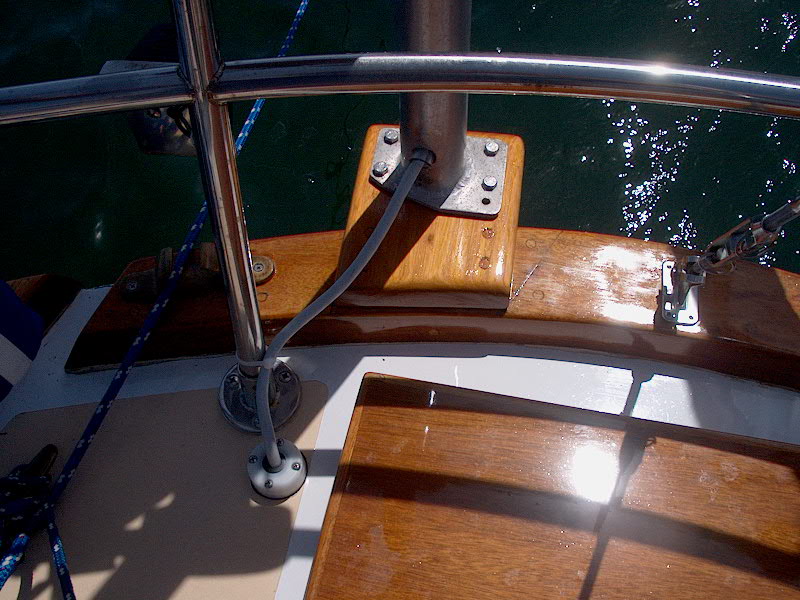
Next, I had to snake the cable
down through the inside of the pole. The pole had been setup previously
(by the previous owner of the pole) so that the cable entered through the back
near the top, and then exited straight through the bottom mounting plate.
I wanted to have the cable exit through the forward side of the pole to better
suit my installation, is I needed to drill a new hole. The cable connector
on the antenna cable is just under 3/4" in diameter. I had a big
1" metal cutting drill bit on hand, but that was too big. At the
hardware store, I was all set to buy the 3/4" bit I needed till I saw the
price of $37.00--too high for one use, even for me! Back at home, I
butchered a new hole at the bottom by drilling a 1/2" hole with a drill,
then using my jigsaw to widen it out as necessary. Kind of a pain, but it
got the job done. The pre-existing hole at the top needed only a slight
filing to allow the connector to fit through.
I fed the cable down to the
bottom, and then faced the fun of trying to get the plastic connector through
the new hole--a 90° turn. Try as I might, I couldn't do it within the
confines of the pole. I tried sticking my finger through the hole at the
bottom of the pole, and nearly ended up with a 6' finger extension, as my finger
was almost stuck in the hole. After finally freeing myself, I drilled that
hole bigger with my 1" drill bit; then, I was able, with some fussing, to
get the cable out through the new hole. With that done, put the pole and
dome aside for a while, as there's no more I can do with it for now--I'll wait
to install the pole and run the cable till the boat is in the water. At
that time, I'll address the issue of making the whole thing at least partly
removable so the boat can be trucked over the road. More to come.
Installing
and Wiring the Radar Display
I purchased one of the
overpriced, but undeniably nice, aluminum electronics swing out brackets from
West Marine (the "basic" model, # 545574). After playing around
with the radar display and the GPS that was already installed in the boat, I
decided to mount the new bracket at the very top of the companionway on the
starboard side. This is possible because the radar can be mounted from
above or below on its bracket, which is a convenient feature.
|
|
However, I still ran in to a
clearance problem with the current
GPS mount. Even when I moved the bracket holding that in place all the
way to the bottom, as far as possible, the tall GPS still interfered with the
radar--in other words, one piece of electronics would always block the
other. I needed to allow the GPS to move further out, so that it would
clear the radar. Even with the multi-swivel mount thingie I had, I
couldn't adjust it enough. Finally, I made a mahogany platform to attach
to the GPS bracket that would extend the unit out the distance I needed--I had
to move the whole thing about 3". Using a scrap  piece
of 1/2" mahogany, I milled the thing up, rounded the edges, and slapped on
a quick coat of tung oil to color it. Then I bolted it in place, and
bolted the GPS bracket to the other end. Voila! The clearance
problem was solved. There are still too many cables running around up the
side of the companionway, but there's just no avoiding this. I plan to
secure them a little better than it shows in the photo, but that's pretty much
the w ay it is. piece
of 1/2" mahogany, I milled the thing up, rounded the edges, and slapped on
a quick coat of tung oil to color it. Then I bolted it in place, and
bolted the GPS bracket to the other end. Voila! The clearance
problem was solved. There are still too many cables running around up the
side of the companionway, but there's just no avoiding this. I plan to
secure them a little better than it shows in the photo, but that's pretty much
the w ay it is.
I wired the radar according to
the supplied instructions. The power cable supplied was amazingly just
long enough to reach the electrical panel on the other side of the boat, after
running down, behind the engine room, behind the icebox trim panels, and finally
into the electrical area. This supplied cable is a two-conductor twisted, shielded
cable. I attached the positive wire to my final blank circuit breaker on
the panel, and the negative wire to the negative distribution bus. In
addition, the radar requires a separate ground wire that runs from the radar
display to a negative distribution post in the engine room.
|
|
Final
Radar Pole and Antenna Installation
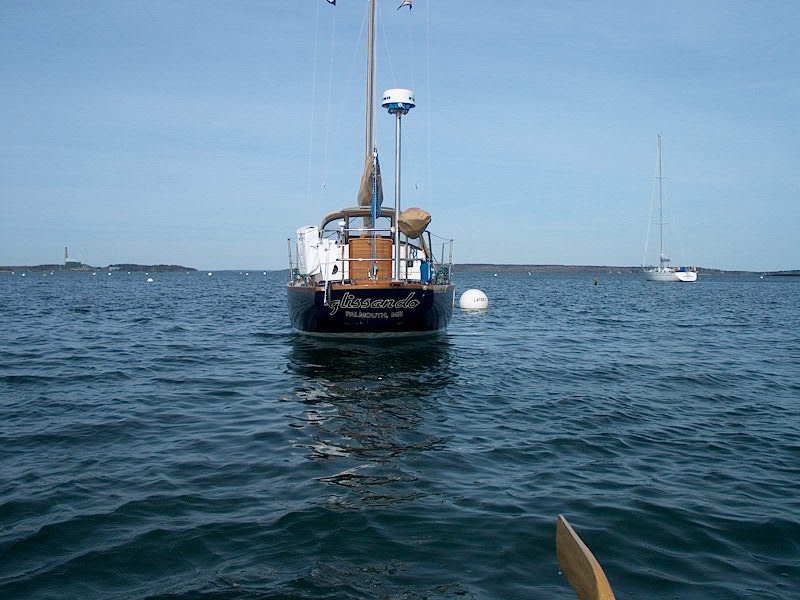
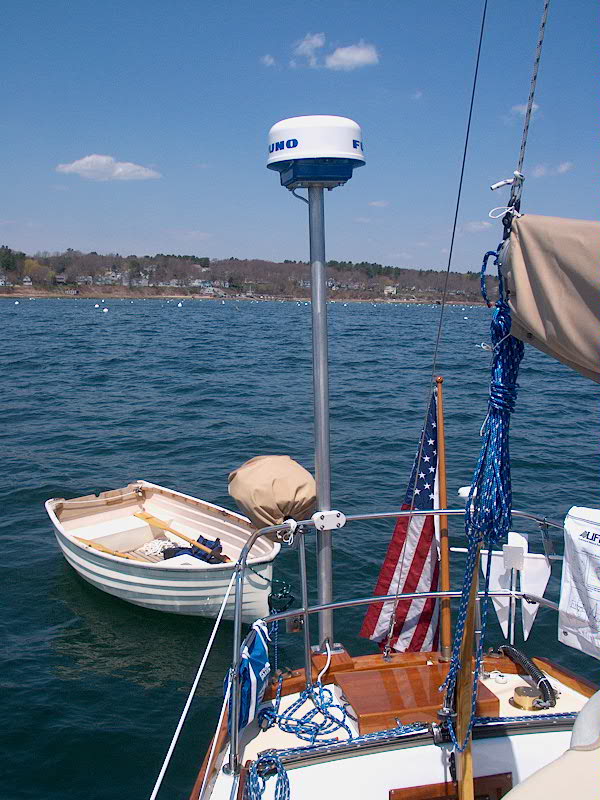 Once
the boat was launched, I finished up the radar pole installation. I
couldn't do it sooner because the pole would be too high for over-road
transport. I secured the base of the pole to my support bracket Once
the boat was launched, I finished up the radar pole installation. I
couldn't do it sooner because the pole would be too high for over-road
transport. I secured the base of the pole to my support bracket  with four
5/16" stainless bolts, and clamped the rail mount to the top pulpit
rail. This completed the mechanical installation of the radar pole, now
with the radome secured on top. with four
5/16" stainless bolts, and clamped the rail mount to the top pulpit
rail. This completed the mechanical installation of the radar pole, now
with the radome secured on top.
 To
run the cable, I installed a cable clam in the deck near the pole. These
seal the cable through the deck by forcing a rubber wedge around the cable as
you tighten the fitting, making a watertight seal. They seem to work
pretty well; I used one on the GPS cable last year. I ran the cable trough
the deck into the lazarette, then forward through the starboard cockpit locker,
exiting into the cabin above the galley in a nearly hidden space where the
cherry plywood veneer I had installed did not extend all the way to the top (you
can't see it, ever). There was plenty of room left at the top to pass the
cable without the need for a new hole--a nice labor-saving convenience. I
ran the cable up with the rest of the wires alongside the companionway to the
display, and secured it. Then, I tied up the cable as necessary all the
way aft, securing it out of the way to various structural members and the fuel
vent line, which runs in the same area. I left the excess cable bundled
near the after end of the run, as I'll need the slack come fall when I need to
remove the pole again for transport. To
run the cable, I installed a cable clam in the deck near the pole. These
seal the cable through the deck by forcing a rubber wedge around the cable as
you tighten the fitting, making a watertight seal. They seem to work
pretty well; I used one on the GPS cable last year. I ran the cable trough
the deck into the lazarette, then forward through the starboard cockpit locker,
exiting into the cabin above the galley in a nearly hidden space where the
cherry plywood veneer I had installed did not extend all the way to the top (you
can't see it, ever). There was plenty of room left at the top to pass the
cable without the need for a new hole--a nice labor-saving convenience. I
ran the cable up with the rest of the wires alongside the companionway to the
display, and secured it. Then, I tied up the cable as necessary all the
way aft, securing it out of the way to various structural members and the fuel
vent line, which runs in the same area. I left the excess cable bundled
near the after end of the run, as I'll need the slack come fall when I need to
remove the pole again for transport.
|
|
 I
had time a few days later to power up the radar and check out some of the basics
of its operation. With the antenna rotating and transmitting, the radar
drew about 2.5 amps. Not too bad at all. I was very pleased with the
display--on a variety of scales (all the way down to 1/8 mile), the
targets--mostly nearby mooring balls, since there were no boats immediately
around me yet this early in the season--were large and distinct, and the picture
was extremely clear and easy to read. I played a little with some of the
various gain and clutter controls, but didn't get into it too much just
yet. Later, I'll spend some more time with the manual in hand to get used
to the various functions, but the controls were basically self-explanatory and
easy to decipher. The reliance on multi-use buttons is minimal,
which is a vast plus over some small radar models, where a single control is
used to cycle through a zillion adjustments. Report so far: very
positive. I
had time a few days later to power up the radar and check out some of the basics
of its operation. With the antenna rotating and transmitting, the radar
drew about 2.5 amps. Not too bad at all. I was very pleased with the
display--on a variety of scales (all the way down to 1/8 mile), the
targets--mostly nearby mooring balls, since there were no boats immediately
around me yet this early in the season--were large and distinct, and the picture
was extremely clear and easy to read. I played a little with some of the
various gain and clutter controls, but didn't get into it too much just
yet. Later, I'll spend some more time with the manual in hand to get used
to the various functions, but the controls were basically self-explanatory and
easy to decipher. The reliance on multi-use buttons is minimal,
which is a vast plus over some small radar models, where a single control is
used to cycle through a zillion adjustments. Report so far: very
positive.
As cool as the radar is, I hope I
never use it. I could live quite nicely without fog, thank you very much.
|
|
|
Please
click here to continue.
|
|