|
Installing a New Cabin
Sole
This page was last updated on 17 May 2001.
|
|
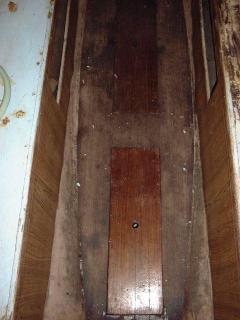 The
original teak-faced cabin sole was beat up and scarred, and it was determined
early on that it was not worth trying to salvage. However, it was
basically sound, and the understructure was in decent condition, so it provided
a good basis for a new sole to be laid directly on top. There are several
potential ways to deal with the cabin sole; we chose to install pre-made teak
and holly veneer plywood marketed for this purpose. 1/4" thick, it
will provide a traditional, attractive look without too much backbreaking
effort. There are three large hatches in the sole, and, with a little
minor work, they are in good enough condition to reuse. They will of
course be covered with the new plywood as well. The
original teak-faced cabin sole was beat up and scarred, and it was determined
early on that it was not worth trying to salvage. However, it was
basically sound, and the understructure was in decent condition, so it provided
a good basis for a new sole to be laid directly on top. There are several
potential ways to deal with the cabin sole; we chose to install pre-made teak
and holly veneer plywood marketed for this purpose. 1/4" thick, it
will provide a traditional, attractive look without too much backbreaking
effort. There are three large hatches in the sole, and, with a little
minor work, they are in good enough condition to reuse. They will of
course be covered with the new plywood as well.
Not wanting to scar up or damage the new sole,
I put off working on it until the last minute, only a month or so before
launching. At this point, I couldn't stand it any longer--with the
interior basically done, the old, scarred, paint-stained cabin sole was really
detracting from the appearance. Plus, I knew this was a job I definitely
wanted to do before launching.
The first step was to create a pattern of the
sole. The edges are curved, and must also be beveled for the best
fit. To make the pattern, I laid some pattern newsprint down and secured
it as I went with tape applied through small triangles cut out of the paper. I
left the edges of the paper pattern about 1/4" - 1/2" shy of the edge
of the new cabin sole. To transfer the new edge to the pattern, I used a
block of wood pressed up against the hull and marked along the inside
edge. (See more about pattern making here.)
The old sole can't be used as a pattern because, first of all, they did a pretty
lousy job fitting it originally and, secondly, the new sole will sit somewhat
higher--1/4", to be exact (the thickness of the plywood), so it will be
somewhat wider because of the angle of the adjacent hull. I cut out the
paper around the three deck hatches by running my knife in the slot between the
hatch and the adjacent sole. I also made a pattern of the head platform
area, which I will cover with teak plywood as well.
|
|
Next, I transferred the pattern line to the
teak ply by reversing the process--holding the same wooden block against the
line on the pattern and drawing along its outer edge. This corresponds
exactly to the line of the hull where the block, inside the boat, butted up
against. Then, I set the angle on my jigsaw to about 25 degrees--an
estimation of the bevel--and cut out the new sole. It used up about a half
sheet of plywood, the long way. A quick test fit in the boat revealed a
near perfect fit, thanks to the pattern. When it is installed for good, I
will run a bead of mahogany-colored Sikaflex along the outer edges to smooth the
transition and make if look less tacked on. With the fit confirmed, I
carefully cut out the hatch areas by drilling a 5/32" hole in each corner
of the opening and cutting between with my jigsaw. These pieces will be reused
to cover the existing bilge hatches, so I wanted a good cut.
After some minor trimming of the hatches, I
glued the cut pieces of the sole to their tops with thickened epoxy. I
made sure that the plank lines were properly lined up, so that the sole looks as
seamless as possible when the hatches are installed.
 Because of the corner holes and the material
lost to the saw kerf, I planned from the beginning on wrapping the hatches with
solid teak. Because of the extreme cost of teak, I decided to cut down on the
amount by cutting only a rabbet in the top edge of the hatches, rather than
trimming them down 1/4" on each side and using a full-height piece of
teak. I could effectively halve my teak requirements by cutting a
half-depth rabbet. I used a dado cutter in my table saw to mill the
rabbets, and then cut and fit solid teak to fit with mitered corners.
These trim pieces are installed with glue and stainless screws from the
side. With the trim pieces installed, I checked the fit, made adjustments
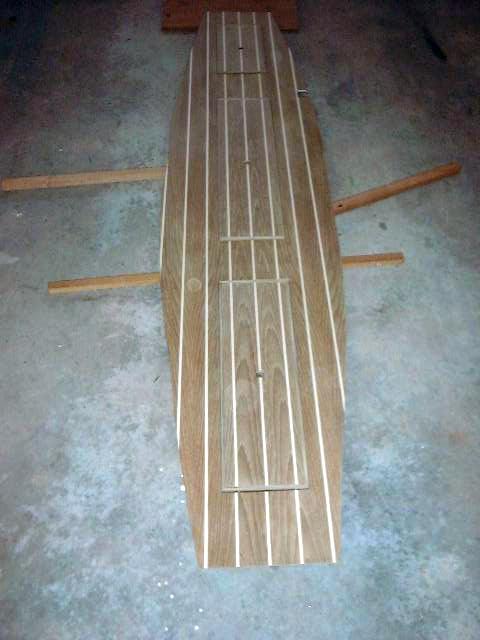
as necessary, and sanded everything smooth. The photo, right, shows the
cabin sole and hatches roughly mocked up on my garage floor, before finishing. Because of the corner holes and the material
lost to the saw kerf, I planned from the beginning on wrapping the hatches with
solid teak. Because of the extreme cost of teak, I decided to cut down on the
amount by cutting only a rabbet in the top edge of the hatches, rather than
trimming them down 1/4" on each side and using a full-height piece of
teak. I could effectively halve my teak requirements by cutting a
half-depth rabbet. I used a dado cutter in my table saw to mill the
rabbets, and then cut and fit solid teak to fit with mitered corners.
These trim pieces are installed with glue and stainless screws from the
side. With the trim pieces installed, I checked the fit, made adjustments
as necessary, and sanded everything smooth. The photo, right, shows the
cabin sole and hatches roughly mocked up on my garage floor, before finishing.
The next step is to varnish the sole
pieces. I will get on as many coats of gloss exterior varnish as I can
before I get too antsy to put the new sole into the boat. I plan on at
least 6 coats to start, and will probably apply additional coats once the boat
is in the water. This is underway as of this writing.
|
|
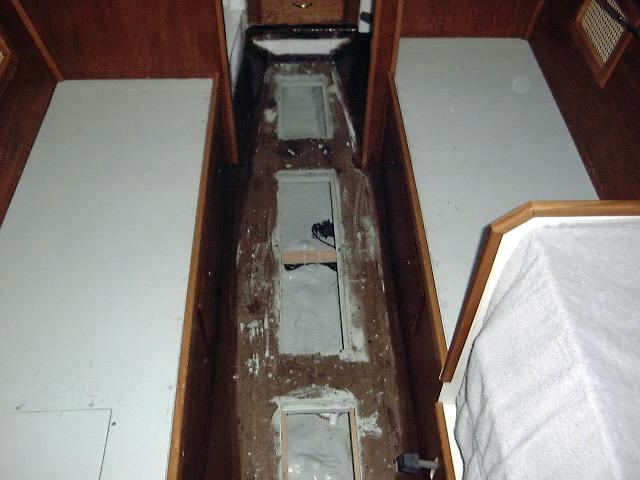 There is a curved section of the hull along
each side of the cabin sole, which is exposed fiberglass. The best way to treat
this might be too install solid teak strips up and over, painstakingly cutting
and fitting each one. I don't have the patience for that, which is why I
chose plywood for the sole. To make the side areas disappear as much as
possible and blend with the general woodwork, I painted them with three coats of
Brightside Chocolate Brown, which is pretty much like painting with Hershey's
Syrup. It does a great job of making the sole look wider and flatter,
though, and I think it is the best choice of color for these areas. Note
how visible they were in the "before" photo at the top of the page in
comparison. There is a curved section of the hull along
each side of the cabin sole, which is exposed fiberglass. The best way to treat
this might be too install solid teak strips up and over, painstakingly cutting
and fitting each one. I don't have the patience for that, which is why I
chose plywood for the sole. To make the side areas disappear as much as
possible and blend with the general woodwork, I painted them with three coats of
Brightside Chocolate Brown, which is pretty much like painting with Hershey's
Syrup. It does a great job of making the sole look wider and flatter,
though, and I think it is the best choice of color for these areas. Note
how visible they were in the "before" photo at the top of the page in
comparison.
|
|
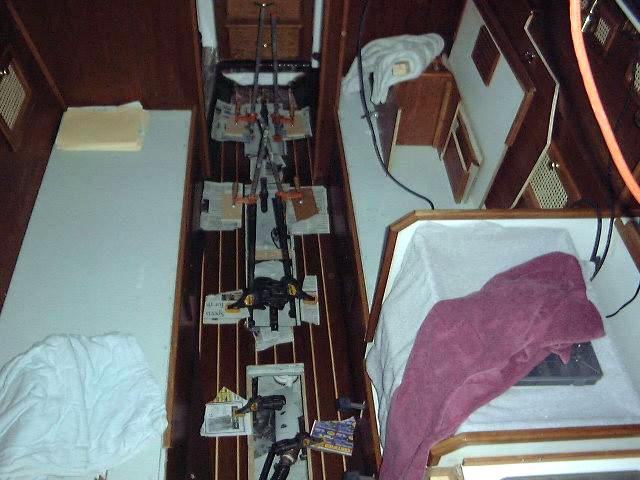 With
six coats of gloss varnish applied, I decided it was time to install the
sole. I will do more coats as time goes on, but that's enough for the time
being. I installed the sole in a bed of 5200--I used an entire tube
between the head platform and the main cabin sole. I kept the adhesive
away from the edges a little so that it wouldn't squeeze out, but otherwise kept
applying it till it was gone. Then, I laid the sole carefully into
place, walked all over it to help set and spread the 5200 (in stocking feet, of
course) and clamped it in several locations to help keep it secured until the
adhesive cures. On the head platform, I placed some weight on top of the
new sole, since there was no way to clamp it. I left the clamps in place
for a few days to allow the adhesive to fully cure. Later, I had to use
some thickened epoxy in a couple places, because the sole sprung up
slightly--notably around the forward end of the head and the aftermost portion
of the cabin sole, just forward of the engine room. With
six coats of gloss varnish applied, I decided it was time to install the
sole. I will do more coats as time goes on, but that's enough for the time
being. I installed the sole in a bed of 5200--I used an entire tube
between the head platform and the main cabin sole. I kept the adhesive
away from the edges a little so that it wouldn't squeeze out, but otherwise kept
applying it till it was gone. Then, I laid the sole carefully into
place, walked all over it to help set and spread the 5200 (in stocking feet, of
course) and clamped it in several locations to help keep it secured until the
adhesive cures. On the head platform, I placed some weight on top of the
new sole, since there was no way to clamp it. I left the clamps in place
for a few days to allow the adhesive to fully cure. Later, I had to use
some thickened epoxy in a couple places, because the sole sprung up
slightly--notably around the forward end of the head and the aftermost portion
of the cabin sole, just forward of the engine room.
|
|
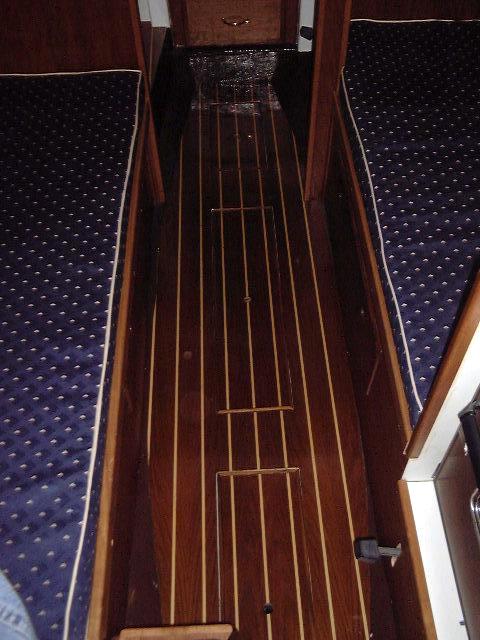
The completed cabin sole.
|
|
